Battle of Falkirk
Coordinates: 55°59′15″N 3°45′41″W / 55.98755°N 3.761476°W

| Battle of Falkirk | |||||||
|---|---|---|---|---|---|---|---|
| Part of the First War of Scottish Independence | |||||||
 A British illustration of Antony Bek's charge | |||||||
| |||||||
| Belligerents | |||||||
| Kingdom of Scotland | Kingdom of England | ||||||
| Commanders and leaders | |||||||
|
William Wallace John Stewart (d. 1298) † John de Graeme † Macduff of Fife † | Edward I of England | ||||||
| Strength | |||||||
|
6,000 men |
15,000 men[2] | ||||||
| Casualties and losses | |||||||
| Around 2,000 killed[4] | 2,000 killed[5] | ||||||
The Battle of Falkirk (Blàr na h-Eaglaise Brice in Gaelic), which took place on 22 July 1298, was one of the major battles in the First War of Scottish Independence. Led by King Edward I of England, the English army defeated the Scots, led by William Wallace. Shortly after the battle Wallace resigned as Guardian of Scotland.[6]
Background[]
After the Battle of Stirling Bridge, from November 1297 until January 1298, Wallace led a Scottish army south. From Newcastle-upon-Tyne to Carlisle, the Scots raided the countryside, bringing back the spoils.[7]: 82
King Edward learned of the defeat of his northern army at the Battle of Stirling Bridge.[8] After concluding a truce with the French king, Philip the Fair in October 1297,[9] he returned to England on 14 March 1298 to continue the ongoing organising of an army for his second invasion of Scotland which had been in preparation since late 1297.[10] As a preliminary step he moved the centre of government to York, where it was to remain for the next six years. A council-of-war was held in the city in April to finalise the details of the invasion. The Scottish magnates were all summoned to attend, and when none appeared they were all declared to be traitors. Edward then ordered his army to assemble at Roxburgh on 25 June. The force counted 2,000 armoured cavalry and about 12,000 infantry[11] receiving wages, though, after the manner of medieval armies there would have been many more serving without pay either as a statement of personal independence, forgiveness of debts to the crown, criminal pardons or just for adventure,[12] including 10,900 Welshmen.[13] Stuart Reid estimates Edward's force at 214 knights with 900 troopers, 1000 cavalry supplied by the Earls, 500 mercenary crossbowmen, 2000 archers with billmen from the Lancashire and Cheshire feudal levies, and 10,500 Welshmen, though the infantry may only have totalled 8,000.[14]
Edward left Roxburgh on 3 July and reached Kirkliston in two weeks, where he awaited supplies expected to arrive along the coastal ports, delayed due to weather. In the interim, Edward dealt with a Welsh mutiny. Finally, on 20 July, Edward advanced, reaching Linlithgow on 21 July. Edward was on the point of falling back on Edinburgh, when he received intelligence the Scots were at Torwood, near Falkirk, ready to harass his retreat. Edward reportedly said that he "would not trouble them to seek me," and placed his army south of Falkirk on the morning of the 22nd. Edward wanted to make camp and feed his men while waiting for his infantry to catch up with his cavalry. His cavalry commanders though, favored an immediate attack.[14][15]
Reid calculates the Scots could have manned four schiltrons with about 1000 men each, in addition to the cavalry and archers. These men would have come from the sheriffdoms of Fife, Kinross, Midlothian, Haddington, Stirling, Linlithgow, Lanark, Merse and Teviotdale. With that, Wallace supposedly said, "I have browghte yowe to the ryng. hoppe yef ye canne!" Absent were forces under the Comyns and Robert Bruce.[14] Also absent was Andrew Moray, co-victor with Wallace at the Battle of Stirling Bridge, having been mortally wounded in that battle. It was Moray who used the schiltrons offensively.[16][17]
Battle[]


The Scots army, again made up chiefly of spearmen as at Stirling Bridge, was arranged in four[20] great "hedgehogs" known as schiltrons.[21] The long spears (pikes) pointing outwards at various heights gave these formations a formidable and impenetrable appearance. The gaps between the schiltrons were filled with archers,[20] with 500 mounted knights at the rear.[14]
On Tuesday 22 July, the English cavalry, divided into four battles,[22] advanced in echelon. The vanguard, led by the Earl of Lincoln, moved to the left to avoid a marshy area, followed by the battle of the Earl of Surrey. The battle of Anthony Bek, Bishop of Durham, followed by the King's battle, moved around the marshy area to the right, toward the Scottish left flank. Lincoln's and Bek's battles charged the Scots and Lincoln quickly routed the Scottish cavalry.[14]
The Scots bowmen commanded by Sir John Stewart,[23] the younger brother of the High Steward of Scotland,[24] stood their ground but were overrun by the English cavalry.[23] However, the schiltrons held firm, with the knights making little impression on the dense forest of long spears, and 111 horses were killed in the vain attempts. Edward's cavalry fell back as his infantry and archers arrived.[14]


Edward's archers, crossbowmen and slingers began raining projectiles on the inexperienced and poorly-armoured Scottish spearmen.[23] The schiltrons were an easy target; they had no defence and nowhere to hide.[23] Pinned in place by the English cavalry and infantry, unable to retreat or attack, the battle was lost for the Scots almost as soon as the first arrows began to fall. The English waited, this time observing the King's command, until the Scottish ranks were thinned out and disordered enough to allow them to break up the schiltrons.[25] The English cavalry and infantry then attacked the wavering Scottish spearmen, and the schiltrons broke and scattered.[25]
Aftermath[]
Edward occupied Stirling and raided Perth, St. Andrews and Ayrshire. Yet, he retreated to Carlisle by 9 September. Edward invaded again in the summer of 1300.[14]
Casualties among the Scottish leaders were not particularly heavy, but did include Wallace's second-in-command, Sir John de Graham, as well as Sir John Stewart, and Macduff of Fife. [24][14]
In the words of Reid, "while unquestionably a good partisan leader, William Wallace's military abilities were simply not up to the job of organizing, training and leading a conventional military force." At Falkirk, Wallace "simply drew up his army in an open field and froze."[14]
In the words of Evan Macleod Barron, it was Moray who "possessed military genius and military training," while Wallace possessed qualities that "make a great guerilla leader." Barron goes on to say, "Falkirk should never have been fought at all...it hardly looks as if the brain which conceived the plan of battle at Falkirk was the same as that which conceived the plan at Stirling Bridge." Though Wallace resigned his leadership and guardianship, he still "represented the mass of the people." Hence Edward's determination to "capture at all costs the man who was in himself the embodiment of that popular hostility, and who was in addition, a warrior of skill and daring and a leader who had won the heart and the imagination of the people."[7][26][27]
The Falkirk Roll of Arms[]
The Falkirk Roll is a collection of the arms of the English bannerets and noblemen present at the battle of Falkirk. It is the oldest known English occasional roll of arms, and contains 111 names and blazoned shields.[28]
Following are a collection of modern illustrations of the Falkirk Roll based on the blazons published in Henry Gough's book, Scotland in 1298. Documents Relating to the Campaign of King Edward the First.[28]

Panel 1 – La Vaunt Garde

Panel 2 – La Batayle le Eveske de Dureme

Panel 3 – La Bataille le Roy
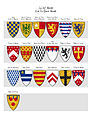
Panel 4 – La Quarte Bataille


Possible battle sites[]

The site of the battle is uncertain.[29] There have been three proposed sites: at Campfield,[30] around the modern Central Retail Park;[31] south of Callendar Woods, as depicted in the diagrams above;[32] and at Mumrills, the site of the Antonine Fort.[33][34]
Walter of Guisborough wrote the Scots were "on hard ground and on one side of a hillock, next to Falkirk." The Scalacronica states it was "on this side of Falkirk." Reid states the consensus of historians places the Scots below Callendar Wood with the Glen Burn in front, though Reid favors the burgh muir of Falkirk, "the plain which is called Falkirk.[14]
References[]
- ^ Barrow, G. W. S. Robert Bruce and the Community of the Realm of Scotland, 1976 and Fisher, Andrew (2002), William Wallace (2nd ed.), Edinburgh: Birlinn, ISBN 1-84158-593-9
- ^ Jump up to: a b UK. Battlefields, Battle of Falkirk
- ^ UK. Battlefields, Falkirk I
- ^ Fisher, Andrew (2002), William Wallace (2nd ed.), Edinburgh: Birlinn, ISBN 1-84158-593-9
- ^ Prestwich p. 481
- ^ Armstrong 2003, p. 80.
- ^ Jump up to: a b Barron, Evan (1997). The Scottish War of Independence. Barnes & Noble Books. pp. 70–85. ISBN 9780760703281.
- ^ Armstrong 2003, p. 34.
- ^ Keen 2003, p. 28.
- ^ Armstrong 2003, p. 60.
- ^ Armstrong 2003, p. 69.
- ^ Paterson, Raymond Campbell For the Lion:History of the Scottish Wars of Independence John Donald Publishers Ltd (29 August 1997) ISBN 978-0-85976-435-3 pp. 21, 165
- ^ "The Welsh soldier: 1283–1422", University of Southampton
- ^ Jump up to: a b c d e f g h i j Reid, Stuart (2004). Battles of the Scottish Lowlands. Barnsley: Pen & Sword Books Limited. pp. 18–25. ISBN 9781844150786.
- ^ ""The Battle of Falkirk", Foghlam Alba". Archived from the original on 16 July 2015. Retrieved 16 July 2015.
- ^ Duncan, A.A.M. (2007). Cowan, Edward (ed.). William, Son of Alan Wallace: The Documents, in The Wallace Book. Edinburgh: John Donald. p. 42. ISBN 9781906566241.
- ^ Watson, Fiona (2007). Cowan, Edward (ed.). Sir William Wallace: What We Do - and Don't - Know, in The Wallace Book. Edinburgh: John Donald. pp. 31–34. ISBN 9781906566241.
- ^ Murison, Alexander Falconer (1900). Sir William Wallace. New York: C. Scribner. p. 105. Retrieved 11 July 2018.
- ^ "Callendar Park Appendix 4 : Historical Monuments". Falkirk Local History Society. Retrieved 11 July 2018.
- ^ Jump up to: a b Armstrong 2003, p. 67.
- ^ Manning, Scott (2013). "Historiography of Falkirk (1298) as the Predecessor to Infantry Dominance". Saber and Scroll Journal. 2 (3): 84–94. Retrieved 22 November 2018.
- ^ Armstrong 2003, p. 73.
- ^ Jump up to: a b c d Armstrong 2003, p. 77.
- ^ Jump up to: a b Armstrong 2003, p. 79.
- ^ Jump up to: a b Armstrong 2003, p. 78.
- ^ Brown, Michael (2004). The Wars of Scotland, 1214-1371, Volume 4 in The New Edinburgh History of Scotland. Edinburgh: Edinburgh University Press Ltd. pp. 184–188. ISBN 9780748612383.
- ^ Brown, Chris (2008). Scottish Battlefields, 500 Battles That Shaped Scottish History. Stroud: Tempus Publishing. pp. 126–128, 270–273. ISBN 9780752436852.
- ^ Jump up to: a b Gough, Henry (1888). Scotland in 1298. Documents Relating to the Campaign of King Edward the First. London: Alexander Gardner. pp. 131–157. ISBN 0853880107.
- ^ Scott, Ian (25 July 2015). "Battle of Falkirk site's smoking gun". The Falkirk Herald. Archived from the original on 10 July 2018. Retrieved 10 July 2018.
- ^ "Falkirk, Campfield". Canmore. Historic Environment Scotland. Retrieved 10 July 2018.
- ^ "Site of the Battle by OS". Central Retail Park from zoomable 25 inch OS map with opacity slider. Ordnance Survey. Retrieved 10 July 2018.
- ^ "Site of the Battle by OS". South of the Woods from zoomable 25 inch OS map with opacity slider. Ordnance Survey. Retrieved 10 July 2018.
- ^ "Site of the Battle by OS". Mumrills from zoomable OS map with opacity slider. Ordnance Survey. Retrieved 10 July 2018.
- ^ Beers, Roy (8 July 2018). "Does a mystery site at Mumrills hold the answer to Falkirk's most tragic secret?". Falkirk Herald. Archived from the original on 29 July 2019. Retrieved 10 July 2018.
- Armstrong, Peter (2003), Stirling Bridge and Falkirk 1297–98 – William Wallace's rebellion (Campaign 117), Osprey Publishing, ISBN 9781841765105
- Keen, Peter (2003), England in the Later Middle Ages, Routledge, ISBN 0415272939
- Prestwich, M., Edward I, 1997, Yale University Press, New Haven & London, ISBN 0-300-07157-4 (pbk.)
Additional Reading[]
- Bain, J., The Edwards in Scotland, 1296–1377, 1961.
- Barrow, G. W. S. Robert Bruce and the Community of the Realm of Scotland, 1976
- Brown, C., "William Wallace", 2004.
- Morris, J. E. The Welsh Wars of Edward I, 1994.
- Nicholson, R. Scotland-the Later Middle Ages, 1974.
- Oman, C., The Art of War in the Middle Ages, 1898.
- Santiuste, D., The Hammer of the Scots: Edward I and the Scottish Wars of Independence, 2015.
- Fordun, John "Chronica Gentis Scotorum (Chronicle of the Scottish nation)", 1363, Translated from the Latin text by Felix J. H. Skene. Ed. by William F. Skene. 1872
External links[]
| Authority control: National libraries |
|---|
- 1298 in Scotland
- Battles of the Wars of Scottish Independence
- Battles between England and Scotland
- Conflicts in 1298
- Falkirk
- 13th-century military history of Scotland
- Edward I of England