Landing Zone Brace
| Landing Zone Brace | |
|---|---|
| Coordinates | 14°20′42″N 107°36′18″E / 14.345°N 107.605°E |
| Site information | |
| Controlled by | People's Army of Vietnam U.S. Army |
| Site history | |
| Built | 1969 |
| In use | 1969 |
| Battles/wars | Vietnam War |
| Events | Operation Wayne Grey |

Landing Zone Brace (also known as LZ Brace) is a former U.S. Army landing zone west of Kontum in the Central Highlands of Vietnam.
History[]
The landing zone was established during Operation Wayne Grey an operation against the People's Army of Vietnam (PAVN) 24th and 66th Regiments in the .[1][2] and was located approximately 44 km west of Kontum.[3]
Battle timeline[]
- 2 March

On 2 March 1969, A, B & D Companies, 3rd Battalion, 8th Infantry Regiment left their staging area at Polei Kleng Camp and were transported to their insertion point at YA793879 (14°20′56″N 107°35′20″E / 14.349°N 107.589°E). The insertion and the subsequent establishment of a perimeter was without incident. A Company swept north-east and established a night position at YA793879. B Company went south and D Company pushed into the centre of the area of operations.[4][5]
- 3 March
On 3 March, A Company continued reconnaissance and was to establish a night defensive position at YA812884 (14°21′11″N 107°36′25″E / 14.353°N 107.607°E). Upon arriving at the location Company A established a perimeter and two men from third platoon were sent to recon a trail heading up the ridgeline. The patrol encountered two PAVN soldiers at what appeared to be an enemy observation post with a cooking pot and a sleeping area prepared in the brush. The PAVN soldiers fled up the hill before the patrol could take action. The patrol then reported back to their platoon leader Lieutenant Williams who was then ordered by the company commander Captain Isom to take 3rd platoon up the trail in pursuit of the PAVN. It was recommended by the company artillery observer Lieutenant Flannigan to prepare the area with artillery before sending in 3rd platoon, but this was rejected by Isom.[6][5] According to statements by Williams the company was outside of artillery range and the Isom knew this.[6]
Williams led his platoon up the ridge line to a place were a large log had fallen across the path. At this time the company was engaged by an estimated battalion size PAVN force in entrenched bunkers. Taking heavy casualties Williams radioed Isom about the situation and asked for reinforcements. Isom radioed the battalion CP at 16:21 saying that A Company had made contact with the enemy, left one squad from each company at the night position and led the rest of the company up the hill with the headquarters element in the lead to reinforce 3rd platoon. As the company moved up the ridge line they took sniper fire from the northeast on their left flank, even so they were able to reach 3rd platoon’s position at the log. Shortly after reaching 3rd platoon, 2nd platoon leader Lieutenant Griffith was killed. The company was pinned down at their position from machine gun fire to their front and by PAVN soldiers who had begun to climb the trees to their flanks and fire and hurl grenades down on them from above. At 16:35 Isom radioed 3rd Battalion command and reported that he was in contact with a battalion size force and taking heavy casualties. Shortly after the radio operator was hit and Isom was killed going to his aid.[5][4][7]
As the only officer left in the fight Williams took command of the remainder of A Company and ordered them to withdraw back to their night position. The company withdrew under heavy fire and was forced to leave their wounded. Two men were killed trying to assist a wounded soldier crawling across a clearing as they retreated.[6] A Company reached their night position at approximately 18:00 and dug in for an expected attack. Artillery and gunships were called in around the contact area, but not upon it for fear of hitting any surviving men left on the hill. A Company was resupplied by helicopter, but only an estimated 20% of the resupply reached them. The rest was dropped off target and captured by the PAVN. The Battalion Commander Lieutenant Colonel Pennel J. Hickey flew overhead in an attempt to direct actions on the ground for a Medical evacuation.[6] The medevac was only able to extract three men due to PAVN fire. The men stayed on alert throughout the night, but no attack materialised, they received sporadic sniper and rocket fire. During the night one of the wounded men left on the ridge line radioed the company requesting help, eight men were sent to retrieve him and they returned with him and another wounded man. After having received word that A Company had come into contact with a large enemy force at LZ Brace, D Company marched through the night to establish themselves at Hill 947 (14°20′13″N 107°36′14″E / 14.337°N 107.604°E) a position just over two kilometres south of A Company, to prevent the PAVN from escaping south.[4][5][6][7]
- 4 March
On the morning of 4 March, Williams was ordered to advance back up the ridge line to retrieve the wounded and killed from the day before. Twenty-six men led by Sergeant Jones of 4th platoon were sent up the ridge. The patrol had only just cleared their perimeter line when they were engaged by the PAVN. A Company came under fire from all around their position. The PAVN used weapons and ammunition captured during the battle the day before including M79 grenade launcher and M60 machine gun to assault their position. At 11:25 an attempt was made to insert B Company on a ridge line to the northeast of the hill with the purpose of reinforcing A Company. The initial attempt was thwarted when the lead helicopter reported taking heavy fire at the landing zone. A second insertion was attempted at 13:28, but again took fire and evacuated. Using radios captured from A Company the PAVN intercepted U.S. communications and knew that B Company was attempting to reinforce A Company and PAVN soldiers on the northern side of the perimeter yelled in English not to shoot and that they were B Company. A Company believing the trick left their foxholes to approach what they thought was B Company. The PAVN engaged the A Company men point blank. The ruse broke morale and caused one man to bolt into the forest, after this A Company’s northern perimeter collapsed. Williams gave the order to retreat along a stream bed downhill, where they regrouped under constant fire. They continued along another stream bed that took them to the top of a hill where they stopped and engaged pursuing PAVN troops. The company radioed for extraction and was guided to a landing zone by a Light Observation Helicopter and was extracted at 15:25. At 15:40 B Company was successfully inserted to their LZ on the north east side of the hill after strikes from artillery and gunships. At 16:00 D Company made an attempt to reach A Company’s position to the north, but came into contact with a PAVN force while moving along a trail. After a brief firefight the PAVN retreated and D Company was able to rescue a prisoner from A Company. The prisoner Private first class Guffy indicated that there was a large PAVN force to their north in prepared bunkers. D Company was then ordered back to Hill 947 and ordered to dig in and prevent the PAVN from escaping to the south. During the night the PAVN probed D company’s perimeter, but were repulsed.[4][5][7][8][6] According to accounts from Lieutenant John Bauer, Guffy reported that after his position had been taken and A Company had retreated the PAVN executed wounded A Company prisoners, he was left alive because the PAVN required a prisoner.[8]

- 5 March
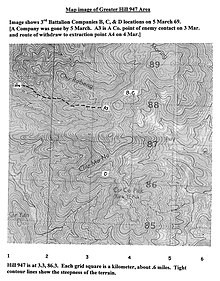
At 07:50 D Company’s position was assaulted from their eastern flank by an estimated 2 companies reinforced with sapper units. The assault was preceded by heavy mortar and B-40 rocket fire. The attack was repulsed with the help of artillery and gunship fire. At 08:15 two PAVN companies were positioning themselves to the east and west of Hill 947 for an assault, but were dislodged when D Company launched a counterattack. The battle continued for the rest of the day with mortar and rocket fire as well as snipers taking shots at the entrenched unit. Captured A Company claymores and tear gas were used in the attack against D Company. Medevac and resupply helicopters took heavy fire during the day and one was forced to make an emergency landing when its fuel tank was hit. While the battle on Hill 947 was raging, B Company continued its attack south towards the hill. C Company 3/8th Infantry joined the fight and attempted to insert into B Company’s landing zone at 10:35, they took fire from the top of the hill and postponed the insertion until the area was prepped with artillery strikes. They successfully landed at 13:20 and linked up with B Company shortly before nightfall. D Company sustained constant contact throughout the night and was supported by an Douglas AC-47 Spooky gunship.[8][4][7]
- 6 March

B and C Companies began a joint assault on the hill. B Company was able to get to within 150m of the top of the hill before they made contact. A joint flanking manoeuvre by B and C Companies to the east and western flanks was unsuccessful. Both companies withdrew down the hill after artillery failed to break the PAVN line. Airstrikes were called in and the PAVN position was bombarded by delay fused bombs. At 17:00 C Company attacked and was successful in taking the hill. B Company joined later and helped set up a defensive position.
At 07:00 D Company was attacked by a mortar barrage followed by an attack on their position. D Company was forced to call in artillery strikes on its own position to avoid being overrun. Gunships were called in to eliminate the remaining mortars and by the end of the day the PAVN made no further attacks against Hill 947. Task Force Swift, made up of elements of the 3rd Battalion 12th Infantry Regiment, moved overland to positions southeast of the hill, now named LZ Brace, to cut off and destroy any retreating PAVN soldiers.[4]

- 7 March
On the final day of the battle, Task Force Swift was extracted to LZ Brace and helped B and C Companies secure the rest of the hill. C Company of the 3/12th Infantry was airlifted to Hill 947 and reinforced D Company. Contact on the 7th was light.[4]
The loss of A Company[]
The main factor that contributed to the rout of A Company was that LZ Brace had been the headquarters of the PAVN 66th Infantry Regiment. It is estimated that A Company came into contact with a battalion sized force in a prepared position of inter connected bunkers.[4] Other factors include the inability to call in artillery fire directly on the location after the contact, so as to not kill wounded troops left on the hill and the capture of friendly radio equipment that allowed the PAVN to monitor US communications and employ a successful ruse de geurre against an already beleaguered A Company.[5][6] One soldier during the battle observed a PAVN soldier with a PRC-77 on their back.[7]

The Company commander was also new to South Vietnam with little combat experience. This as well as reports of A company being undermanned due to several seasoned Non-commissioned officers being on leave at the time of deployment, contributed to A Company’s demise.[4][6]
Discrepancies in US casualty reports[]
A Company entered the field with 115 men.[7] Accounts from the surviving men of A Company, suggest 33 to 35 men made it aboard the evacuation helicopters.[6][9] This is confirmed by the duty officer’s log which states that 36 men made it to the helicopters.[7] These including the 3 wounded evacuated the previous night,[6] 3 Missing in action who later made their way back to friendly territory[5] and PFC. Guffy who was rescued by D Company makes a total of 43 survivors and 72 casualties. Williams, who made an assessment of their number after their original firefight, estimated 35 Killed in action, 5 wounded and 20 missing.[6][7] Despite this, the official after action report by Colonel Hale H. Knight, states that A Company sustained only 22 killed and 52 wounded.[4] In statements authored by Bauer it is suggested that up to 50 men were killed.[9] For the entire battle the official casualty toll was: 32 killed, 125 wounded and 1 missing for the US and 241 killed for the PAVN.[4]
After the battle[]
On 16 March 6th Battalion, 29th Artillery moved to LZ Brace.[1]: 366
Current use[]
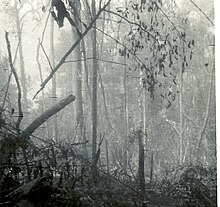
The landing zone has reverted to jungle.
References[]
- ^ a b Carey, Ronald (2004). The War Above the Trees. Trafford Publishing. p. 351. ISBN 9781412035033.
- ^ "Combat Operations After Action Report for Operation Wayne Grey" (PDF). Department of the Army. Retrieved 28 January 2015.
- ^ Kelley, Michael (2002). Where we were in Vietnam. Hellgate Press. p. 66. ISBN 978-1555716257.
- ^ a b c d e f g h i j k Knight, Hale (April 30, 1969). "Combat Operations After Action Report for Operation Wayne Grey" (PDF). ivydragoons.org. Retrieved August 28, 2020.
- ^ a b c d e f g Hickey, Pennel (March 14, 1969). "Combat Operations After Action Report 2nd-4th, March, 1969" (PDF). ivydragoons.org. Retrieved August 28, 2020.
- ^ a b c d e f g h i j k Bauer, John (February 2008). "Ambushed and Overrun: Survivors of Company A Tell their Stories". ivydragoons.org. Retrieved August 28, 2020.
- ^ a b c d e f g h Officer, Duty (March 3–10, 1969). "Duty Officer Log 3rd March to March 10th, 1969" (PDF). ivydragoons.org. Retrieved August 28, 2020.
- ^ a b c Bauer, John (2005). "The Battle for Hill 947: Company D, 3/8th Hangs Tough Against the Vaunted 66th NVA Regiment". ivydragoons.org. Retrieved August 25, 2020.
- ^ a b Bauer, John (2005). "Revisiting the Casualty Numbers: The Tragedy of Co A, 3/8 Infantry". ivydragoons.org. Retrieved August 28, 2020.
- Installations of the United States Army in South Vietnam
- Buildings and structures in Kon Tum province