New Guinea campaign
| New Guinea Campaign | |||||||
|---|---|---|---|---|---|---|---|
| Part of the Pacific Theater of World War II | |||||||
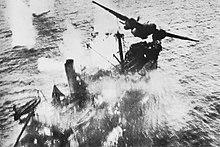
 Australian forces attack Japanese positions near Buna | |||||||
| |||||||
| Belligerents | |||||||
|
|
| ||||||
| Commanders and leaders | |||||||
|
| ||||||
| Strength | |||||||
| 350,000[1] | |||||||
| Casualties and losses | |||||||
|
42,000 total[2] | 127,600 (mostly from disease and starvation)[a][3] | ||||||
| |||||||
The New Guinea campaign of the Pacific War lasted from January 1942 until the end of the war in August 1945. During the initial phase in early 1942, the Empire of Japan invaded the Australian-administered Mandated Territory of New Guinea (23 January) and the Australian Territory of Papua (21 July) and overran western New Guinea (beginning 29/30 March), which was a part of the Netherlands East Indies. During the second phase, lasting from late 1942 until the Japanese surrender, the Allies—consisting primarily of Australian forces—cleared the Japanese first from Papua, then the Mandate and finally from the Dutch colony.
The campaign resulted in a crushing defeat and heavy losses for the Empire of Japan. As in most Pacific War campaigns, disease and starvation claimed more Japanese lives than enemy action. Most Japanese troops never even came into contact with Allied forces, and were instead simply cut off and subjected to an effective blockade by Allied naval forces. Garrisons were effectively besieged and denied shipments of food and medical supplies, and as a result, some claim that 97% of Japanese deaths in this campaign were from non-combat causes.[5]
According to John Laffin, the campaign "was arguably the most arduous fought by any Allied troops during World War II".[6]
1942[]
Strategic situation[]

The struggle for New Guinea began with the capture by the Japanese of the city of Rabaul at the northeastern tip of New Britain Island in January 1942 (the Allies responded with multiple bombing raids, of which the action off Bougainville was one). Rabaul overlooks Simpson Harbor, a considerable natural anchorage, and was ideal for the construction of airfields.[7][8] Over the next year, the Japanese built up the area into a major air and naval base.[9]
The Japanese 8th Area Army (equivalent to an Anglo-American army), under General Hitoshi Imamura at Rabaul, was responsible for both the New Guinea and Solomon Islands campaigns. The Japanese 18th Army (equivalent to a Anglo-American corps), under Lieutenant General Hatazō Adachi, was responsible for Japanese operations on mainland New Guinea.[10]
The colonial capital of Port Moresby on the south coast of Papua was the strategic key for the Japanese in this area of operations. Capturing it would both neutralize the Allies' principal forward base and serve as a springboard for a possible invasion of Australia.[11] For the same reasons, General Douglas MacArthur, Supreme Commander Allied Forces South West Pacific Area was determined to hold it. MacArthur was further determined to conquer all of New Guinea in his progress toward the eventual recapture of the Philippines.[12] General Headquarters Southwest Pacific Area Operational Instruction No.7 of 25 May 1942, issued by Commander-Allied-Forces, General Douglas MacArthur, placed all Australian and US Army, Air Force and Navy Forces in the Port Moresby Area under the control of New Guinea Force.[13]
Japanese seizure of Lae and Salamaua[]
Due north of Port Moresby, on the northeast coast of Papua, are the Huon Gulf and the Huon Peninsula. The Japanese entered Lae and Salamaua, two locations on Huon Gulf, on 8 March 1942 unopposed.[14] MacArthur would have liked to deny this area to the Japanese, but he had neither sufficient air nor naval forces to undertake a counterlanding. The Japanese at Rabaul and other bases on New Britain would have easily overwhelmed any such effort (by mid-September, MacArthur's entire naval force under Vice Admiral Arthur S. Carpender consisted of 5 cruisers, 8 destroyers, 20 submarines, and 7 small craft).[15] The only Allied response was a bombing raid of Lae and Salamaua by aircraft flying over the Owen Stanley Range from the carriers USS Lexington and USS Yorktown, leading the Japanese to reinforce these sites.[14]
Japanese attempt on Port Moresby[]
Operation Mo was the designation given by the Japanese to their initial plan to take possession of Port Moresby. Their operation plan decreed a five-pronged attack: one task force to establish a seaplane base at Tulagi in the lower Solomons, one to establish a seaplane base in the Louisiade Archipelago off the eastern tip of New Guinea, one of transports to land troops near Port Moresby, one with a light carrier to cover the landing, and one with two fleet carriers to sink the Allied forces sent in response.[16] In the resulting 4–8 May 1942 Battle of the Coral Sea, the Allies suffered higher losses in ships, but achieved a crucial strategic victory by turning the Japanese landing force back, thereby removing the threat to Port Moresby, at least for the time being.[17]
After this failure, the Japanese decided on a longer term, two-pronged assault for their next attempt on Port Moresby. Forward positions would first be established at Milne Bay, located in the forked eastern end of the Papuan peninsula, and at Buna, a village on the northeast coast of Papua about halfway between Huon Gulf and Milne Bay. Simultaneous operations from these two locations, one amphibious and one overland, would converge on the target city.[18]
Crossing the Owen Stanleys[]
"[T]he Owen Stanley Range is a jagged, precipitous obstacle covered with tropical rainforest up to the pass at 6500-foot elevation, and with moss like a thick wet sponge up to the highest peaks, 13,000 feet above the sea. The Kokoda Trail [was] suitable for splay-toed Papuan aborigines but a torture to modern soldiers carrying heavy equipment..."
– Samuel Eliot Morison, Breaking the Bismarcks Barrier, p. 34
Buna was easily taken as the Allies had no military presence there (MacArthur wisely chose not to attempt an occupation by paratroopers since any such force would have been easily wiped out by the Japanese). The Japanese occupied the village with an initial force of 1,500 on 21 July and by 22 August had 11,430 men under arms at Buna. Then began the grueling Kokoda Track campaign, a brutal experience for both the Japanese and Australian troops involved. On 17 September, the Japanese had reached the village of Ioribaiwa, just 30 kilometres (20 mi) from the Allied airdrome at Port Moresby. The Australians held firm and began their counterdrive on 26 September. According to Morison, "...the Japanese retreat down the Kokoda Trail had turned into a rout. Thousands perished from starvation and disease; the commanding general, Horii, was drowned."[19] Thus was the overland threat to Port Moresby permanently removed.[20]
Air operations[]
Since Port Moresby was the only port supporting operations in Papua, its defence was critical to the campaign. The air defences consisted of P-39 and P-40 fighters. RAAF radar could not provide sufficient warning of Japanese attacks, so reliance was placed on coastwatchers and spotters in the hills until an American radar unit arrived in September with better equipment.[21] Japanese bombers were often escorted by fighters which came in at 30,000 ft (9,100 m)—too high to be intercepted by the P-39s and P-40s—giving the Japanese an altitude advantage in air combat.[22] The cost to the Allied fighters was high. Before June, between 20 and 25 P-39s had been lost in air combat, while three more had been destroyed on the ground and eight had been destroyed in landings by accident. The following month at least 20 fighters were lost in combat, while eight were destroyed in July.[23] The Australian and American anti-aircraft gunners of the Composite Anti-Aircraft Defences played a crucial part. The gunners got a lot of practice; Port Moresby suffered its 78th raid on 17 August 1942.[24] A gradual improvement in their numbers and skill forced the Japanese bombers up to higher altitude, where they were less accurate, and then, in August, to raiding by night.[21]
Although RAAF PBY Catalinas and Lockheed Hudsons were based at Port Moresby, because of the Japanese air attacks, long-range bombers like B-17s, B-25s, and B-26s could not be safely based there and were instead staged through from bases in Australia. This resulted in considerable fatigue for the air crews. Due to USAAF doctrine and a lack of long-range escorts, long-range bomber raids on targets like Rabaul went in unescorted and suffered heavy losses, prompting severe criticism of Lieutenant General George Brett by war correspondents for misusing his forces.[25] But fighters did provide cover for the transports, and for bombers when their targets were within range.[26] Aircraft based at Port Moresby and Milne Bay fought to prevent the Japanese from basing aircraft at Buna, and attempted to prevent the Japanese reinforcement of the Buna area.[27] As the Japanese ground forces pressed toward Port Moresby, the Allied Air Forces struck supply points along the Kokoda Track. Japanese makeshift bridges were attacked by P-40s with 500 lb (230 kg) bombs.[28]
Allied defence of Milne Bay[]
"Thenceforth, the Battle of Milne Bay became an infantry struggle in the sopping jungle carried on mostly at night under pouring rain. The Aussies were fighting mad, for they had found some of their captured fellows tied to trees and bayoneted to death, surmounted by the placard, 'It took them a long time to die'."
– Samuel Eliot Morison, Breaking the Bismarcks Barrier, p. 38
While it was beyond MacArthur's capabilities to deny Buna to the Japanese, the same could not be said of Milne Bay, which was easily accessible by Allied naval forces. In early June, US Army engineers, Australian infantry and an anti-aircraft battery were landed near the Lever Brothers coconut plantation at Gili Gili, and work was begun on an airfield. By 22 August, about 8,500 Australians and 1,300 Americans were on site.[29] The Japanese arrived and the 25 August – 7 September Battle of Milne Bay was underway. Historian Samuel Eliot Morison summed up the results this way:
...the enemy had shot his bolt; he never showed up again in these waters. The Battle for Milne Bay was a small one as World War II engagements went, but very important. Except for the initial assault on Wake Island, this was the first time that a Japanese amphibious operation had been thrown for a loss ... Furthermore, the Milne Bay affair demonstrated once again that an amphibious assault without air protection, and with an assault force inferior to that of the defenders, could not succeed.[30]
The D'Entrecasteaux Islands lie directly off the northeast coast of the lower portion of the Papuan peninsula. The westernmost island of this group, Goodenough, had been occupied in August 1942 by 353 stranded troops from bombed Japanese landing craft. The destroyer Yayoi, sent to recover these men, was itself bombed and sunk on 11 September. A force of 800 Australian troops landed on 22 October on either side of the Japanese position. Beleaguered, the survivors of the Japanese garrison were evacuated by submarine on the night of 26 October. The Allies proceeded to turn the island into an air base.[31]
Allied recapture of Buna and Gona[]
"In the swamp country which surrounded the area were large crocodiles ... Incidence of malaria was almost one hundred per cent. At Sanananda the swamp and jungle were typhus-ridden ... crawling roots reached out into stagnant pools infested with mosquitoes and numerous crawling insects ... every foxhole filled with water. Thompson sub machine-guns jammed with the gritty mud and were unreliable in the humid atmosphere ... "
– John Vader, New Guinea: The Tide Is Stemmed, pp. 102–103
The Japanese drive to conquer all of New Guinea had been decisively stopped. MacArthur was now determined to liberate the island as a stepping-stone to the reconquest of the Philippines. MacArthur's rollback began with the 16 November 1942 – 22 January 1943 Battle of Buna-Gona. The experience of the green US 32nd Infantry Division, just out of training camp and utterly unschooled in jungle warfare, was nearly disastrous. Instances were noted of officers completely out of their depth, of men eating meals when they should have been on the firing line, even of cowardice. MacArthur relieved the division commander and on 30 November instructed Lieutenant General Robert L. Eichelberger, commander of the US I Corps, to go to the front personally with the charge "to remove all officers who won't fight ... if necessary, put sergeants in charge of battalions ... I want you to take Buna, or not come back alive."[32]
"Also formidable was the tenacity of the enemy, who would fight to the death in these stinking holes, starving, diseased and with their dead rotting and unburied beside them."
– John Vader, New Guinea: The Tide Is Stemmed, p. 93
The Australian 7th Division under the command of Major General George Alan Vasey, along with the revitalized US 32nd Division, restarted the Allied offensive. Gona fell to the Australians on 9 December 1942, Buna to the US 32nd on 2 January 1943, and Sanananda, located between the two larger villages, fell to the Australians on 22 January.[33]
Operation Lilliput (18 December 1942 – June 1943) was an ongoing resupply operation ferrying troops and supplies from Milne Bay, at the tip of the Papuan Peninsula, to Oro Bay, a little more than halfway between Milne Bay and the Buna–Gona area.[34]
1943[]
Holding Wau[]

Wau is a village in the interior of the Papuan peninsula, approximately 50 kilometres (30 mi) southwest of Salamaua. An airfield had been built there during an area gold rush in the 1920s and 1930s. This airfield was of great value to the Australians during the fighting for northeast Papua.[35]
Once the Japanese had decided to give up on Guadalcanal, the capture of Port Moresby loomed even larger in their strategic thinking. Taking the airfield at Wau was a crucial step in this process, and to this end, the 51st Division was transferred from Indochina and placed under General Hitoshi Imamura's Eighth Area Army at Rabaul; one regiment arrived at Lae in early January 1943. In addition, about 5,400 survivors of the Japanese defeat at Buna-Gona were moved into the Lae-Salamaua area. Opposing these forces were the Australian 2/5th, 2/6th and 2/7th Battalions along with Lieutenant Colonel Norman Fleay's Kanga Force.[36]
The Australians decisively turned back the Japanese assault in the ensuing 29–31 January 1943 Battle of Wau. "Within a few days, the enemy was retreating from the Wau Valley, where he had suffered a serious defeat, harassed all the way back to Mubo..."[37] About one week later, the Japanese completed their evacuation of Guadalcanal.[38]
Final Japanese drive on Wau[]
General Imamura and his naval counterpart at Rabaul, Admiral Jinichi Kusaka, commander Southeast Area Fleet, resolved to reinforce their ground forces at Lae for one final all-out attempt against Wau. If the transports succeeded in staying behind a weather front and were protected the whole way by fighters from the various airfields surrounding the Bismarck Sea, they might make it to Lae with an acceptable level of loss, i.e., at worst half the task force would be sunk en route.[39] It is indicative of the extent to which Japanese ambitions had fallen at this point in the war that a 50% loss of ground troops aboard ship was considered acceptable.[citation needed]
Three factors conspired to create disaster for the Japanese. First, they had woefully underestimated the strength of the Allied air forces. Second, the Allies had become convinced that the Japanese were preparing a major seaborne reinforcement and so had stepped up their air searches. Most important of all, the bombers of MacArthur's air forces, under the command of Lieutenant General George C. Kenney, had been modified to enable new offensive tactics. Their noses had been refitted with eight 50-caliber machine guns for strafing slow-moving ships on the high seas. In addition, their bomb bays were filled with 500-pound bombs to be used in the newly devised practice of skip bombing.[40]
About 6,900 troops aboard eight transports, escorted by eight destroyers, departed Rabaul at midnight 28 February under the command of Rear Admiral Masatomi Kimura.[41] Through the afternoon of 1 March, the overcast weather held at which point everything began to go wrong for the Japanese. The weather changed direction and Kimura's slow-moving task force was spotted by an Allied scout plane. By the time the Allied bombers and PT boats finished their work on 3 March, Kimura had lost all eight transports and four of his eight destroyers.[42]
" 'The Boeing [B-25] is most terrifying,' wrote one survivor in his diary. 'We are repeating the failure of Guadalcanal. Most regrettable!!' "
– Samuel Eliot Morison, Breaking the Bismarcks Barrier, p. 60
...planes and PTs went about the sickening business of killing survivors in boats, rafts or wreckage. Fighters mercilessly strafed anything on the surface ... The PTs turned their guns on, and hurled depth charges at the three boats which, with over a hundred men on board, sank. It was a grisly task, but a military necessity since Japanese soldiers do not surrender and within swimming distance of shore, they could not be allowed to land and join the Lae garrison.[43]
The remaining destroyers with about 2,700 surviving troops limped back to Rabaul. According to Morison, the Japanese "...never again risked a transport larger than a small coaster or barge in waters shadowed by American planes. His contemplated offensive against Wau died a-borning."[43]
Operation I-Go[]


Marshal Admiral Isoroku Yamamoto promised the emperor that he would pay back the Allies for the disaster at the Bismarck Sea with a series of massive air strikes. For this, he ordered the air arm of Vice Admiral Jisaburo Ozawa's Third Fleet carriers to reinforce the Eleventh Air Fleet at Rabaul. To demonstrate the seriousness of the effort to the Supreme War Council, multiple shifts of high-ranking personnel were also effected: Both Yamamoto and Ozawa moved their headquarters to Rabaul; and Eighth Fleet commander Vice Admiral Gunichi Mikawa as well as General Imamura's chief of staff were sent to Tokyo with advice and explanations for the respective General Staffs (Admiral Tomoshige Samejima replaced Mikawa as Eight Fleet commander).[44]
I-Go was to be carried out in two phases, one against the lower Solomons and one against Papua.[45]
"At 1400 the Russell Island radar screen became milky with traces of bogeys and Guadalcanal broadcast "Condition Red," followed shortly by an unprecedented "Condition Very Red."
– Samuel Eliot Morison, Breaking the Bismarcks Barrier, p. 120
The first strike, on 7 April, was against Allied shipping in the waters between Guadalcanal and Tulagi. At 177 planes, this was the largest Japanese air attack since Pearl Harbor.[46] Yamamoto then turned his attention to New Guinea: 94 planes struck Oro Bay on 11 April; 174 planes hit Port Moresby on 12 April; and in the largest raid of all, 188 aircraft struck Milne Bay on 14 April.[47]
I-Go demonstrated that the Japanese command was not learning the lessons of air power that the Allies were. The Allied reduction of Rabaul was only made possible by relentless air strikes that took place day after day, but Yamamoto thought the damage inflicted by a few attacks of large formations would derail Allied plans long enough for Japan to prepare a defense in depth. Also, Yamamoto accepted at face value his fliers' over-optimistic reports of damage: they reported a score of one cruiser, two destroyers and 25 transports, as well as 175 Allied planes, a figure that should certainly have aroused some skepticism. Actual Allied losses amounted to one destroyer, one oiler, one corvette, two cargo ships and approximately 25 aircraft.[48] These meager results were not commensurate with either the resources expended or the expectations that had been promoted.[citation needed]
Allied strategy toward Rabaul[]
The umbrella term for the series of strategic actions taken by the Allies to reduce and capture the vast Japanese naval and air facilities at Rabaul was Operation Cartwheel. Two major moves were planned for the end of June:
- Turner's III 'Phib undertook Operation Toenails, the invasion of the New Georgia Islands halfway up the Solomons chain (30 June – 7 October 1943).
- Barbey's VII 'Phib carried out two almost simultaneous undertakings. Operation Chronicle, the capture of the Trobriand Islands between Papua and the Solomons (22 – 30 June 1943), and the landing of a combined American/Australian force at Nassau Bay on the Papuan coast just south of Huon Gulf (30 June – 6 July 1943).[49]
Eventually, the Joint Chiefs of Staff realized that a landing and siege of "Fortress Rabaul" would be far too costly, and that the Allies' ultimate strategic purposes could be achieved by simply neutralizing and bypassing it. At the Quebec Conference in August 1943, the leaders of the Allied nations agreed to this change in strategy focusing on neutralizing Rabaul rather than capturing it.[50]


From Wau to Salamaua[]
Despite the disaster of the Bismarck Sea, the Japanese could not give up on recapturing Wau. The remote but crucial airfield lay about ___ miles south/southeast of the port town of Salamaua.
- Landing at Nassau Bay
- First Battle of Mubo
- First Battle of Bobdubi
- Battle of Lababia Ridge
- Second Battle of Bobdubi
- Second Battle of Mubo
- Battle of Roosevelt Ridge
- Battle of Mount Tambu
- Operation Postern
- Landing at Lae
- Landing at Nadzab
- Bombing of Wewak (17–21 August 1943)
- Finisterre Range campaign (1943–1944)
- Battle of Kaiapit
- Battle of Dumpu
- Battle of John's Knoll–Trevor's Ridge
- Battle of The Pimple
- Battle of Shaggy Ridge
- Battle of Madang
- Huon Peninsula campaign (22 September 1943 – 1 March 1944)
- Battle of Scarlet Beach
- Battle of Finschhafen
- Battle of Sattelberg
- Battle of Jivevaneng
- Battle of Wareo
- Battle of Sio
- Landing at Saidor
- Bombing of Rabaul (November 1943)
- New Britain campaign (15 December 1943 – 21 August 1945)
1944–1945[]

- Admiralty Islands campaign (1944)
- Western New Guinea campaign (1944–1945)
- Landing at Aitape
- Landing at Hollandia
- Battle of Wakde
- Battle of Lone Tree Hill (1944)
- Battle of Morotai
- Battle of Biak
- Battle of Noemfoor
- Battle of Driniumor River
- Battle of Sansapor
- Aitape–Wewak campaign
Notes[]
- ^ Tanaka 1980, p. ii.
- ^ New Guinea: The US Army Campaigns of World War II. 8,500 prior to January 1943, 24,000 between January 1943 and April 1944, and 9,500 from April 1944 to the end of the war. Retrieved 23 July 2015.
- ^ Jump up to: a b Fenton, Damien (1 June 2004). "How many died?". Australian War Memorial. Retrieved 13 June 2020.
- ^ Statistical and Accounting Branch Office of the Adjutant General 1953, p. 94
- ^ Stevens, David. "The Naval Campaigns for New Guinea". Journal of the Australian War Memorial: paragraph 30. Retrieved 10 March 2016.
- ^ Laffin 1986, p. 303
- ^ Rottman 2002, p. 188
- ^ Keogh 1965, pp. 101–102
- ^ Rottman 2005, pp. 8 & 49
- ^ Rottman 2005, pp. 12 & 43
- ^ Morison 1949, p. 10
- ^ Morison 1950, pp. 31–33
- ^ GHQ SWPA
- ^ Jump up to: a b Morison 1950, p. 31
- ^ Morison 1950, p. 32
- ^ Morison 1949, pp. 10–11
- ^ Morison 1949, p. 63
- ^ Morison 1950, p. 33
- ^ Morison 1950, p. 43
- ^ Morison 1950, pp. 33–34
- ^ Jump up to: a b Craven & Cate 1948, pp. 476–477.
- ^ Watson 1944, p. 20.
- ^ Craven & Cate 1948, p. 477 & 723 (note 15)
- ^ Watson 1944, p. 31.
- ^ Watson 1944, p. 24.
- ^ Watson 1944, p. 38.
- ^ Watson 1944, pp. 31–33.
- ^ Watson 1944, p. 42.
- ^ Morison 1950, pp. 36–37
- ^ Morison 1950, p. 39
- ^ Morison 1950, pp. 39–40
- ^ Vader 1971, p. 90
- ^ Vader 1971, p. 102
- ^ Gill 1968, pp. 239, 262 & 283
- ^ Morison 1950, p. 54
- ^ Vader 1971, p. 106
- ^ Vader 1971, p. 108
- ^ Rottman 2005, p. 64
- ^ Morison 1950, pp. 54–55
- ^ Morison 1950, pp. 56–57
- ^ Morison 1950, p. 55
- ^ Morison 1950, pp. 58–62
- ^ Jump up to: a b Morison 1950, p. 62
- ^ Morison 1950, pp. 117–118
- ^ Morison 1950, p. 118
- ^ Morison 1950, pp. 120–123
- ^ Morison 1950, pp. 125–126
- ^ Morison 1950, pp. 127
- ^ Morison 1950, pp. 132–133
- ^ Office of the Combined Chiefs of Staff 1943, p. 67
References[]
- "Biography of Lieutenant-General Heisuke Abe – (阿部平輔) – (あべ へいすけ) (1886–1943), Japan". Generals.dk. Retrieved 18 September 2013.
- Craven, Wesley; Cate, James (1948). Army Air Forces in World War II, Volume 1: Plans and Early Operations—January 1938 to August 1942. Chicago: University of Chicago Press. ISBN 9781428915862. OCLC 704158.
- GHQ SWPA, Establishment of New Guinea Force and Miscellaneous GHQ Correspondence Relative to NGF, Australian Army, retrieved 15 November 2015
- Gill, G. Hermon (1968). Royal Australian Navy, 1942–1945. Australia in the War of 1939–1945. Series 2 – Navy. Volume II. Canberra: Australian War Memorial. OCLC 65475.
|volume=has extra text (help) - Laffin, John (1986). Brassey's Battles: 3,500 Years of Conflict, Campaigns and Wars from A-Z. London: Brassey's Defence Publishers. ISBN 0080311857.
- Morison, Samuel Eliot (1949). Coral Sea, Midway and Submarine Actions, vol. 4 of History of United States Naval Operations in World War II. Boston: Little, Brown and Co. ISBN 0-316-58304-9.
- Morison, Samuel Eliot (1950). Breaking the Bismarcks Barrier, vol. 6 of History of United States Naval Operations in World War II. Edison, New Jersey: Castle Books. ISBN 0-7858-1307-1.
- Office of the Combined Chiefs of Staff (1943). Quadrant Conference: August 1943: Papers and Minutes of Meetings (PDF). Department of Defense (United States).
- Rottman, Gordon (2002). World War II Pacific Island Guide: A Geo-military Study. Greenwood Publishing Group. ISBN 9780313313950.
- Rottman, Gordon L. (2005). Duncan Anderson (ed.). Japanese Army in World War II: The South Pacific and New Guinea, 1942–43. Oxford and New York: Osprey. ISBN 1-84176-870-7.
- Statistical and Accounting Branch, Office of the Adjutant General (1953). Army Battle Casualties and Nonbattle Deaths in World II: Final Report 7 December 1941 – 31 December 1946. Washington: Department of the Army. OCLC 4051205.
- Tanaka, Kengoro (1980). Operations of the Imperial Japanese Armed Forces in the Papua New Guinea Theater During World War II. Tokyo, Japan: Japan Papua New Guinea Goodwill Society. OCLC 9206229.
- Vader, John (1971). New Guinea: The Tide Is Stemmed. New York: Ballantine Books. ISBN 978-0-3450-2223-3.
- Watson, Richard L. Jr (1944). USAAF Historical Study No. 17: Air Action in the Papuan Campaign, 21 July 1942 to 23 January 1943 (PDF). Washington, DC: USAAF Historical Office. OCLC 22357584.
Further reading[]
- Anderson, Charles R. Papua. World War II Campaign Brochures. Washington D.C.: United States Army Center of Military History. CMH Pub 72-7.
- Dear, I.C.B.; Foot, M.R.D., eds. (2001). "New Guinea campaign". The Oxford Companion to World War II. Oxford University Press. ISBN 978-0-19860-446-4.
- Dexter, David (1961). The New Guinea Offensives. Australia in the War of 1939–1945. Series 1 – Army. Volume 6. Canberra: Australian War Memorial. OCLC 2028994.
|volume=has extra text (help) - Drea, Edward J. (1998). In the Service of the Emperor: Essays on the Imperial Japanese Army. Nebraska: University of Nebraska Press. ISBN 0-8032-1708-0.
- Drea, Edward J. Papua. World War II Campaign Brochures. Washington D.C.: United States Army Center of Military History. CMH Pub 72-9.
- Gailey, Harry A. (2004). MacArthur's Victory: The War In New Guinea 1943–1944. New York: Random House. ISBN.
- Hungerford, T.A.G. (1952). The Ridge and the River. Sydney: Angus & Robertson; Republished by Penguin, 1992. ISBN 0-14-300174-4.
- Japanese Research Division (1950). Sumatra Invasion and Southwest Area Naval Mopping-Up Operations, January 1942 – May 1942. Japanese Monographs, No. 79A. General Headquarters Far East Command, Foreign Histories Division.
- Leary, William M. (2004). We Shall Return! MacArthur's Commanders and the Defeat of Japan, 1942–1945. University Press of Kentucky. ISBN 0-8131-9105-X.
- McCarthy, Dudley (1959). South-West Pacific Area – First Year. Australia in the War of 1939–1945. Series 1 – Army. Volume 5. Canberra: Australian War Memorial. OCLC 3134247.
|volume=has extra text (help) - Toll, Ian W. (2015). The Conquering Tide: War in the Pacific Islands, 1942–1944. New York: W. W. Norton.
- Taafe, Stephen R. (2006). MacArthur's Jungle War: The 1944 New Guinea Campaign. Lawrence, Kansas, U.S.A.: University Press Of Kansas. ISBN 0-7006-0870-2.
- Zaloga, Stephen J. (2007). Japanese Tanks 1939–45. Osprey. ISBN 978-1-84603-091-8.
External links[]
| Wikimedia Commons has media related to New Guinea campaign. |
- Nelson, Hank. "Report on Historical Sources on Australia and Japan at war in Papua and New Guinea, 1942–45". Retrieved 13 December 2006.
- "The Campaigns of MacArthur in the Pacific, Volume I". Reports of General MacArthur. United States Army Center of Military History. Retrieved 8 December 2006.
- "Japanese Operations in the Southwest Pacific Area, Volume II – Part I". Reports of General MacArthur. United States Army Center of Military History. Retrieved 8 December 2006.
- Translation of the official record by the Japanese Demobilization Bureaux detailing the Imperial Japanese Army and Navy's participation in the Southwest Pacific area of the Pacific War.
- National Archive Video of Hollandia Bay, New Guinea Invasion
- A film clip Allies Study Post-War Security etc. (1944) is available at the Internet Archive
| Authority control: National libraries |
|---|
- Campaigns of World War II
- New Guinea
- Indonesia in World War II
- South West Pacific theatre of World War II
- Conflicts in 1942
- Conflicts in 1943
- Conflicts in 1944
- Conflicts in 1945
- 1940s in the Dutch East Indies
- 1942 in Papua New Guinea
- 1943 in Papua New Guinea
- 1944 in Papua New Guinea
- 1945 in Papua New Guinea
- Battles and operations of World War II involving Papua New Guinea
- Battles and operations of World War II involving the United States
- Campaigns, operations and battles of World War II involving the United Kingdom
- Battles and operations of World War II involving Australia
- Japan–Papua New Guinea relations