Sword Beach
| Sword | |||||||
|---|---|---|---|---|---|---|---|
| Part of Normandy landings and the Battle for Caen | |||||||
 British infantry waiting to move off Queen Beach, SWORD Area, while under heavy enemy fire, on the morning of 6 June | |||||||
| |||||||
| Belligerents | |||||||
|
| ||||||
| Commanders and leaders | |||||||
|
|
| ||||||
| Strength | |||||||
|
28,845[1] 223 tanks[2] |
8 infantry companies (716th Infantry Division)[nb 1] 9,790 124–127 tanks[5][6] 40 assault guns[5] (21st Panzer Division)[nb 2] | ||||||
| Casualties and losses | |||||||
| 683 casualties[nb 3] |
unknown casualties 40[6]–54 tanks lost[nb 4] 6 bombers destroyed[13] | ||||||
Sword, commonly known as Sword Beach, was the code name given to one of the five main landing areas along the Normandy coast during the initial assault phase, Operation Neptune, of Operation Overlord, the Allied invasion of German-occupied France that commenced on 6 June 1944. Stretching 8 kilometres (5.0 mi) from Ouistreham to Saint-Aubin-sur-Mer, the beach proved to be the easternmost landing site of the invasion after the abortion of an attack on a sixth beach, code-named Band. Taking Sword was to be the responsibility of the British Army with sea transport, mine sweeping, and a naval bombardment force provided by the British Royal Navy as well as elements from the Polish, Norwegian and other Allied navies.
Among the five beaches of the operation, Sword is the nearest to Caen, being located around 15 kilometres (9.3 mi) from the goal of the 3rd Infantry Division. The initial landings were achieved with low casualties, but the advance from the beach was slowed by traffic congestion and resistance in heavily defended areas behind the beachhead. Further progress towards Caen was halted by the only armoured counter-attack of the day, mounted by the 21st Panzer Division.
Background[]
Following the Fall of France, British Prime Minister Winston Churchill vowed to return to continental Europe and liberate the Nazi German-occupied nations.[14] The Western Allies agreed to open a Second Front in northern Europe in 1942 to aid the Soviet Union. However, with resources for an invasion lacking, it was postponed[15] but planning was undertaken that in the event of the German position in western Europe becoming critically weakened or the Soviet Union's situation becoming dire, forces could be landed in France; Operation Sledgehammer. At the same time, planning was underway for a major landing in occupied France during 1943; Operation Roundup.[16] In August 1942, Canadian and British forces attempted an abortive landing—Operation Jubilee—at the Calais port-town of Dieppe; the landing was designed to test the feasibility of a cross-channel invasion. The attack was poorly planned and ended in disaster; 4,963 soldiers were killed, wounded or captured.[17] The decision to prosecute the Battle of the Atlantic to its closure, the lack of landing craft,[18] invading Sicily in July 1943, and Italy in September following the defeat of Axis forces in North Africa in May 1943[19] resulted in the postponement of any assault on northern Europe till 1944.[18]
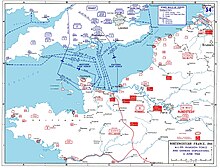
Having succeeded in opening up an offensive front in southern Europe, gaining valuable experience in amphibious assaults and inland fighting, Allied planners returned to the plans to invade Northern France.[20] Now scheduled for 5 June 1944,[21] the beaches of Normandy were selected as landing sites, with a zone of operations extending from the Cotentin Peninsula to Caen.[22] Operation Overlord called for the British Second Army to assault between the River Orne and Port en Bessin, capture the German-occupied city of Caen and form a front line from Caumont-l'Éventé to the south-east of Caen, in order to acquire airfields and protect the left flank of the United States First Army while it captured Cherbourg.[23] Possession of Caen and its surroundings would give Second Army a suitable staging area for a push south to capture the city of Falaise, which could then be used as a pivot for an advance on Argentan, the Touques River and then towards the Seine River.[24] Overlord would constitute the largest amphibious operation in military history.[22] After delays, due to both logistical difficulties and poor weather, the D-Day of Overlord was moved to 6 June 1944. Eisenhower and Bernard Montgomery, commander of 21st Army Group, aimed to capture Caen within the first day, and liberate Paris within 90 days.[22]
Plans[]
Allied[]
The coastline of Normandy was divided into seventeen sectors, with codenames using a spelling alphabet—from Able, west of Omaha, to Roger on the east flank of Sword. Eight further sectors were added when the invasion was extended to include Utah on the Cotentin Peninsula. Sectors were further subdivided into beaches identified by the colours Green, Red, and White.[25]
The Anglo-Canadian assault landings on D-Day were to be carried out by the British Second Army, under Lieutenant General Miles Dempsey. The Second Army's I Corps, commanded by Lieutenant General John Crocker, was assigned to take Sword. To Major General Tom Rennie's 3rd Infantry Division fell the task of assaulting the beaches and seizing the main British objective on D-Day, the historic Norman city of Caen.[26][27] Attached to the 3rd Infantry Division for the assault were the 27th Independent Armoured Brigade, the 1st Special Service Brigade (which also contained Free French Commandos), No. 41 (Royal Marine) Commando of the 4th Special Service Brigade, Royal Marine armoured support, additional artillery and engineers, and elements of the 79th Armoured Division.[28] 6th Beach Group was deployed to assist the troops and landing craft landing on Sword and to develop the beach maintenance area.
The 3rd Infantry Division was ordered to advance on Caen, 7.5 miles (12.1 km) from Sword,[29] with the 3rd Canadian Infantry Division advancing on its western flank to secure Carpiquet airfield, 11 miles (18 km) from Juno Beach, on the outskirts of the city.[27] The 3rd Infantry was also ordered to relieve the elements of the 6th Airborne Division that had secured the bridges over the River Orne and Caen Canal during Operation Tonga, secure the high ground north of Caen, and "if possible Caen itself".[30] The last point was further reinforced when I Corps' commander, General Crocker, instructed the division, prior to the invasion, that by nightfall the city must be either captured or "effectively masked" with troops based north-west of the city and Bénouville.[31]

Sword stretched about 5 miles (8.0 km) from Saint-Aubin-sur-Mer in the west to the mouth of the River Orne in the east. It was further sub-divided into four landing sectors; from west to east these sectors were 'Oboe' (from Saint-Aubin-sur-Mer to Luc-sur-Mer), 'Peter' (from Luc-sur-Mer to Lion-sur-Mer), 'Queen' (from Lion-sur-Mer to La Brèche d'Hermanville), and finally 'Roger' (from La Brèche d'Hermanville to Ouistreham). Each sector was also divided into multiple beaches.[32] The sector chosen for the assault was the 1.8 miles (2.9 km) wide 'White' and 'Red' beaches of 'Queen' sector, as shallow reefs blocked access to the other sectors.[33] Two infantry battalions supported by DD tanks would lead the assault followed up by the commandos and the rest of the division;[34] the landing was due to start at 07:25 hours;[35] the division would be the last assault division to land.[nb 5]
German[]

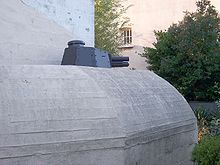
On 23 March 1942, Führer Directive Number 40 called for the official creation of the Atlantic Wall - a line of concrete gun emplacements, machine-gun nests, minefields and beach obstacles stretching along the French coast. Fortifications were initially concentrated around ports, but were extended into other areas beginning in late 1943.[37] While the German Army had seen its strength and morale heavily depleted by campaigns in Russia, North Africa and Italy, it remained a powerful fighting force.[38] Most of the German divisions along the French coast in late 1943, however, were either formations of new recruits or battered veteran units still resting and rebuilding after service on the Eastern Front; altogether some 856,000 soldiers were stationed in France, predominantly along the Channel coast.[38] They were supported by an additional 60,000 Hilfswillige (Russian and Polish conscripts to the German army).[39]
Under the command of Field Marshals Erwin Rommel and Gerd von Rundstedt, the defences of the Atlantic Wall were heavily upgraded; in the first six months of 1944, 1.2 million tons of steel and 17.3 million cubic yards of concrete were laid.[40] The coast of northern France was also studded with four million antitank and anti-personnel mines, and 500,000 beach obstacles.[40]
On and behind Sword, twenty strongpoints, including several artillery batteries, were constructed.[4] The coastline was littered with wooden stakes, mines, hedgehogs, and Dragon's teeth, while along the top of the beach, the Germans had constructed a network of trenches, gun pits, mortar pits, and machine gun nests. Barbed wire surrounded these positions and lined the beach.[41][42] The beachfront itself, being generally flat and exposed, was guarded by a few scattered bunkers, with machine gun and sniper posts in some of the holiday homes and tourist facilities lining the shore. To reinforce the defences, six strongpoints had been constructed, each with at least eight 5 cm Pak 38 50mm anti-tank guns, four 75mm guns, and one 88mm gun. One of the strongpoints (codenamed Cod by the British), faced directly on to Queen sector. Exits from the beaches had been blocked with various obstacles,[4][42] and behind the beaches, six artillery batteries had been positioned, three of which were based within three strongpoints; these latter batteries had four 100 mm guns and up to ten 155mm guns.[4] In addition, positioned east of the River Orne was the Merville Gun Battery, containing four Czechoslovakian 100 mm howitzers which were within range of Sword and the invasion fleet.[43][44] Between Cherbourg and the River Seine there were a total of 32 batteries capable of firing on to the five invasion beaches; half of them were positioned in casemates of 6-foot (1.8 m) reinforced concrete.[42]
Since the spring of 1942, Generalleutnant Wilhelm Richter's 8,000-man strong 716th Infantry Division had been positioned to defend the Calvados coast of Normandy.[45] In March 1942, the 352nd Infantry Division assumed control of the western Calvados coast, leaving the 716th in position north of Caen covering an 8-mile (13 km) stretch of coastline. The division comprised four regular infantry battalions, two Ost battalions, and artillery units.[46] Four infantry companies were spread along Sword, with two positioned facing Queen sector - another four were positioned inland behind the beach.[4] Further inland, Generalleutnant's Edgar Feuchtinger's 16,297 strong 21st Panzer Division had been positioned on both sides of the River Orne around Caen to provide an immediate counter-attack force should a landing take place.[47][48][49] In May 1944, two Panzergrenadier battalions and an antitank battalion from the 21st Panzer Division were placed under Richter's command;[46] this deployment eliminated 21st Panzer as a mobile reserve.[49] One of these battalions, along with the division's anti-tank guns and several mobile 155 mm guns, was positioned on Périers Ridge, which rose to about 50 metres (160 ft) above sea level, 3 miles (4.8 km) south of Sword.[31][50][51]
Order of battle[]
3rd Division group[]

![]() 3rd Division[52] – Major-General T. G. Rennie
3rd Division[52] – Major-General T. G. Rennie
8th Brigade (assault brigade)
- 1st Battalion Suffolk Regiment
- 2nd Battalion East Yorkshire Regiment
- 1st Battalion South Lancashire Regiment
- 2nd Battalion Lincolnshire Regiment
- 1st Battalion King's Own Scottish Borderers
- 2nd Battalion Royal Ulster Rifles
- 2nd Battalion Royal Warwickshire Regiment
- 1st Battalion Royal Norfolk Regiment
- 2nd Battalion King's Own Shropshire Light Infantry
Divisional Troops
- 3rd Reconnaissance Regiment Royal Armoured Corps
- HQ Royal Artillery (RA) 3rd Division
- 33rd and 76th Field Regiments, RA (self-propelled guns)
- 7th Field Regiment, RA
- 20th Anti-Tank Regiment, RA
- 92nd (Loyals) Light Anti-Aircraft Regiment, RA
- 3rd Divisional Royal Engineers (RE)[52][53] – CRE: Lieutenant Colonel R.W. Urquhart
- 17th Field Company, RE
- 245th Field Company, RE
- 253rd Field Company, RE
- 15th Field Park Company, RE
- 3rd Divisional Signals, Royal Corps of Signals
- 2nd Battalion Middlesex Regiment (machine guns)
Attached units and formations[52]
27th Armoured Brigade (DD Tanks)
- 13th/18th Royal Hussars
- 1st East Riding Yeomanry
- Staffordshire Yeomanry
5th Assault Regiment, RE[54]
- 77 & 79 Assault Squadrons, RE (AVREs)
- 629 Field Squadron, RE
- 71 Field Company, RE
- 263rd (Sussex) Field Company, RE (attached from XII Corps Troops, Royal Engineers as beach obstacle clearance parties)[55]
![]() 1st Special Service Brigade (landed on eastern extremity of Sword) – Brigadier Lord Lovat
1st Special Service Brigade (landed on eastern extremity of Sword) – Brigadier Lord Lovat
- No. 3 Commando – Lieutenant Colonel Peter Young
- No. 4 Commando – Lieutenant Colonel Robert Dawson
- A force of 176 French Marine Commandos from No. 10 (Inter-Allied) Commando, commanded by Commandant Philippe Kieffer landed with No. 4 Commando
- No. 6 Commando – Lieutenant Colonel Derek Mills-Roberts
- No. 45 (Royal Marine) Commando – Lieutenant Colonel Charles Ries
![]() 4th Special Service Brigade (landed between Juno and Sword)
4th Special Service Brigade (landed between Juno and Sword)
- No. 5 Beach Group (Queen sector)
- 'M' AA Assault Group (from 80th Anti-Aircraft Brigade)[57][58][59]
- RHQ 73rd Light AA Rgt, RA – Lieutenant-Colonel J.A. Armstrong
- 218 LAA Bty and 296 LAA Bty less 2 Troops
- G & H Troops 322 LAA Bty, 93rd LAA Rgt, RA
- 322 HAA Bty and C Troop 323 HAA Bty, 103rd Heavy AA Rgt, RA
- B Troop 474 Independent Searchlight Bty, RA
- 16 Fire Control Post, RA
- 76 & 103 Coast Observation Detachments, RA
- One Platoon 112 Company Pioneer Corps (smoke generators)
- 73 LAA Rgt Workshop, Royal Electrical and Mechanical Engineers (REME)
- RHQ 73rd Light AA Rgt, RA – Lieutenant-Colonel J.A. Armstrong
- 'N' AA Assault Group (from 80th AA Bde)[57][58]
- RHQ 103rd HAA Rgt, RA – Lieutenant-Colonel H.E. Johnston (AA Defence Commander, 101 BSA)
- D Troop 323 HAA Bty and 324 HAA Bty
- 220 LAA Bty, 73rd LAA Rgt, RA
- I Troop 322 LAA Bty, 93rd LAA Rgt, RA
- C Troop 474 S/L Bty, RA
- 160 AA Operations Room, RA
- One Platoon 112 Company, Pioneer Corps
- 103 HAA Rgt Workshop, REME
- RHQ 103rd HAA Rgt, RA – Lieutenant-Colonel H.E. Johnston (AA Defence Commander, 101 BSA)
- 18th GHQ Troops Engineers[52][53] – CRE: Lieutenant-Colonel J.H. Boyd
- 84th Field Company, RE
- 91st Field Company, RE
- 8th & 9th Stores Sections, RE
- 50th Mechanical Equipment Section, RE
- 205th Works Section, RE
- 654th & 722nd Artisan Works Companies, RE
- Two Advanced Park Sections of 176th Workshop and Park Company, RE
- 49th Bomb Disposal Section, RE
- 999th & 1028th Port Operating Companies, RE
- 940 Inland Water Transport Company, RE
- Five Companies, Pioneer Corps
- No. 6 Beach Group (in reserve)
- 1st Buckinghamshire Battalion, Oxfordshire and Buckinghamshire Light Infantry
D-Day at Sword[]
British Assault[]

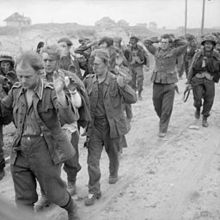
The assault on Sword began at about 03:00 with the aerial and naval bombardment of German coastal defences and artillery sites. The landing was to be concentrated on Queen Red and Queen White in front of Hermanville-sur-Mer, other approaches having proven impassable due to shoals. At 07:25, the first units set off for the beach. These were the amphibious DD tanks of the 13th/18th Hussars; they were followed closely by the 8th Infantry Brigade, and by Royal Engineers in AVREs and the various odd-looking, specialized vehicles that had been nicknamed 'Hobart's funnies'. The engineers set to work clearing mines and obstacles under a steady hail of small arms fire and artillery fire from Périers Ridge just south of Hermanville.[60][61] Resistance on the beach was initially fairly strong, with wrecked vehicles piling up and casualties mounting; however, with most of their armoured vehicles successfully landed, the British were able to quickly secure the immediate area. By 09:30 the engineers had cleared seven of the eight exits from the beach, allowing the inland advance to begin.[62]
British and French commandos encountered tough resistance in the seaside town of Ouistreham, on Sword's eastern extremity, but were able to clear it of enemy strongpoints. By 13:00, the 1st Special Service Brigade had reached the bridges on the River Orne and the Caen Canal, linking up with paratroops of the 6th Airborne Division, who were holding the bridges, after earlier disabling German gun batteries in a fierce night-time battle at Merville.[61]
On the western flank of Sword, commandos of the 4th Special Service Brigade moved out to secure Lion-sur-Mer and effect a link up with Canadian forces at Juno Beach, but encountered strong resistance and were pinned down by heavy fire for several hours. Meanwhile, around the main landing area, the men of the 3rd Infantry Division had secured Hermanville-sur-Mer by 10:00, but were finding tougher going as they slowly fought their way up Périers Ridge and moved inland. Congestion as more men, vehicles, and equipment arrived on the beach further complicated matters. It was gradually becoming apparent that the British would not be able to make the hook-up with the 3rd Canadian Infantry Division necessary to protect its right flank in an immediate assault on Caen. Troops of the King's Shropshire Light Infantry continued down the Hermanville-Caen road, reaching Biéville-Beuville, close to Caen, but were supported by only a few self-propelled guns, their flanks exposed. The issue was fully rendered moot when, on the afternoon of 6 June, the 21st Panzer Division, based around Caen, launched the only major German counterattack of D-Day.[61][63]
German counter-attacks[]
The 21st Panzer Division, with its formidable inventory of some 127 Panzer IV tanks,[64] was intended for use as a rapid response force; on the morning of 6 June, however, its commander, Generalmajor Edgar Feuchtinger, was in Paris, and Rommel was in Germany. The division was unable to finalize orders and preparations for a counterattack until late in the day. At about 17:00, two thrusts were launched, east and west of the River Orne. The eastern attack, carried out by II Battalion and supporting units, under Major Hans von Luck, was intended to destroy the 6th Airborne Division's Orne bridgehead, but was almost immediately stopped in its tracks by intense Allied air attacks and naval gunfire.[65] To the west, a larger Armoured Group initially fared somewhat better. Taking advantage of the gap between the Sword and Juno sectors, elements of the 192nd Panzergrenadier Regiment were able to reach the coast at Lion-sur-Mer by 8:00 p.m.; however, with few flak units and very little support from the Luftwaffe, they too suffered devastating losses to Allied aircraft. When 250 Gliders of the British 6th Airlanding Brigade overflew their positions, on their way to reinforce the Orne bridgehead in Operation Mallard, the Germans, believing they were about to be cut off, retired.[61][66]
The Luftwaffe was particularly weak in this sector, but tried to support the attack with a few of the rare daylight appearances it made on D-Day. Generalfeldmarschall Hugo Sperrle, commanding Luftflotte 3 (Air Fleet 3) was responsible for the air defense of Normandy and ordered all available forces to attack the beachhead. Junkers Ju 88s from Kampfgeschwader 54 (KG 54: Bomber Wing 54) attacked British positions with Butterfly Bombs. III./KG 54 struck Lion-sur-Mer while I./KG 54 bombed shipping at the mouth of the Orne. No. 145 Wing RAF intercepted and shot down five German aircraft.[67][68]
Aftermath[]
Analysis[]

By the end of D-Day, 28,845 men of I Corps had come ashore across Sword. The British Official Historian, L. F. Ellis, wrote that "in spite of the Atlantic Wall over 156,000 men had been landed in France on the first day of the campaign."[1] British losses in the Sword area amounted to 683 men.[69] The British and Canadians were able to link up and resume the drive on Caen the following day, but three days into the invasion, the advance was halted.[70][71] On 7 June, Operation Perch, a pincer attack by the 51st (Highland) Infantry Division and XXX Corps was launched to encircle Caen from the east and west flanks.[72] The 21st Panzer Division halted the 51st Division advance and the XXX Corps attack resulted in the Battle of Villers-Bocage and the withdrawal of the leading elements of the 7th Armoured Division soon after.[73][74] The next offensive, codenamed Operation Epsom, was launched by VIII Corps on 26 June, to envelope Caen from the west.[75][76] German forces managed to contain the offensive but to do so, they were obliged to commit all their available strength.[77]
On 27 June, the 3rd Infantry Division and its supporting tanks launched Operation Mitten. The objective was to seize two German-occupied châteaux, la Londe and le Landel. The initial evening assault was repulsed but the following morning, attacks gained the objectives and destroyed several German tanks. Operation Mitten cost at least three British tanks and 268 men.[78][79][80] In 2003 Copp wrote that fighting for these châteaux made the area the "bloodiest square mile in Normandy".[80] Scarfe wrote in 1947 that, had the operation gone more smoothly, further elements of the division and elements of the 3rd Canadian Division would have launched Operation Aberlour, an ambitious plan to capture several villages north of Caen but the attack was cancelled by Lieutenant-General John Crocker.[78][79] Several days later I Corps launched a new offensive, codenamed Operation Charnwood, to gain possession of Caen.[81] In a frontal assault, the northern half of the city was captured,[81] but German forces retained possession of the city south of the River Orne. The southern half of Caen was only captured 12 days later by Canadian infantry during Operation Atlantic.[82][83]
See also[]
Notes[]
- Footnotes
- ^ Historian Stephen Badsey notes that the beach itself was only defended by two companies, no more than 300 men.[3] The other companies were positioned further inland and at Ouistreham.[4]
- ^ Carlo D'Este and Ken Ford both note that various elements of the 21st Panzer Division's two infantry regiments, tank regiment, pioneer battalion and artillery regiment were all involved in the fighting on 6 June.[7][8] Niklas Zetterling notes that on 1 June that these formations amounted to 9,778 men.[9]
- ^ 3rd Infantry Division recorded the loss of 683 men on D-Day; 8th Infantry Brigade recorded 367 casualties, 9th Infantry Brigade losses are not available for D-Day but are recorded as slight, 185th Infantry Brigade lost 232 men, and the divisional machine-gun battalion lost 36 men.[10] The Commandos lost 18 men killed and 30 wounded on the beaches alone.[11]
- ^ 20 tanks destroyed and "over 30 damaged"[12]
- ^ 50th (Northumbrian) Infantry Division landed on Gold just prior to I Corps landing, while the American landings took place a full hour beforehand.[36]
- Citations
- ^ Jump up to: a b Ellis, p. 223
- ^ Fortin, p. 58
- ^ Buckley (2006), p. 53
- ^ Jump up to: a b c d e Ford, pp. 24–25
- ^ Jump up to: a b c D'Este, p. 124
- ^ Jump up to: a b Ellis, p. 204
- ^ D'Este, pp. 136, 139
- ^ Ford, pp. 71-72
- ^ Zetterling, 21st Panzer Division
- ^ Ford, p. 86
- ^ Ford, p. 112
- ^ Ford, p. 80
- ^ Buckley (2006), p. 137
- ^ D'Este, p. 21
- ^ Bauer, 44
- ^ Ellis, p. 7
- ^ Granatstein, p. 11
- ^ Jump up to: a b Ellis, p. 9
- ^ Granatstein, pp. 13–14
- ^ Zuehlke, p. 25
- ^ Ellis, p. 140
- ^ Jump up to: a b c Granatstein, p. 18
- ^ Ellis, p. 78
- ^ Ellis, p. 81
- ^ Buckingham 2004, p. 88.
- ^ Williams, p. 24
- ^ Jump up to: a b Wilmot, p. 273
- ^ Ford, pp. 28–29, 42
- ^ Ford, p. 17
- ^ Scarfe, p. 18
- ^ Jump up to: a b Wilmot, p. 274
- ^ Ford, pp. 36-37, 40-41
- ^ Ford, p. 37
- ^ Ford, pp. 37, 42
- ^ Ford, p. 47
- ^ Wilmot, pp. 251, 255, 270, 273
- ^ Kaufmann & Kaufmann, pp. 196–197
- ^ Jump up to: a b Granatstein, p. 19
- ^ Wieviorka, p. 157
- ^ Jump up to: a b Saunders, p. 35
- ^ Ford, pp. 32, 49
- ^ Jump up to: a b c Notes on Operations of 21 Army Group, p. 3
- ^ Buckingham, p. 145
- ^ Harclerode,p. 319
- ^ Ford and Gerrard, p. 16.
- ^ Jump up to: a b Copp, p. 37
- ^ Beevor, p. 29
- ^ Ford, p. 23
- ^ Jump up to: a b D’Este, p. 117
- ^ Buckley, p. 20
- ^ Ford, p. 65
- ^ Jump up to: a b c d e Joslen, pp. 584–5.
- ^ Jump up to: a b Pakenham-Walsh, pp. 335–6.
- ^ Watson & Rinaldi, p. 124.
- ^ Morling, p. 221.
- ^ Rogers p20
- ^ Jump up to: a b 80 AA Bde Operation Order No 1, 20 May 1944, in 80 AA Bde War Diary 1944, The National Archives (TNA), Kew, file WO 171/1085.
- ^ Jump up to: a b Routledge, pp. 305–7.
- ^ 3 Division at Royal Artillery 1939–45.
- ^ Thompson, p.133-139
- ^ Jump up to: a b c d Ford and Gerrard, p. 13.
- ^ Thompson, p.139
- ^ Thompson, p.139-140
- ^ Mitcham, p. 18.
- ^ Von Luck, p.178-9
- ^ Thompson, p.151
- ^ Weal 2000, pp. 81.
- ^ de Zeng 2007, p. 183, 190.
- ^ Ford, pp. 86, 112
- ^ Ford, p. 90, 96
- ^ Keegan, p. 143.
- ^ Ellis, p. 250
- ^ Van der Vat, p. 139
- ^ Taylor, p. 76
- ^ Clark, pp. 32–33
- ^ Clark, pp. 31–32
- ^ Hart, p. 108
- ^ Jump up to: a b Scarfe, pp. 68–69
- ^ Jump up to: a b Fortin, p. 30
- ^ Jump up to: a b Copp (2004), p. 113
- ^ Jump up to: a b Williams, p. 131
- ^ Bercuson, p. 222
- ^ Trew, p. 102
References[]
- Bauer, Eddy (1983). Spelet vid konferensbordet. Bokorama. ISBN 91-7024-017-5.
- Beevor, Antony (2009). D-Day: The Battle for Normandy. Viking. ISBN 978-0-670-88703-3.
- Buckingham, William F. (2005). D-Day The First 72 Hours. Tempus Publishing. ISBN 0-7524-2842-X.
- Buckley, John (2006) [2004]. British Armour in the Normandy Campaign 1944. Abingdon: Taylor & Francis. ISBN 0-415-40773-7. OCLC 154699922.
- D'Este, Carlo (2004) [1983]. Decision in Normandy: The Real Story of Montgomery and the Allied Campaign. London: Penguin Books. ISBN 0-14-101761-9. OCLC 44772546.
- Copp, T. (2004) [2003]. Fields of Fire: The Canadians in Normandy. Toronto: University of Toronto Press. ISBN 0-8020-3780-1. OCLC 56329119.
- Ellis, Major L. F.; Allen R.N., Captain G. R. G.; Warhurst, Lieutenant-Colonel A. E. & Robb, Air Chief-Marshal Sir James (1962). Butler, J. R. M. (ed.). Victory in the West: The Battle of Normandy. History of the Second World War United Kingdom Military Series. I (Naval & Military Press 2004 ed.). HMSO. ISBN 1-84574-058-0.
- Ford, Ken (2004). Sword Beach. Battle Zone Normandy. Sutton Publishing. ISBN 0-7509-3019-5.
- Ford, Ken; Howard Gerrard (2002). D-Day 1944: Sword Beach & British Airborne Landings. 3. Osprey Publishing. ISBN 0-8117-3384-X.
- Kaufmann, J. E.; Kaufmann, H. W. (2003). Fortress Third Reich. Da Capo Press.
- Fortin, Ludovic (2004). British Tanks in Normandy. Histoire & Collections. ISBN 2-915239-33-9.
- Mitcham Jr., Samuel W. (2007). Retreat to the Reich: The German Defeat in France, 1944. Stackpole Books. ISBN 978-1-84067-136-0.
- Harclerode, Peter (2002). Go To It! The Illustrated History of the 6th Airborne Division. Caxton Editions. ISBN 1-84067-136-X.
- Joslen, H. F. (2003) [1990]. Orders of Battle: Second World War, 1939–1945. Uckfield, East Sussex: Naval and Military Press. ISBN 978-1-84342-474-1.
- Col L.F. Morling, Sussex Sappers: A History of the Sussex Volunteer and Territorial Army Royal Engineer Units from 1890 to 1967, Seaford: 208th Field Co, RE/Christians–W.J. Offord, 1972.
- Maj-Gen R.P. Pakenham-Walsh, History of the Corps of Royal Engineers, Vol IX, 1938–1948, Chatham: Institution of Royal Engineers, 1958.
- Rogers, J & D (2012). D-Day Beach Force. The Men Who Turned Chaos into Order (1 ed.). Stroud: The History Press. p. 20. ISBN 9780752463308.
- Brig N.W. Routledge, History of the Royal Regiment of Artillery: Anti-Aircraft Artillery 1914–55, London: Royal Artillery Institution/Brassey's, 1994, ISBN 1-85753-099-3
- Scarfe, Norman (2006) [1947]. Assault Division: A History of the 3rd Division from the Invasion of Normandy to the Surrender of Germany. Stroud, Gloucestershire: Spellmount. ISBN 1-86227-338-3.
- Stewart, Andrew. Caen Controversy: The Battle for Sword Beach 1944 (2014) online review
- Graham E. Watson & Richard A. Rinaldi, The Corps of Royal Engineers: Organization and Units 1889–2018, Tiger Lily Books, 2018, ISBN 978-171790180-4.
- Weal, J. (2000). Ju 88 Kampfgeschwader on the Western Front. Oxford: Osprey. ISBN 1-84176-020-X.
- Williams, Andrew (2004). D-Day to Berlin. London: Hodder & Stoughton. ISBN 0-340-83397-1. OCLC 60416729.
- Wilmot, Chester (1997) [1952]. The Struggle For Europe. Ware, Hertfordshire: Wordsworth Editions. ISBN 1-85326-677-9. OCLC 39697844.
- Zaloga, Steven J.; Hugh Johnson (2005). D-Day Fortifications in Normandy. Osprey. ISBN 1-84176-876-6.
- Von Luck, Hans (1989). Panzer Commander. New York: Dell. ISBN 0-440-20802-5.
- Thompson, R.W. (1968). D-Day, Spearhead of Invasion. New York: Ballantine.
- Zeng, H. L. de; Stankey, D. G; Creek, E. J. (2007). Bomber Units of the Luftwaffe 1933–1945: A Reference Source. I. Birmingham: Ian Allan Publishing. ISBN 978-1-85780-279-5.
External links[]
- D-Day-Overlord Sword Beach
- Photos de Sword Beach
- http://www.dday.co.uk/page30.html
- Sword Beach United Kingdom Ministry of Defence
- D-Day : Etat des Lieux : Sword Beach
Coordinates: 49°18′23″N 0°19′16″W / 49.30639°N 0.32111°W

- Operation Overlord
- Operation Neptune
- Battle for Caen
- Battles of World War II involving Germany
- Battles of World War II involving France
- Battles of World War II involving the United Kingdom
- Beaches of Metropolitan France
- Landforms of Normandy