2nd West Virginia Cavalry Regiment
| 2nd West Virginia Cavalry Regiment | |
|---|---|
 | |
| Active | September 1861 – June 30, 1865 |
| Disbanded | June 30, 1865 |
| Country | United States |
| Allegiance | Union |
| Branch | Cavalry |
| Size | Regiment |
| Engagements |
|
| Commanders | |
| Colonel | William M. Bolles 1861–62 John C. Paxton 1862–63 William H. Powell 1863–64 |
| Lt. Colonel | David Dove 1863–64 John J. Hoffman 1864 James Allen 1864–65 |
The 2nd West Virginia Cavalry Regiment served in the Union Army during the American Civil War. It was organized in Parkersburg, Virginia (now West Virginia) during September 1861. Most of the original members of this regiment were from southeastern Ohio, and planners thought that this regiment would become the 4th Ohio Cavalry. Their application was rejected by the governor of Ohio, so the unit became the 2nd Regiment of Loyal Virginia Volunteer Cavalry. The "Loyal Virginia" part of the name was replaced with "West Virginia" after the state of West Virginia was officially admitted to the Union in 1863. Today, the National Park Service lists them as 2nd Regiment, West Virginia Cavalry under a heading of Union West Virginia Volunteers.
The regiment's first full–fledged war experience happened in early January 1862 in northeastern Kentucky, where they assisted the command of Colonel James A. Garfield. For the next two years, most of the regiment's fighting was in the mountainous backwoods of what later became the southern portion of West Virginia, especially the Kanawha River Valley. During the Kanawha Campaign in September 1862, the 2nd Regiment of Loyal Virginia Volunteer Cavalry cleared away Confederate cavalry that intended to prevent a retreating Union Army from reaching the safety of Ohio. By 1864, the regiment was part of the Army of West Virginia, and spent much of its time fighting in the western portion of today's state of Virginia. It participated in General David Hunter's unsuccessful raid on Lynchburg. It also participated in Union General Philip Sheridan's Shenandoah Valley Campaign, playing an important part in the Third Battle of Winchester.
On November 28, 1864, about 240 members of the regiment completed their 3-year enlistment and mustered out. The regiment was then reorganized into five companies. By the end of 1864, the regiment was part of General George Armstrong Custer's 3rd Division, Cavalry Corps—which, along with another division, remained under the command of General Sheridan. Sheridan's two cavalry divisions continued to fight in the Shenandoah Valley, and were responsible for eliminating Confederate General Jubal Early's Army of the Valley from the war. During March 1865, Sheridan moved his two divisions eastward toward Petersburg, Virginia. The regiment, as part of Capehart's Fighting Brigade in Custer's division, was part of a crucial cavalry charge in the Union victory at the Battle of Sailor's Creek. The regiment was also present during the Appomattox Campaign and the surrender of Confederate General Robert E. Lee's Army of Northern Virginia. After the war, the 2nd West Virginia Cavalry participated in the Grand Review of the Armies, and was mustered out on June 30, 1865. Four men from the regiment received the United States of America's highest military award, the Medal of Honor.
Formation and organization[]

Recruiting for the 2nd Regiment of Loyal Virginia Volunteer Cavalry began in September 1861 after an appeal by President Abraham Lincoln earlier in July. The rebellion in the southern states, which began earlier in the year, had lasted longer than expected—and many of the war's original recruits had been asked to commit to only three months of service.
Most of the recruits for this new cavalry regiment were from southeastern Ohio, including the counties of Lawrence, Meigs, and Washington—all counties located along the Ohio River border with Virginia. The nearby counties of Jackson, Vinton, and Morgan were also major sources for recruits. Additional recruits were from Putnam and Monroe counties.[1] Company I was organized in Mason City, (West) Virginia, which is located along the Ohio River.[2] Volunteers for the new cavalry regiment committed to serve for 3 years.[3] One company of recruits already had military experience. Company H consisted mostly of men who had completed their 3-month commitment at the beginning of the war as part of 18th Ohio Infantry.[4]
Organizers originally planned for the regiment to be the 4th Ohio Cavalry.[5] However, Ohio's governor William Dennison refused to accept the unit's application, stating that he had instructions to recruit no more cavalry.[1] After being rejected in Ohio, the organizers sought acceptance from an alternative government for the state of Virginia that was composed of western Virginia counties that refused to accept Virginia's succession from the United States.[Note 1] This restored government of Virginia was located in Wheeling, and had a provisional governor. The provisional governor, Francis Harrison Pierpont, accepted the regiment's application with approval from the United States Secretary of War.[1] The ten original companies of the unit reported at Parkersburg, Virginia (now West Virginia) in mid-September, 1861. The regiment was originally named 2nd Regiment of Loyal Virginia Volunteer Cavalry. Its first commander was Colonel William M. Bolles, and deputy commander was Lieutenant Colonel John C. Paxton. John J. Hoffman was one of the regiment's two majors.[8] Among the other original officers, William H. Powell was captain of B Company, and David Dove was captain of H Company.[4]
The regiment was armed by December 15, 1861. Most of the regiment was equipped with horse pistols, a poor weaponry choice for a cavalry unit.[4] Horse pistols were 58-caliber hand guns that fired a single shot.[9] They were typically carried in pairs—one in each holster on the sides of the horse. They had a long barrel for a hand gun—nearly 12 inches (30.5 cm) long. Horse pistols were accurate up to about 25 yards (22.9 m).[10] A portion of the regiment received shortened muzzle-loading Enfield rifles. This British import fired a .577-caliber projectile, and was popular with both sides at the beginning of the war. Like the horse pistol, it needed to be reloaded after firing a single shot.[11] Both weapons were difficult for a rider to reload while mounted—and had significant recoils.[4] The men were also issued sabers, which were good quality, but not always useful in the mountainous terrain of western Virginia.[4]
After receiving their weapons, the regiment was ordered to Guyandotte in (West) Virginia's Cabell County. This small Ohio River community is located close to Virginia's border with Ohio and Kentucky, and is now part of Huntington, West Virginia (which did not exist at the time). At Guyandotte, the regiment received its horses and conducted more drills.[4]
Kanawha Valley[]

During 1862–1863, the 2nd Loyal Virginia Volunteer Cavalry usually camped in (or near) the Kanawha River Valley, in the southwestern portion of the present West Virginia. The regiment's first serious warfare occurred on January 8, 1862, near Louisa, Kentucky. Assisting Colonel James A. Garfield, the regiment combined with additional cavalry and infantry to drive rebels from the area.[4] This was also the day the regiment experienced its first loss of life in combat.[Note 2] A few days later, the 2nd Loyal Virginia Cavalry returned to its winter quarters in Guyandotte.[5] Garfield would eventually become the 20th President of the United States.[13]
In April 1862, the regiment was divided into two battalions consisting of five companies each.[14] One battalion was ordered to report to General Jacob Dolson Cox (commanding the Kanawha Division) at Flat Top Mountain. Much of its work for the next few months involved removing "bushwhackers" from Raleigh, Fayette, and Wyoming counties in the southern portion of the present West Virginia.[14]
The other battalion joined some Ohio infantry regiments to form Cox's 3rd Brigade of the Kanawha Division, which was commanded by Colonel (later Major General) George Crook. This brigade normally operated apart from Cox.[15] Its camp was located at Meadow Bluff, west of Lewisburg in Greenbrier County.[16]
Crook, Heth, and Lewisburg[]

On May 23, 1862, Colonel Crook's 3rd Brigade routed rebel infantry in a conflict where the shooting lasted for only 27 minutes. Rebel casualties were 72 men killed, over 100 wounded, and 157 men taken prisoner. They also lost four cannon, 300 small weapons, and 25 horses. Crook's brigade lost 13 killed, 50 wounded (including Crook, who was shot in the foot), and 6 missing.[17] The feat was accomplished by taking advantage of aggressive rebel soldiers and a hostile town. Crook had learned that a large rebel infantry under the command of General Henry Heth was moving toward Lewisburg. Crook positioned his brigade at the far end of the town, and sent a small group of pickets to the opposite end where the rebels would approach. Heth's rebels raced into town after the pickets, urged on by the pro-rebel local population. The rebels were quickly ambushed in a short action that ended after a charge by Union infantry and cavalry.[16] The 2nd Loyal Virginia Cavalry battalion had been held out of the fighting, but was used to chase the fleeing rebels. The rebels escaped by burning the Greenbrier Bridge.[18]
On June 23, Crook's brigade searched for Heth's infantry again, but Heth withdrew to the mountains.[16] On the same day, Colonel William M. Bolles resigned from the 2nd Loyal Virginia Cavalry.[19] In the following months, three officers were promoted. Lieutenant Colonel Paxton was promoted to colonel during July. During August, Major Rollin L. Curtis was promoted to lieutenant colonel, and Captain William H. Powell was promoted to major. Additional promotions occurred within the companies.[19]
Kanawha Valley Campaign[]
On August 14, 1862, Cox began moving his Kanawha Division toward Washington as reinforcement for Major General John Pope's Army of Virginia.[20] Exceptions to Cox's orders were the 2nd Loyal Virginia Cavalry and two regiments of Ohio infantry, which remained in the area for defensive purposes.[21] The three regiments moved to Kanawha Falls in what is now south central West Virginia, at the beginning of the Kanawha River—which flows to the Ohio River. They were put under the command of Colonel Joseph Andrew Jackson Lightburn. Thus, the two battalions of 2nd Loyal Virginia Cavalry were reunited, with Colonel John C. Paxton commanding the cavalry regiment.[22] Confederate leaders soon learned of the force reduction, and made plans to drive the Union army out of the Kanawha Valley.[23]

In early September 1862, Colonel Lightburn became aware of rebel cavalry led by Colonel Albert G. Jenkins, which invaded Ohio. After a brief incursion into Ohio, Jenkins positioned his cavalry at Barboursville, which blocked one of Lightburn's possible routes to the safety of the Ohio River. Jenkins also prepared to move toward the Kanawha River and Charleston—which could block all of Lightburn's retreat routes to Ohio.[24] Lightburn also received news that the Confederate General William W. Loring was advancing from the south with a force rumored to be between 8,000 and 10,000 men.[25] (The actual number was 5,000 plus new recruits.[26]) Lightburn faced the possibility of confronting an army (Loring) that he thought was much larger than his while having no easy way to retreat because of Jenkins.[27]
Lightburn responded to the threat by splitting his army into two brigades plus a few small posts. One brigade, commanded by Colonel Edward Siber, was positioned on the south side of the Kanawha River (between the river and Loring). The other brigade, commanded by Colonel Samuel A. Gilbert, was positioned on the north side of the river.[28] Lightburn also sent six companies of the 2nd Loyal Virginia Cavalry in pursuit of Jenkins's cavalry.[Note 3]
The cavalry pursuing Jenkins was led by Colonel Paxton, and the advance guard consisted of Company B led by Major William Powell. On September 8, Powell's advance group attacked Jenkins's rebel camp outside of Barboursville. The camp was captured, and Jenkins himself barely escaped. The rebel force, which was much larger than Paxton's cavalry, was driven up (southward) the Guyandotte River. It was discovered that Jenkins planned to move his cavalry toward Charleston the next day—to intercept Lightburn if his Union Army retreated.[30]
Siber's brigade moved from Raleigh Court House to Fayette Court House, which was easier to defend.[Note 4] His brigade was attacked (and briefly surrounded) by Loring on September 10, prompting a retreat toward Ohio with continuous skirmishing from Gauley Bridge to Charleston.[28] The portion of the 2nd Loyal Virginia Cavalry that was not pursuing Jenkins' cavalry was involved in fighting in the region between Charleston and Fayetteville/Fayette Court House. Siber was assisted in his brigade's escape from Fayetteville by a 25-man detachment from the 2nd Loyal Virginia Cavalry.[32] On September 12, Lieutenant George K. Weir from the regiment's Company I was killed near Fayetteville.[33]
After the 2nd Loyal Virginia Cavalry removed Jenkins' cavalry from the Ohio River area, it escorted Lightburn's retreating army and supplies to Ohio. Over 700 wagons were involved in this retreat.[32] Lightburn and his infantry crossed the Ohio River into Ohio, and moved to the Ohio side of Point Pleasant, Virginia. The 2nd Virginia did not cross the river, and camped on the Virginia side at Point Pleasant.[34] Lightburn's report said "The Second Virginia Cavalry, under Colonel Paxton, did good service in keeping Jenkins' force at bay, thereby preventing an attack in our rear. I wish, also, to state that Colonel Paxton, with 300 men, attacked Jenkins' whole force (from 1,200 to 1,500), and drove them from Barboursville, which, no doubt, kept them from an attempt to harass our retreat."[32]
Colonel Lightburn was replaced shortly after the retreat.[34] General Cox returned to the area and reorganized the cavalry and infantry. The Confederate Army did not remain in Charleston, and Cox returned there on October 20, 1862.[35] The 2nd Loyal Virginia Cavalry made winter quarters 12 miles (19.3 km) away at Camp Piatt on the Kanawha River.[36] Camp Piatt was strategically located at the intersection of the Kanawha River, James River, and the Kanawha Turnpike.[37] Union soldiers and supplies were often moved by steamboat up the Kanawha River to this location.[38] On November 16, Cox put newly promoted Brigadier General George Crook in command of the Kanawha Division.[36]
Sinking Creek raid[]

During November 1862, the 2nd Loyal Virginia Volunteer Cavalry camped a few miles upriver from Charleston. On November 23, Colonel Paxton was ordered to attack two rebel cavalry camps in Sinking Creek Valley, located north of Lewisburg near the Greenbrier County border. One regiment of infantry, which was camped in Summerville, was supposed to assist Paxton. The cavalry departed on the next day, and traveled over 80 miles (128.7 km) in two days. They used less-traveled roads to conceal their movement, and endured a snowstorm while ascending a mountain during the latter half of their journey. The infantry that was supposed to assist them was caught in a rain storm and then the same snow storm. The infantry men were soaking wet and their gear was freezing. After conferring with Paxton, the infantry returned to its camp.[39]
The cavalry continued with its plan to attack. Paxton sent the regiment's advance guard, led by Major Powell, down the mountain to scout the rebel camps in Sinking Creek Valley. Each man in the 2nd Loyal Virginia Cavalry's 22-man advance guard was armed with two six-shot revolvers and a saber. The advance guard discovered that the rebels in the first camp were focused on staying warm, and many did not have their one-shot muskets loaded. Powell and his advance guard decided to try to capture the camp by themselves, and were successful in persuading a 500-man rebel camp to surrender. Rebel weapons were destroyed, and over 100 prisoners on horses were brought up the mountain to the remaining portion of the regiment. Union casualties in the raid were 2 horses killed.[40]
Because of the two rebel cavalry units in the area (the second group at Sinking Creek plus another unit near Lewisberg), the regiment began their return home late that afternoon. The rebel pursuit was ineffective, although there was some skirmishing with the 2nd Loyal Virginia's rear guard. Ten more of the regiment's horses died from exhaustion on the trip home. The nighttime portion of this return trip was conducted non-stop. Other than horses and weather-related injuries (two men were hospitalized with frozen feet), the regiment suffered no casualties during a 70-hour excursion. The leaders of the advance guard, William H. Powell and Jeremiah Davidson, were promoted shortly afterwards—Powell from major to lieutenant colonel, and Davidson from second lieutenant to first lieutenant.[41] Years after the war, Powell was awarded the Medal of Honor for his performance in the Sinking Creek raid. In 1889, General George Crook said that he regarded the "expedition as one of the most daring, brilliant and successful of the whole war."[42]
Disaster in Lewisburg[]

During March 1863, Lieutenant Colonel Powell became severely ill, and was unable to recover at the camp. He submitted his resignation from the cavalry, and returned to his home in Ohio.[43] Thus, the 2nd Loyal Virginia Cavalry lost the man who led the attacks at Barboursville and Sinking Creek—and was well respected by Union and Confederate generals.[Note 5] On May 1, 1863, Colonel Paxton was ordered to scout Lewisburg. The regiment rode about 75 miles (120.7 km) from Camp Piatt, encountering a few bushwhackers along the way. About 25 miles (40.2 km) outside of Lewisburg, Paxton was informed that a battalion of rebels was camped near Lewisburg. Paxton hoped to surprise the rebels, and continued advancing (down Brushy Mountain) after dark. The advance guard, led by Captain David Dove, was discovered by a small group of rebels.[47]
Against the advice of Captain Dove, Paxton continued to advance the regiment. The element of surprise was gone, and it was dark. Dove knew the probability of being attacked was high, and he took steps to minimize the danger to the main column. The advance guard was ambushed around 1:00 am on May 2. Dove received a severe wound on his foot, and two of his men were killed.[48] The regiment's total losses were four killed, eight wounded, and four missing—plus 28 horses killed.[49] Paxton, who was popular with the regiment, was dismissed by General Eliakim P. Scammon after the regiment returned to camp.[49]
At the time of Paxton's dismissal, Powell's resignation had yet to be accepted—although he was at home in Ohio regaining his health. After a petition by the regiment, Powell was persuaded to retract his resignation. He was promoted to colonel and became the regiment's commander effective May 13, 1863.[50] Powell soon had a new second in command. On May 18, while Captain Dove was recovering from his wound, he was promoted to lieutenant colonel.[51]
Wytheville Raid[]

The Wytheville Raid was an expedition from the Union camps in the Kanawha Valley to Wytheville, Virginia. The raid was first organized on July 13, 1863. As it was led by Colonel John Toland, it is also known as Toland's Raid. Wytheville had a strategic significance because of a nearby lead mine. The lead mine was the source for much of the lead used by the Confederacy to produce bullets for its army.[52] A salt mine, located west of Wytheville, was also important to the Confederacy.[53] Another target was the Virginia and Tennessee Railroad, which served both mines. The railroad was also important for transporting Confederate soldiers and supplies.[54]
By this time, the state of West Virginia had joined the union—and the 2nd Regiment of Loyal Virginia Volunteer Cavalry was now known as the 2nd West Virginia Volunteer Cavalry Regiment.[7] Seven companies of the cavalry regiment left Camp Piatt and joined with the 34th Ohio Volunteer Infantry (who were also mounted) to form a brigade. The cavalry totaled to 365 men, while the infantry totaled to 505. The cavalry's commander, Colonel William H. Powell, was second in command of the entire brigade. Colonel John T. Toland, from the 34th Ohio Infantry, was the brigade commander.[55] During the trip to Wytheville, the Union force was joined (and resupplied) by two regiments from the 1st West Virginia Cavalry. One company from the 2nd West Virginia returned to camp with the empty supply wagons.[56]
After several skirmishes and an aborted attempt to sever the rail line west of Wytheville, the brigade arrived at the town. Colonel Toland ordered three companies of cavalry to charge in columns down Wytheville's main street. This was not the preference of Colonel Powell, but Toland "vigorously renewed in unnecessary language" his order to Powell.[57] This first group of Union cavalry was ambushed by a rebel group consisting of Confederate soldiers, Home Guard, and local citizens—who had been warned that a large group of Union horsemen was heading in their direction. Many of the local citizens fired their weapons at the cavalry from inside the cover of homes and businesses—while their targets had been ordered to ride in column down the town's fenced main street. One soldier called the street "an avenue of death".[57]

Captain Dennis Delaney of the 1st West Virginia Cavalry was at the front of the Union charge, and he was shot dead. His first lieutenant was mortally wounded.[58] Both colonels were shot within the first 10 minutes of the action.[59] Colonel Powell was seriously wounded while he was with the lead group of three regiments, causing Colonel Toland to move to the front. With Powell disabled, Major John J. Hoffman became commander of the cavalry regiment.[60] Hoffman was leading the second group of cavalrymen that charged into the "avenue of death". He was thrown over his horse after it was killed from gunfire, which temporarily stunned him.[58] His column was prevented from advancing because of numerous dead horses in the road—and also trapped on the street by fences. Colonel Toland arrived at the "avenue of death", and refused to take cover despite warnings from the cavalry regiment's Company H. He was shot through the heart by a marksman shooting from a two-story house.[58]
The 2nd West Virginia, without its two cavalry leaders, became disorganized.[Note 6] The cavalry was led by company commanders (typically captains or lieutenants), who guided only their own company.[62] The infantry commander, Lieutenant Colonel Freeman E. Franklin wisely sent his infantry forward dismounted, and they were "not sitting ducks like the cavalry."[62] Major Hoffman's portion of the cavalry, which was dismounted and trapped on the street, eventually pushed the fencing down. They were joined by infantry and fought from building to building.[57] The Union soldiers burned the buildings that had been used by the rebels as cover when they shot at the blue-coated horsemen. Despite significant losses of horses and officers, the Union brigade was eventually able to secure the town. However, the Union Army did not achieve its major goals: little damage was done to the railroad, and the lead and salt mines were not damaged.[63]
Fearing reinforcements from the Confederate army, especially after hearing a distant train whistle, the Union brigade left Wytheville less than 24 hours after it entered.[63] The Union brigade retreated toward its camps in West Virginia, and repelled attacks on July 19 and 20.[64] It reached the safety of Union lines at Fayetteville on July 23, having received no rations for four days.[65] Losses for the entire excursion (including the trip to Wytheville and the return to camp) were 14 killed, 32 wounded, 17 taken prisoner, and 26 missing.[58] An estimated 300 horses died.[65]
Colonel Powell's wound received at Wytheville was judged to be fatal by surgeons for both the Union and Confederate armies. When the Union army departed from Wytheville, Powell was left behind with other wounded soldiers who could not be moved. These men became prisoners of the Confederacy. The citizens of Wytheville blamed Powell for the burning of many of the community's homes. For his own safety, Powell was hidden.[66] Confederate General Sam Jones wanted Powell held accountable for the burning of two buildings from an earlier raid, and added that Powell was "... one of the most dangerous officers we have had to contend with ..."[46] Surprisingly, Powell recovered enough from his wound that he was moved to a Richmond prison. While in captivity there, he was fed only bread and water, and slept on the floor.[67] Lieutenant Colonel David Dove, who was recovering from a severe wound suffered earlier in the year, returned to camp in October. During Powell's absence, Dove was in command of the regiment.[51]
Duffié[]

For the rest of 1863, the regiment spent most of its time drilling and scouting. General Henry Halleck noted in 1863 that the entire Union force in western Virginia/West Virginia was "... too small to attempt any campaign by itself" and "acted merely on the defensive in repelling raids and breaking up guerrilla bands."[68] During August, Brigadier General Alfred N. Duffié, a veteran of European wars, became the commander of all cavalry in the Kanawha Valley. His headquarters, and the regiment, was located in Charleston. The regiment's Company H was trained to be Duffié's bodyguards.[69] Duffié was an excellent drillmaster, and his drills helped prepare the regiment for future fighting in the Shenandoah Valley. He was not as good at fighting as he was at training. He was eventually transferred, and later captured.[Note 7]
Lewisburg again[]
During November and December, the regiment was part of two more expeditions to Lewisburg.[71] General Duffié led the November expedition, and missed intercepting the retreating Confederates at Lewisburg by seven hours. The Confederate army had been defeated at the Battle of Droop Mountain on November 6, 1863, by General William W. Averell.[72] Duffié captured some Confederate supplies, including those of the rebel 22nd Virginia Infantry. On the return trip to Charleston, the soldiers rode through five inches of snow on Sewell Mountain.[73]
General E. P. Scammon led the December expedition, which was a diversion with mixed results. The purpose of the diversion was to draw Confederate forces away from a Union force led by General Averell, which was conducting a raid on the Virginia and Tennessee Railroad near Salem, Virginia. Although Scammon captured Lewisburg, he soon retreated—making the situation for Averell more difficult. Beginning December 1863, the regiment became part of the 3rd Brigade, 3rd Division, Army of West Virginia.[71]
Powell returns[]
Colonel Powell was released from Libby Prison in Richmond on January 29, 1864. He was exchanged for Colonel Richard H. Lee, a relative of Confederate leader Robert E. Lee. Powell went home to Ironton, Ohio, where he continued to regain his health. Citizens from his home town donated money for a horse, and Powell received a saber and a pair of .44 caliber Colt Navy revolvers. Powell returned to Charleston, and took command of the regiment on March 20, 1864.[67]
Averell and the Virginia raid[]

During April 1864, the regiment became part of the 1st Brigade, 2nd Cavalry Division, Army of West Virginia.[71] General Crook returned to West Virginia to command the Army's infantry. General Averell became commander of the cavalry. On April 30, Crook and Averell departed Charleston for Virginia, using different routes, as part of a plan to attack the Virginia and Tennessee Railroad. The salt mine and lead mine located along the railroad were also targets.[74]
As the cavalry got closer to the salt mine, Averell discovered that the mine was defended by a large force of infantry and cavalry. He decided to abandon the planned attack on the salt mine, and proceeded toward Wytheville, intending to join with Crook's infantry.[74]
Entering the northern part of Wythe County, Virginia, on May 10, Averell's cavalry fought the Battle of Cove Mountain.[75] In this battle, Confederate forces under the command of General William "Grumble" Jones, assisted by John Hunt Morgan's Raiders, prevented the Union cavalry from moving through Cove Gap. General Averell's forehead was grazed by a bullet, and he temporarily removed himself from command.[76] General Duffié seemed to disappear, so the 2nd West Virginia's Colonel Powell directed all cavalry. The fighting ended at dusk, and the Confederates held the gap. The 2nd West Virginia Cavalry was nearly surrounded at least three times, but was able to prevent the division from suffering a disaster. The Union force survived this small battle because of the "heroics of the Ohioans of the 2nd West Virginia Cavalry".[77] Union losses were 114 casualties, including four killed from the 2nd West Virginia. Confederate losses are unknown.[78]
Since they were unable to pass through the gap in the mountains, the Union force moved over the mountains using a different (and more difficult) route with a local slave as their guide. Eventually they were able to destroy 26 bridges and portions of railroad track near Dublin, Virginia. Rainy weather caused the nearby New River to rise, and several men drowned while crossing—including a corporal from the 2nd West Virginia Cavalry. The rising river prevented pursuing Confederate soldiers from crossing.[79]
Averell's cavalry joined Crook's infantry on May 15, and they struggled to return to their Charleston base.[79] Ammunition was in short supply because some had been ruined by the rain and river. Rations were exhausted, clothing was soaked, and swollen feet became a problem. Counting only men from the 2nd West Virginia Cavalry, 188 men were bare footed after having to cut off their boots.[79] About 30 miles (48.3 km) of their return trip was made dismounted as the force took small obscure trails through the mountains. The division arrived at a base in Greenbrier County on May 18, having escaped pursuing Confederate forces led by General John McCausland and General William "Mudwall" Jackson (a cousin of Stonewall Jackson).[79]
Hunter's Lynchburg Campaign[]
On June 2, 1864, the 2nd West Virginia Cavalry (plus additional cavalry and infantry regiments) marched from Charleston towards White Sulphur Springs in eastern West Virginia. The men were poorly equipped, and over one third of the cavalry did not have horses. Their immediate destination was Stanton, Virginia. On June 7, they met two groups of infantry, and one division of cavalry, under the commands of Generals David Hunter and George Crook. Fresh supplies were issued at that time.[80]

The cavalry was reorganized on June 9, with General Duffié in command of the 1st Cavalry Division, and General Averell in command of the 2nd. The 3rd Brigade of the 2nd Cavalry Division was commanded by Colonel Powell, and it consisted of the 1st and 2nd West Virginia Cavalry regiments. The infantry was led by General Crook. General David Hunter was the commander of the entire cavalry and infantry force.[80]
Lexington[]
On June 10, Averell and Crook moved towards Lexington, Virginia, in the first part of an effort to capture Lynchburg. This series of raids and battles, the Lynchburg Campaign, is also known as "Hunter's Raid". The force arrived in Lexington on June 11.[80] Lexington, Virginia, is the home of the Virginia Military Institute (VMI), which produced numerous officers for the Confederate Army—including General Stonewall Jackson and General John McCausland. Lexington was occupied for several days, and General Hunter ordered VMI burned.[81] General Duffié's 1st Cavalry Division, which had taken a different route toward Lynchburg, rejoined Crook and Averell in Lexington. On June 14, Powell's brigade was sent forward to Liberty (today, Liberty is named Bedford), and drove away Confederate cavalry. During this time, Confederate reinforcements were arriving at Lynchburg.[82]
Lynchburg[]
On June 16, the entire Union force left Liberty and approached Lynchburg from the southwest. Confederate soldiers under the command of General Jubal Early arrived in Lynchburg by train on June 17. The Battle of Lynchburg was fought on June 17 and 18. Approximately 44,000 soldiers participated in this Confederate victory.[83] The Union force could not capture Lynchburg, and was forced to retreat as supplies dwindled. Powell's brigade briefly became cut off from the rest of the army when he was not immediately notified of the retreat. His cavalry reached Union lines near New London as the Confederate army was close to catching them.[84]
Retreat[]
A northern route of retreat had too many obstacles, so Hunter's force retreated westward toward Charleston—with the Confederate army in pursuit. On June 19, the 2nd West Virginia Cavalry was the rear guard. The regiment often had to fight dismounted. Averell's entire division fought for two hours near Liberty. His cavalry division fought until its ammunition was exhausted, and then was relieved by Crook's infantry. Averell lost 122 men.[84]
More skirmishes were fought at Bonsack and Mountain Cove, Virginia. The retreat route took the army through the communities of Salem, New Castle, and White Sulphur Springs. The army reached Charleston on July 1. Total losses were 940. For the 2nd West Virginia, the loss was 13 killed (4 near Salem, Virginia), 33 wounded, and 21 missing.[85]
Shenandoah Valley[]
On July 5, 1864, Lieutenant Colonel Dove resigned. He never recovered from his foot wound received in 1863 near Lewisburg, and died in 1868.[51] Major Hoffman was in command of the regiment during Dove's absence (and after Powell's promotion to brigade commander), and he was promoted to lieutenant colonel effective July 14, 1864.[86] On July 8, the regiment left Charleston, West Virginia, for Parkersburg—arriving on July 12. They boarded the Baltimore and Ohio Railroad with their horses on July 16, and began a three-day trip to the other side of the state. Their destination was the rail station at Martinsburg.[87] They were part of the 2nd Brigade, 2nd Cavalry Division, Army of West Virginia.[Note 8] The Army was commanded by General Hunter. The 2nd Cavalry Division was commanded by General Averell, and the 2nd Brigade of the 2nd Division was commanded by Colonel Powell.[89]
Battle of Rutherford's Farm[]

The Battle of Rutherford's Farm, also known as the Battle of Carter's Farm, occurred on July 20, about 4 miles (6.4 km) north of Winchester, Virginia.[90] Union General Hunter sent Brigadier General Averell from Martinsburg toward Winchester to meet a perceived threat to the Baltimore and Ohio Railroad from Early's Army of the Valley.[91] Averell encountered Confederate troops under the command of General Stephen Dodson Ramseur. Ramseur's division was ordered to assume a defensive position at Winchester, which would enable the main portion of Early's army to safely withdraw south from Berryville and Winchester to the more secure city of Strasburg and a hospital in Mount Jackson. (Early had no plan to attack the Baltimore and Ohio Railroad—it was more important for it to appear that he would attack it.)[92]
Against orders, Ramseur attacked Averell's smaller force.[93] The 2nd West Virginia Cavalry was called from reserve to assist the 3rd West Virginia Cavalry when Averell's flanks were threatened. The additional (and unexpected) cavalry caused a Confederate panic, and Averell won the battle.[94]
The Confederates were still able to evacuate Winchester (including a hospital), and Averell did not pursue the retreating rebels because he was unsure if the rest of Confederate General Early's army was nearby.[95] This Union victory was the second of three major Union victories won under the leadership of General Averell.[Note 9]
Battle of Kernstown II[]
In the days before this defeat of General Crook's Army of West Virginia, the 2nd West Virginia Cavalry, as part of the 2nd Brigade of the 2nd Cavalry Division, spent its time searching for the enemy to the south of Winchester. General Averell was commander of the 2nd Division, and Colonel Powell was commander of the 2nd Brigade. A small detachment of the 2nd West Virginia Cavalry found the enemy, and had to retreat back to the safety of Union lines by "vigorous use of the revolver and saber".[97] Both Averell and General Duffié (commander of the 1st Cavalry Division) reported that enemy infantry, artillery, and cavalry were in the area, but General Crook believed that many of the troops supporting Confederate General Early had returned to Richmond.[98] Crook's belief was an error on his part, and both Averell and Duffié made accurate reports.[99]

On July 24, Averell was ordered to conduct a flanking maneuver near Front Royal to cut off what Crook believed was a small band of Confederates. Averell encountered much more resistance then he was led to expect, and the Second Battle of Kernstown began. A major event for the 2nd West Virginia Cavalry in this battle was a charge at Confederate artillery. The charging regiment was forced to change course when the Confederate artillery began firing directly at them. Their altered course put them in an even worse prediciment—they were moving toward an area that contained concealed Confederate infantry. The regiment suffered casualties, and was forced to retreat.[100] It lost a lieutenant, a sergeant, and a few enlisted men.[101] Captain Jeremiah Davidson of Company E was shot twice and lost his horse after it was also shot. He was thought to be dying and left behind. Davidson survived by crawling to a nearby house where he was given medical attention.[100]
General Crook finally understood the situation as his infantry and cavalry fled north through Winchester.[102] He organized a more orderly retreat.[Note 10] Powell's brigade and an infantry brigade led by Colonel Rutherford B. Hayes (future President of the United States) were among the few organized units remaining.[105] They became the rear guard against the pursuing Confederate cavalry. At one point, the 2nd West Virginia Cavalry made a charge with sabers drawn—rescuing a portion of Hayes' brigade that became cut off from the rest of the command.[101]
The Confederates continued their pursuit on July 25. However, all soldiers were soaked in cold hard rain, and by now were hungry and thirsty. An ambush by Hayes' men brought the Confederate pursuit to a halt.[106] Powell's cavalry brigade was used to drive the Confederates back.[101] Crook was ordered to retreat north across the Potomac River, and the Confederates reoccupied Martinsburg (in addition to controlling Winchester). While most of Averell's division camped at Hagerstown, Maryland, the 2nd West Virginia Cavalry guarded a river crossing near Shepherdstown, West Virginia.[107]
Chambersburg and Moorefield[]
The regiment was part of a cavalry force commanded by General Averell that pursued Confederate Generals McCausland and Bradley Johnson after the rebels burned the Pennsylvania community of Chambersburg.[108] After multiple skirmishes and Confederate threats to burn more towns, McCausland's two brigades of cavalry were caught in Moorefield, West Virginia. In a surprise attack at dawn on August 6, 1864, Averell captured over 400 Confederates.[109] This ruined General Early's cavalry, and it was never again the dominant force it once was. In this battle, the 2nd West Virginia Cavalry was held in reserve while five other regiments attacked two rebel camps. Colonel Powell directed portions of the attack.[110]
Battle of Opequon[]

The Battle of Opequon, also known as the Third Battle of Winchester, began in the morning on September 19, 1864.[111] Some historians consider this the most important battle of the Shenandoah Campaign. Philip Sheridan's Army of the Shenandoah defeated Jubal Early's Army of the Valley. Union casualties were about 5,000 out of 40,000 men, while Confederate casualties were about 3,600 out of 12,000 men. Generals and colonels on both sides were killed, including Confederate Colonel George S. Patton Sr.—grandfather of the famous World War II tank commander, General George S. Patton. Confederate General Robert E. Rodes was killed, and Confederate cavalry generals Fitzhugh Lee and Bradley Johnson were among the wounded. General David Allen Russell, killed in action, was among the Union casualties.[112]
General Alfred T. Torbert was commander of the union cavalry. The 2nd West Virginia Cavalry was part of the 2nd Brigade (commanded by Colonel Powell), which was part of the 2nd Cavalry Division (commanded by General Averell). Powell's brigade was positioned on the northwest side of the battlefield between brigades led by Colonel James Schoonmaker and Colonel George Custer. During the battle, Powell sent the 2nd West Virginia Cavalry to the flank and rear of Confederate cavalry consisting of Virginians led by Colonel William H. F. Payne, which was facing Custer's brigade. Powell also sent the 3rd West Virginia Cavalry toward Payne's left flank.[113] The 2nd West Virginia Cavalry had been newly armed with 7-shot carbines, and found them very effective against an enemy that was driven from the area in panic.[114] During this time, Confederate General Fitzhugh Lee's horse was shot out from under him, but Lee escaped on another horse.[113]
Battle of Fisher's Hill[]

This battle occurred on September 21–22, 1864.[115] General Sheridan considered this battle a continuation of the Battle of Opequon near Winchester. General Early's Confederate army was pursued from Winchester to Fisher's Hill, where the rebels had strong fortifications and an advantageous location given the terrain. The 2nd West Virginia Cavalry regiment was still part of the 2nd Brigade led by Colonel Powell, who reported to General Averell. In this battle, the regiment initially engaged in some skirmishing while dismounted—the terrain made it difficult to fight while mounted.[116]
Using a night march and diversions by other segments of the army, General Crook secretly positioned his infantry to the rear of the Confederate line. Averell's cavalry division, plus a division of infantry led by General James B. Ricketts, created the diversion that enabled Crook's two infantry divisions to remain concealed while they positioned themselves near Little North Mountain. Crook's fighters, who were experienced in fighting in mountainous terrain, flanked the west side of the Confederate line. Crook's surprise attack broke through the Confederate lines, and was the major reason for the Union victory. Powell's cavalry brigade pushed through the gap created by Crook, and chased rebels as they fled south. The chase continued throughout the evening.[116]
After the battle, Sheridan pressured his officers to pursue Early's retreating army. On September 23, Sheridan became impatient with the cautious commander of the 2nd Cavalry Division, General Averell. Sheridan replaced Averell with Colonel Powell, who had been one of Averell's brigade commanders.[116] Powell was promoted to brigadier general shortly afterwards.[117] Colonel Henry Capehart was designated commander of Powell's old brigade, and Capehart's brother, Charles, became commander of Capehart's 1st West Virginia Cavalry regiment. Major Hoffman remained commander of the 2nd West Virginia Cavalry regiment.[118] Powell's 2nd Cavalry Division pursued Early further south. During this pursuit, Confederate cavalry led by General Williams Carter Wickham attempted a flanking maneuver on Powell's right, but was repulsed by artillery and a charge by the 2nd West Virginia Cavalry.[Note 11]
Battle of Cedar Creek[]

The Battle of Cedar Creek occurred on October 19, 1864. Jubal Early's Confederate Army appeared to have a victory until General Sheridan rallied his troops to a successful counterattack. Although Union casualties were more than double those of the Confederates, this battle is considered a Union victory, and Confederate troops were driven from the battlefield. The Union troops recaptured all of their artillery lost earlier in the battle, and 22 additional cannons belonging to Early's army.[120] The 2nd West Virginia Cavalry did not participate in this battle until near the end. The regiment advanced toward Front Royal right before the final cavalry charge by Merritt's and Custer's divisions. This positioning prevented the Confederate cavalry under General Lunsford L. Lomax from flanking the Union force.[121] The Union victory helped President Abraham Lincoln get re-elected a month later.[120]
Muster out[]
On November 8, 1864, the regiment left their Front Royal, Virginia, camp for Martinsburg, West Virginia. They stopped near Winchester, Virginia, and voted in the presidential election. After a short period, 240 officers and enlisted men departed for Wheeling, West Virginia. These were the men who had completed their 3-year enlistment, and did not re-enlist.[122] These men were discharged on November 28, 1864. Among those discharged was Lieutenant Colonel John J. Hoffman, commander of the regiment.[123] General William H. Powell did not remain with the army much longer, as he resigned to attend to family issues. His resignation was reluctantly approved after a protest that the army could not afford to lose an officer of his quality, and he gave his farewell speech on January 10, 1865.[124]
New 2nd West Virginia Cavalry[]

After 240 men mustered out of the regiment, it was reorganized into seven companies. Since most of the regiment's companies were depleted from either lack of re-enlistments or casualties, some of the companies were combined. Company I was combined into Company B, Company H was combined into Company C, Company E was composed of men from Company G and Company K, and a new Company G consisted of men from Company M. The new regiment commander was Lieutenant Colonel James Allen. His second-in-command was Major Edwin S. Morgan.[125]
General Sheridan now led an 8,000-man force, and it consisted of two cavalry divisions.[126] General Wesley Merritt was Sheridan's cavalry commander. General Thomas Devin led the 1st Division, and the 3rd Division was commanded by George Armstrong Custer, who was now a general.[127] The 2nd West Virginia Cavalry became part of the 3rd Brigade, 3rd Division Cavalry Corps. The brigade consisted of the 1st, 2nd, and 3rd West Virginia Cavalry regiments, and was commanded by Colonel Henry Capehart.[128] The divisions spent about six weeks in winter quarters, where they rested and were given fresh clothing. On February 27, they left Winchester and moved south. Their purpose was to eliminate Jubal Early's Confederate army.[129]
On March 1, a few miles north of Stanton, Virginia, the 3rd Division encountered Confederate cavalry (known as the Laurel Brigade) under the command of General Thomas L. Rosser. Rosser's elite Laurel Brigade had been sent to assist Early's army—and enable it to attack instead of flee. Many of the men in the proud and well–equipped Laurel Brigade had served with General Jeb Stuart—the Confederacy's most famous cavalry officer.[Note 12] Custer sent Capehart's Third Brigade after Rosser. Capehart's brigade chased Rosser's cavalry from the area, captured 50 men, and captured all of the Laurel Brigade's artillery.[131] Custer, with Capehart's Brigade (including the 2nd West Virginia Cavalry) leading, defeated one of the Confederacy's best cavalries.[132]
Battle of Waynesboro[]
Two federal cavalry divisions encountered the remnants of General Early's army at Waynesboro, Virginia, on March 2. Most of Early's army was killed or captured, although Early evaded capture.[133] Custer's division did the fighting. His 1st Brigade dismounted and attacked as infantry, then the 3rd Brigade charged and cut off over half of Early's force—which forced that portion of the rebels to surrender. All of Early's headquarters equipment was captured, as were 11 pieces of artillery.[134] The 2nd West Virginia Cavalry captured 200 wagons loaded with supplies that were supposed to be sent to Lee's Army of Northern Virginia. Early's army was eliminated from the war.[135]
Sheridan joins the Army of the Potomac near Petersburg[]

Sheridan's original orders were to destroy the Virginia Central Railroad and then meet with the army of Union General William Tecumseh Sherman in North Carolina.[136] Sheridan reached Charlottesville on March 3, but faced delays caused by muddy roads. During that time, Custer's division (including the 2nd West Virginia Cavalry) destroyed the railroad line between Lynchburg and Amherst Courthouse, and Devin's division destroyed the James River Canal. Rainy weather had caused the James River to swell. The deeper and wider river became dangerous to cross, and fords became unusable. The swollen river, and bridges that had been destroyed by the Confederates, persuaded Sheridan to move east toward Richmond instead of moving south across the river to link with Sherman's army in North Carolina. Sheridan's army kept north of the James River, and reached Columbia, Virginia, on March 10.[137]
Sheridan's two cavalry divisions continued their movement eastward, still staying north of the swollen James River. Both divisions reached a Union Army base at the river port community of White House, Virginia (not to be confused with the "White House" in Washington, D.C.), on March 18, 1865.[138] At White House, the two divisions were resupplied, and rested for five days.[138]
Sheridan's force departed from White House on March 24, and met the Army of the Potomac near Petersburg on March 27.[138] The Army of the Potomac was "the Union's primary army operating in the East."[139] It often confronted Lee's Army of Northern Virginia, and was tasked with protecting the capital in Washington, D.C., while attempting to capture the Confederate capital city of Richmond. Sheridan's Army of the Shenandoah was still considered separate from the Army of the Potomac, so he received orders directly from General Ulysses S. Grant (the Union's highest-ranking officer and future president of the United States). Grant was working on site with General George Meade, the commander of the Army of the Potomac.[139] Meade had partially surrounded Lee's army at Richmond and Petersburg, but Lee still had a western escape route. Grant ordered Sheridan to proceed to Dinwiddie, Virginia. The two divisions were joined by the 2nd Cavalry Division from the Army of the Potomac, which was led by General Crook.[140] The three cavalry divisions totaled to a force of about 9,000.[141] Since Lee's Army of Northern Virginia was concentrated in Richmond and Petersburg, Sheridan's movement would flank Lee's army—and threaten Lee's escape route if he decided to abandon Richmond and Petersburg.[142]
Battle of Dinwiddie Court House[]

Sheridan's army reached Dinwiddie Court House on March 29. His first two divisions went into camp at that location, while Custer's 3rd Division (which included the 2nd West Virginia Cavalry regiment) guarded the wagon trains further back at Malone's Crossing.[141] The 3rd Division's Third Brigade, which included the 1st, 2nd, and 3rd West Virginia cavalry regiments, also included the 1st New York (Lincoln) Cavalry.[140] On the next day, Devin's 1st Cavalry Division, and a brigade from Crook's 2nd Division, were sent north toward Five Forks. Their reconnaissance found a strong enemy force led by General George E. Pickett, and the Union cavalry was driven back.[143]
The Battle of Dinwiddie Court House occurred on March 31, and is considered a Confederate victory.[144] The same Union force that was driven back earlier was again sent toward Five Forks. The remaining portion of Crook's 2nd Division met the Confederates further west at Chamberlain's Creek. During this time, infantry under the command of Union General Gouverneur Kemble Warren, located east of Sheridan's army, was driven back. The attacking Confederate force then turned its attention to Sheridan—Sheridan's cavalry had to face two enemy infantry divisions and a cavalry.[145]
As the Union cavalry was driven back toward Dinwiddie Court House, Capehart's 3rd Brigade was recalled from duty guarding the wagon train. They moved near what would soon become the front, an open area in front of Dinwiddie. Capehart's brigade, sometimes called the "Virginia Brigade", used rails from a fence to quickly build a protective area for fighting while dismounted. The men in the 2nd West Virginia Cavalry, along with the rest of the 3rd Brigade, were able to halt the Confederate attack in fighting that continued until after dark.[146]
Battle of Five Forks[]
The Battle of Five Forks occurred on April 1, 1865. Five Forks is a small community in Dinwiddie County, located between Dinwiddie Court House and Petersburg. For this Union victory, Sheridan received reinforcements from the Fifth Corps and a division of cavalry from the Army of the James.[147] Sheridan's plan was to capture the Confederate infantry that had isolated itself beyond the Confederate line of defense after pursuing Sheridan at Dinwiddie.[148]

Union infantry attacked from the east side of the battlefield, while most of the cavalry attacked from the south and west. Capehart's brigade attacked from the southwest, and eventually was on the extreme western side of the battlefield. At times, the cavalry fought dismounted, with their horses led at a safe distance behind. The opposing forces were always within range of the Union cavalry carbines, keeping the weapon's seven-shot advantage—and not enabling the Confederate infantry to utilize the advantage of their longer range weapons.[149]
After 5:00 pm, Custer's division (including Capehart's brigade) remounted, and attacked a Confederate battery. The battery was unable to shoot low enough to hit the charging cavalry, and was soon captured. The rebels responded with a Rebel yell, and soon the opposing forces were fighting in close combat using sabers. Because of their position on the field, most of the Union casualties in this encounter belonged to the 2nd West Virginia Cavalry—but a large portion of the loss was from wounds that were not lethal.[150]
Since the fighting was very close, many of the Confederates were killed before they had a chance to retreat. The 2nd West Virginia Cavalry drove the rebels to the end of the field, only to be partially driven back by a second group of Confederate cavalrymen. After the regiment was reinforced by the rest of Capehart's brigade, the Confederates were driven from the area, and numerous battle flags were captured.[151]
Battle of Sailor's Creek[]
On April 1, General Lee, realizing the threat to his army and the Confederate government in Richmond, recommended abandoning the city. The battles as Dinwiddie Court House and Five Forks played important roles in this decision. Confederate president Jefferson Davis left the city on April 2. Lee's army began moving west a few days later.[142]
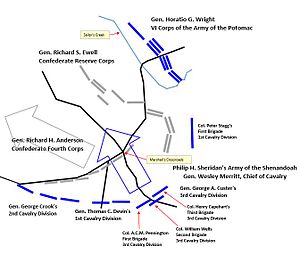
On April 6, Union troops chased Lee's Army to an area south of the Appomattox River near Saylor's Creek. The area was about halfway between Richmond and Lynchburg. Some historians say the Battle of Sailor's Creek was actually three battles that were fought simultaneously at Lockett Farm, Hillsman Farm, and Marshall's Crossroads.[152] Sheridan's cavalry fought in the Marshall's Crossroads area. Confederate General Richard Ewell's two divisions were between Little Sailor's (also spelled Saylor's and Sayler's) Creek and Marshall's Crossroads. Confederate General Richard H. Anderson commanded additional divisions mostly west of Marshall's Crossroads. Sheridan's cavalry, commanded by General Merritt, was on the southeast side, with the three divisions commanded by Devin, Crook, and Custer. The 2nd West Virginia Cavalry, as part of Capehart's Brigade and Custer's 3rd Division, began their fight south of Marshall's Crossroads. Once again, Union infantry attacked from the east, while Sheridan's cavalry attacked mostly from the south and west.[153]
As Colonel Capehart (commander of Custer's Third Brigade) reviewed the Confederate army's position, General Custer rode along the lines in plain view of the Confederate infantry, brashly displaying captured Confederate battle flags. The Confederates responded by taking numerous shots at the general, and Custer's horse was hit. Custer dismounted without injury. Capehart realized that the Confederates would need time to reload their single-shot rifles, and requested that his 3rd Brigade attack immediately. Custer quickly agreed, and Capehart's brigade of about 1,400 cavalry men (including the 2nd West Virginia) charged the Confederate lines.[154] In addition to the 2nd West Virginia Cavalry, Capehart's 3rd Brigade still included the 1st and 3rd West Virginia Cavalries—plus the 1st New York (Lincoln) Cavalry.[140]
Capehart and Lieutenant Colonel Allen of the 2nd West Virginia Cavalry led the charge. Thomas Custer, brother of General George Custer, rode with the two leaders at the front of the column.[154] The men used sabers, carbines, and revolvers to move through three Confederate infantry lines. A large portion of Ewell's corps became surrounded, causing many of the demoralized Confederate soldiers to surrender. Thus, the Union troops captured more than 20 percent of Lee's army. Approximately 8,000 Confederate soldiers, including eight generals, were killed or captured.[154] Among the surrendering generals were Richard Ewell and Custis Lee. Upon seeing the battered survivors from his army, Lee said "My God, has the army dissolved?" Although many of Anderson's men escaped westward, the battle is considered the "death knell" for Lee's Confederate Army.[155]
The Battle of Sailor's Creek is the last major battle of the American Civil War.[152] Two privates (Joseph Kimball and Samuel McElhinney) from the 2nd West Virginia Cavalry captured Confederate battle flags in this battle, and were later awarded the Medal of Honor.[156] Thomas Custer, who was not part of the Capehart's brigade (but rode with it), also received a Medal of Honor. Custer was shot in the face as he captured a battle flag. Custer killed the shooter in the instant after he was shot. The non-lethal shot exited Custer's cheek, and he was able to return to the safety of the Union lines.[157]
Battle of Appomattox Station[]
On April 8, Lee's Army of Northern Virginia continued to flee westward. Two Union army corps were following. Additional Union troops, including cavalry led by General Sheridan, were further west. Sheridan hoped to block Lee's retreat. His advance force was Custer's 3rd Division. The advance portion of Lee's army consisted of artillerymen led by General R. Lindsey Walker, and they passed through the small community of Appomattox Court House toward their destination—Appomattox Station. Walker's artillery force led a wagon train with luggage and ambulances. Three trains, sent from Lynchburg, were waiting at Appomattox Station with supplies. They were guarded by a small cavalry brigade.[158]
Custer learned that the Confederate supply trains were waiting at Appomattox Station. He sent the 2nd New York Cavalry forward, and the supply trains were captured. A few pieces of track were removed to prevent the trains from going back to Lynchburg. Walker was surprised to see Union troops waiting at the station, and set up his artillery. He was forced to form a battle line in a wooded area—not an ideal situation for his weaponry. He was able to repel Custer's 1st Brigade.[158]
Custer used his 2nd and 3rd (Capehart's) brigades for two more ineffective attacks. Finally, Custer made a rare night attack using his entire division.[Note 13] Strong moonlight reduced the risk of getting lost or misidentifying friendly and enemy soldiers. The night attack was successful, and Custer's division captured 24 to 30 artillery pieces. About 1,000 Confederates were taken prisoner, and 150 to 200 wagons were captured.[158]
Battle of Appomattox Courthouse[]

On April 9, Lee's Army of Northern Virginia continued to flee westward. Infantry led by Generals John Brown Gordon and James Longstreet, and cavalry led by Fitzhugh Lee formed a battle line near the Appomattox Court House. This was their last chance to escape to Lynchburg, as Union troops were attempting to surround them.[160]
A Confederate officer approached Capehart's 3rd Brigade on horseback under a flag of truce. Capehart and the officer rode down the column to General Custer, where the officer told the general that Lee and Grant were in correspondence concerning a surrender of Lee's Army.[Note 14] The Confederate officer also requested a truce until the results of the negotiation were known.[161] Custer's response was "Tell General Longstreet that I am not in command of all the forces here, but that I am on his flank and rear with a large cavalry force, and that I will accept nothing but unconditional surrender."[161]
The 2nd West Virginia Cavalry's participation in this "battle" was mostly preparing to attack—but no full-fledged charges were made. Shortly after his meeting with Longstreet's representative, Custer turned command of the division over to General Capehart, commander of the 3rd Brigade (that included the 2nd West Virginia Cavalry). Custer rode off to see General Sheridan.[161]
Thus, on April 9, 1865, Confederate General Lee unconditionally surrendered his starving Army of Northern Virginia to General Grant. The surrender look place at the home of Wilmer and Virginia McLean in the small community of Appomattox Court House, Virginia.[163]
War's end[]
The 2nd West Virginia Volunteer Cavalry remained in battle line until the evening of April 9, and then went into camp. On the next day, they marched toward Burkesville Junction, arriving on April 12. After resting for the night, they marched to Nottoway Court House, and received new clothing. The cavalry reached Petersburg, Virginia, by April 18, and camped outside the city.[164] On April 24, the division started a march to North Carolina to join General William Tecumseh Sherman's army confronting the Confederate army of General Joseph E. Johnston. They reached South Boston, on the Dan River in Virginia, which is close to the North Carolina border. However, on April 28, they became aware that Johnston had surrendered. On the next day, the division began its return north.[165]
The northbound division reached Petersburg on May 5, where they rested. They were visited by General Custer's wife, Elizabeth Bacon Custer. Knowing that her husband's division would soon be marching in Washington to celebrate the Union victory, Mrs. Custer suggested that the entire division wear a red tie like her husband's while it was on parade. On May 10, the division began the trip to Washington, and eventually reached Alexandria, Virginia, where they made camp.[166]
Grand Review of the armies[]

The Grand Review of the Armies began on May 23, 1865, as a Union celebration of the end of the Civil War. Union troops paraded down Pennsylvania Avenue in Washington, DC. The parade was led by Custer's 3rd Division.[167] The division was led by Company F of the 2nd West Virginia Cavalry as part of Capehart's Brigade.[168] The New York Times described men in Custer's division as "being decorated with a scarf or tie, known as the Custer Tie, red in color ..." It also said "Capehart's brigade of West Virginia Veterans, as trusty a body as ever drew a sabre, are singled out for their fine appearance ..."[169]
Final muster out[]
In early June 1865, the 1st, 2nd, and 3rd West Virginia Cavalries were ordered to proceed to Wheeling, West Virginia, to muster out. On June 17, the men and their horses were loaded onto a Baltimore & Ohio Railroad train where they departed for Wheeling. The three regiments camped on Wheeling Island between Wheeling and Belmont County, Ohio.[170] They were officially mustered on out on June 30, 1865. On July 4, 1865, the men received their discharge papers.[171]
During the war, the 2nd West Virginia Cavalry had 4 officers and 77 enlisted men killed. An additional 115 men died from disease.[71] Four men received the Medal of Honor. William H. Powell received his medal for actions at the Sinking Creek Raid. Samuel O. McElhinny and Joseph Kimball won theirs for capturing battle flags at Sailor's Creek. Bernard Shields won his medal for capturing a flag at Appomattox.[156]
See also[]
- West Virginia Units in the Civil War
- West Virginia in the Civil War
Notes[]
Footnotes[]
- ^ Although Virginia had succeeded from the United States earlier in 1861, a group of its western counties refused to leave the United States. Representatives of the western counties met in Wheeling, Virginia, and eventually established a government known as the restored government of Virginia.[6] This alternative government was headquartered in Wheeling, and the meetings became known as the Wheeling Convention. In 1863, this group of counties, plus some additional territory, became the state of West Virginia.[7]
- ^ The first men to be killed in action from the 2nd Loyal Virginia Volunteer Cavalry were Amos McKee of Company B and Albert Leonard of Company C.[12]
- ^ A soldier from the 2nd Loyal Virginia Cavalry, which was composed mostly of men from Ohio, wrote that the cavalry's Colonel Paxton "begged for permission to be allowed" to go after Jenkins (who had invaded Ohio), and that eight companies were sent.[22] Lightburn's report says "Finding these positions untenable against the reported force of the enemy, and Jenkins already in my rear, I ordered Colonel Paxton, with six companies of the Second Virginia Cavalry, to look after him, and, if possible, keep open communications with the Ohio River, by way of the Kanawha River."[29]
- ^ At the time of the American Civil War, some of the small county seats were identified with the county name followed by "Court House". For example, Beckley, Virginia (later Beckley, West Virginia) is identified in one of the maps displayed earlier as "Beckley", but it is identified in the adjacent map as "Raleigh C.H." or Raleigh Court House. Beckley is the county seat of Raleigh County. Some of these smaller communities consisted of not much more than a courthouse during the 1860s.[31]
- ^ General George Crook said that Powell was "one of the best cavalry officers I have seen in the service".[44] General William W. Averell said that Powell was "one of the best brigade commanders that I know".[45] Confederate General Sam Jones said Powell was "a bold, daring man, and one of the most dangerous officers we have had to contend with ..."[46]
- ^ The 2nd West Virginia was without the services of its top two officers, Colonel Powell and Major Hoffman (temporarily). The report of infantry commander Lieutenant Colonel Freeman E. Franklin says "I regret to state that the Second West Virginia Cavalry did not behave so well, but were thrown into considerable confusion, many of them dismounting and leaving their horses while they sought their own safety."[61] Franklin, who was not nearby when both colonels were shot during the first ten minutes of the attack, did not mention that Colonel Toland was killed because he refused to dismount and seek safety.[61]
- ^ During October 1864, after being relieved of command, Duffié was captured. General Philip Sheridan requested that Duffié be dismissed from the army, saying "I think him a trifling man and a poor soldier. He was captured by his own stupidity".[70]
- ^ General George Crook called this army the "Army of the Kanawha".[88] The U.S. National Park Service calls the army the "Army of West Virginia.[71]
- ^ General General William W. Averell had major victories at Droop Mountain, Rutherford's Farm, and Moorefield. He worked best independently instead of under the leadership of someone else.[91] Averell was relieved of command by General Sheridan during the pursuit of rebel forces after the Battle of Fisher's Hill.[96]
- ^ The retreat was initially very disorganized. One brigade commander from Duffié's 1st Division caused panic by ordering teamsters to bring their horses to a trot as his brigade fled north.[103] The main road eventually became littered with burning wagons. Duffié's other brigade, led by Colonel William B. Tibbits, performed much more admirably. His brigade made several charges that enabled trapped infantry men to escape.[104]
- ^ Powell noted that his "old regiment, the Second West Virginia Cavalry ... never failed me in emergency". He also said "Wickham's dashing cavalry were driven back in confusion, utterly routed, and they did not again disturb my right."[119]
- ^ Jeb Stuart was one of the Confederacy's most famous leaders. "Few Confederate generals achieved wider renown during the Civil War than Major General James Ewell Brown Stuart."[130] He was killed in battle during mid-May 1864.[130]
- ^ Night attacks were rare during the American Civil War because there was too much of a chance of a friendly fire incident. The darkness made it difficult to determine friend or foe.[159]
- ^ One author (Lang) says the Confederate approached General Henry Capehart.[161] A second author (Sutton) says the Confederate officer approached "Colonel Briggs, of the seventh Michigan".[162]
Citations[]
- ^ a b c Sutton 2001, p. 48
- ^ Hewett 1994, p. 770
- ^ United States Adjutant-General's Office 1865–67, p. 1105
- ^ a b c d e f g Sutton 2001, p. 49
- ^ a b Sutton 2001, p. 50
- ^ "First Session of the Second Wheeling Convention". West Virginia Division of Culture and History. Retrieved 2015-02-21.
- ^ a b "The New State of West Virginia". West Virginia Division of Culture and History. Retrieved 2015-02-21.
- ^ Sutton 2001, pp. 48–49
- ^ Adler 2011, p. 321
- ^ "The Harper's Ferry Horse Pistol". Barlow and Barlow. Retrieved 2015-01-31.
- ^ Adler 2011, p. 234
- ^ Sutton 2001, p. 51
- ^ "James Garfield". United States government - "The White House". Retrieved 2016-01-06.
- ^ a b Lang 1895, p. 182
- ^ Magid 2011, p. 125
- ^ a b c Sutton 2001, p. 53
- ^ Sutton 2001, p. 54
- ^ "Battle of Lewisburg – Official Records". West Virginia Division of Culture and History. Retrieved 2015-07-03.
- ^ a b Sutton 2001, p. 55
- ^ Cox 1900, pp. 224–226
- ^ Lang 1895, p. 183
- ^ a b Sutton 2001, p. 59
- ^ Schmiel 2014, p. 54
- ^ "Ohio Invaded!". Steubenville Weekly Herald. 1862-09-10. p. 2.
We have startling news to-day, of the invasion of Ohio by the notorious guerrilla, Jenkins, who, it appears, crossed the Ohio River, yesterday, at Huffington's Island, and made a descent upon Racine, Meigs county, this State, where the band killed and wounded the citizens, stole their horses, and then re-crossed into Jackson county, Virginia, whence they came.
- ^ Lang 1895, p. 248
- ^ Cox 1900, p. 392
- ^ Sutton 2001, p. 58
- ^ a b Cox 1900, p. 393
- ^ Scott, Lazelle & Davis 1887, p. 1059
- ^ Sutton 2001, p. 60
- ^ "Beckley Raleigh County Chamber of Commerce". Beckley Raleigh County Chamber of Commerce. Retrieved 2016-11-13.
- ^ a b c "Campaign in the Kanawha Valley, W. Va". West Virginia Division of Culture and History. Retrieved 2015-07-22.
- ^ Sutton 2001, p. 249
- ^ a b Sutton 2001, p. 61
- ^ Lang 1895, p. 184
- ^ a b Lang 1895, p. 185
- ^ "Camp Piatt". Groundspeak, Inc. Retrieved 2015-02-01.
- ^ "Camp Piatt". West Virginia Humanities Council. Retrieved 2015-02-01.
- ^ Jones 1897, pp. 184–185
- ^ Jones 1897, p. 189
- ^ Jones 1897, p. 191
- ^ Lang 1895, p. 186
- ^ Sutton 2001, p. 73
- ^ Lang 1895, p. 191
- ^ Lang 1895, p. 192
- ^ a b Sutton 2001, p. 103
- ^ Sutton 2001, p. 76
- ^ Sutton 2001, p. 77
- ^ a b Sutton 2001, p. 81
- ^ Lang 1895, p. 187
- ^ a b c Sutton 2001, pp. 80–81
- ^ "Geology and the Civil War in Southwest Virginia: The Wythe County Mines" (PDF). Commonwealth of Virginia, Division of Mineral Resources (May 1996). Retrieved 2015-03-14.
- ^ "Geology and the Civil War in Southwest Virginia: The Smyth County Salt Works" (PDF). Commonwealth of Virginia, Division of Mineral Resources (August 1996). Retrieved 2015-03-16.
- ^ Whisonant 2015, p. 157
- ^ Sutton 2001, p. 88
- ^ Sutton 2001, p. 89
- ^ a b c Sutton 2001, p. 91
- ^ a b c d Sutton 2001, p. 92
- ^ Scott 1889, p. 943
- ^ Scott 1889, p. 945
- ^ a b United States Congress 1891, p. 1002
- ^ a b Walker 1985, p. 47
- ^ a b Sutton 2001, p. 93
- ^ Sutton 2001, p. 94
- ^ a b Sutton 2001, p. 95
- ^ Walker 1992, p. 25
- ^ a b Lang 1895, p. 188
- ^ Rhodes 1900, p. 36
- ^ Sutton 2001, p. 104
- ^ Ainsworth & Kirkley 1902, p. 35
- ^ a b c d e "Union West VirginiaI Volunteers, 2nd Regiment, West Virginia Cavalry". National Park Service, U.S. Department of the Interior. Retrieved 2015-03-28.
- ^ "Battle of Droop Mountain". West Virginia Division of Culture and History. Retrieved 2016-02-21.
- ^ Sutton 2001, p. 110
- ^ a b Sutton 2001, pp. 113–114
- ^ "Battle Summary - Cove Mountain". National Park Service. Retrieved 2016-02-12.
- ^ Sutton 2001, p. 115
- ^ Snell 2011, p. 126
- ^ Sutton 2001, p. 116
- ^ a b c d Sutton 2001, p. 117
- ^ a b c Sutton 2001, pp. 125–126
- ^ "General David Hunter & the Burning of VMI, June 1864". Virginia Military Institute. Retrieved 2016-12-07.
- ^ Sutton 2001, p. 127
- ^ "CWSAC Battle Summary: Lynchburg". National Park Service. Retrieved 2015-12-14.
- ^ a b Sutton 2001, p. 130
- ^ Sutton 2001, p. 135
- ^ Sutton 2001, p. 5
- ^ Sutton 2001, p. 138
- ^ Scott, Lazelle & Davis 1891, p. 19
- ^ Sutton 2001, p. 126
- ^ "CWSAC Battle Summary: Rutherford's Farm". National Park Service. Retrieved 2015-12-26.
- ^ a b Patchan 2007, p. 119
- ^ Patchan 2007, p. 127
- ^ Patchan 2007, p. 133
- ^ Patchan 2007, p. 138
- ^ Sutton 2001, p. 140
- ^ "General William Woods Averell and the 1864 Valley Campaign". Blog at WordPress.com. Archived from the original on 2016-03-13. Retrieved 2016-02-03.
- ^ Sutton 2001, p. 143
- ^ Patchan 2007, p. 181
- ^ Patchan 2007, p. 268
- ^ a b Patchan 2007, p. 227
- ^ a b c Sutton 2001, p. 144
- ^ Patchan 2007, p. 232
- ^ Patchan 2007, p. 242
- ^ Patchan 2007, p. 237
- ^ "Rutherford B. Hayes". United States government - "The White House". Retrieved 2016-02-26.
- ^ Patchan 2007, p. 250
- ^ Sutton 2001, p. 145
- ^ "Battle Summary - Moorefield". National Park Service. Retrieved 2016-02-12.
- ^ Patchan 2007, p. 307
- ^ Patchan 2007, p. 299
- ^ Sutton 2001, p. 159
- ^ "Battle Detail - Opequon". National Park Service, U.S. Department of the Interior. Retrieved 2015-09-12.
- ^ a b Patchan 2013, p. 332
- ^ Sutton 2001, p. 160
- ^ "13. FISHER'S HILL (21-22 September 1864)". National Park Service, U.S. Department of the Interior. Retrieved 2015-12-27.
- ^ a b c Sutton 2001, p. 161
- ^ Sutton 2001, p. 162
- ^ Lang 1895, p. 166
- ^ Sutton 2001, p. 163
- ^ a b "Battle Detail - The Battle of Cedar Creek". National Park Service, U.S. Department of the Interior. Retrieved 2015-12-26.
- ^ Sutton 2001, p. 170
- ^ Sutton 2001, p. 181
- ^ "Full text of "Official army register of the volunteer force of the United States army for the years 1861, '62, '63, '64, '65 ..."". Cornell University Library. Retrieved 2016-02-15.
- ^ Reid 1868, p. 910
- ^ Sutton 2001, pp. 181–182
- ^ Sutton 2001, pp. 188–189
- ^ Rhodes 1900, p. 191
- ^ Sutton 2001, p. 189
- ^ Sutton 2001, p. 188
- ^ a b Thomason & Gallagher 1994, p. vii
- ^ Sutton 2001, pp. 191–194
- ^ Sutton 2001, p. 198
- ^ "Waynesboro". U.S. National Park Service. Retrieved 2015-11-12.
- ^ Sutton 2001, p. 192
- ^ Sutton 2001, p. 197
- ^ Rhodes 1900, p. 156
- ^ Rhodes 1900, p. 157
- ^ a b c Rhodes 1900, p. 158
- ^ a b "Army of the Potomac". Ohio History Central. Retrieved 2016-11-30.
- ^ a b c Rhodes 1900, pp. 191–192
- ^ a b Rhodes 1900, p. 159
- ^ a b "The Fall of Richmond, Virginia". Civil War Trust. Retrieved 2016-01-02.
- ^ Rhodes 1900, pp. 159–160
- ^ "Battle Summary - Dinwiddie Court House, Virginia". National Park Service. Retrieved 2015-12-30.
- ^ Rhodes 1900, p. 160
- ^ Sutton 2001, pp. 210–211
- ^ "Battle Summary - Five Forks, Virginia". National Park Service. Retrieved 2015-12-30.
- ^ Rhodes 1900, p. 161
- ^ Sutton 2001, p. 212
- ^ Sutton 2001, p. 213
- ^ Sutton 2001, p. 214
- ^ a b "10 Facts About Sailor's Creek". Civil War Trust. Retrieved 2016-03-26.
- ^ "Battle of Sailor's Creek - Hillsman Farm". Civil War Trust. Retrieved 2016-01-02.
- ^ a b c "Battle Analysis: Cavalry Battle at Sailor's Creek". The United States Army, Fort Benning Public Affairs Office. Retrieved 2015-12-16.
- ^ "Battle Detail - Sailor's Creek". National Park Service. Retrieved 2015-12-16.
- ^ a b "West Virginia Medal of Honor Recipients". West Virginia Division of Culture and History. Retrieved 2016-12-07.
- ^ Lang 1895, p. 171
- ^ a b c "In Search of the Battle of Appomattox Station". Civil War Trust. Retrieved 2015-12-18.
- ^ Howe 1902, pp. 77–78
- ^ "Battle Summary: Appomattox Court House". National Park Service. Retrieved 2016-01-08.
- ^ a b c d Lang 1895, p. 174
- ^ Sutton 2001, p. 225
- ^ "The Surrender - Appomattox Court House". National Park Service. Retrieved 2016-01-09.
- ^ Sutton 2001, pp. 230–232
- ^ Sutton 2001, pp. 234–235
- ^ Sutton 2001, pp. 235–236
- ^ Sutton 2001, pp. 237–238
- ^ Sutton 2001, p. 264
- ^ "Review of the Armies". New York Times. 1865-05-24. p. 1.
- ^ Sutton 2001, p. 239
- ^ Sutton 2001, p. 241
References[]
- Adler, Dennis (2011). Guns of the Civil War. Minneapolis, MN: Zenith Press. ISBN 978-1-61060-140-5. OCLC 843883213.
- Ainsworth, Fred C.; Kirkley, Joseph W. (1902). The War of the Rebellion: A Compilation of the Official Records of the Union and Confederate Armies Series I Volume XLIII Part 1. Washington, DC: Government Printing Office. ISBN 978-0-918678-07-2. OCLC 427057.
- Cox, Jacob Dolson (1900). Military Reminiscences of the Civil War, Volume I. New York: Charles Scribner's Sons. ISBN 9781465537324. OCLC 42028627.
- Hewett, Janet (1994). Supplement to the Official Records of the Union and Confederate Armies Volume 70. Wilmington, NC: Broadfoot Pub. Co. ISBN 978-1-56837-275-4. OCLC 39379883.
- Howe, Daniel Wait (1902). Civil War Times 1861–1865. Indianapolis: Bowen-Merrill. ISBN 9780722279601. OCLC 617336.
- Jones, J. W. (1897). The Story of American Heroism : Thrilling Narratives of Personal Adventures During the Great Civil War, as Told by the Medal Winners and Roll of Honor Men. Springfield, Ohio. OCLC 11816985.
- Lang, Joseph J. (1895). Loyal West Virginia from 1861 to 1865 : With an Introductory Chapter on the Status of Virginia for Thirty Years Prior to the War. Baltimore, MD: Deutsch Publishing Co. OCLC 779093.
- Magid, Paul (2011). George Crook: From the Redwoods to Appomattox. Norman, Oklahoma: University of Oklahoma Press. ISBN 978-0-8061-8593-4. OCLC 812924966.
- Patchan, Scott C. (2007). Shenandoah Summer: The 1864 Valley Campaign. Lincoln, NE: University of Nebraska Press. ISBN 978-0-8032-0700-4. OCLC 122563754.
- Patchan, Scott C. (2013). The Last Battle of Winchester: Phil Sheridan, Jubal Early, and the Shenandoah Valley Campaign, August 7-September 19, 1864. El Dorado Hills, Calif: Savas Beatie. ISBN 978-1-932714-98-2. OCLC 751578151.
- Reid, Whitelaw (1868). Ohio in the War: Her Statesmen, Her Generals and Soldiers. Volume I: History of the State During the War, and the Lives of Her Generals. New York: Moore, Wilstach & Baldwin. ISBN 978-1-236-51745-6.
- Rhodes, Charles D. (1900). History of the Cavalry of the Army of the Potomac including that of the Army of Virginia (Pope's) and also the History of the Operations of the Federal Cavalry in West Virginia During the War. Kansas City, MO: Hudson-Kimberly Publishing Co.
- Schmiel, Gene (2014). Citizen-General : Jacob Dolson Cox and the Civil War Era. Athens, OH: Ohio University Press. ISBN 978-0-8214-2082-9. OCLC 861676486.
- Scott, Robert N. (1889). The War of the Rebellion: a Compilation of the Official Records of the Union and Confederate Armies Series I Volume XXVIII Part II. Washington, DC: Government Printing Office. OCLC 318422190.
- Scott, Robert Nicholson; Lazelle, H. M.; Davis, George B. (1887). The War of the Rebellion: A Compilation of the Official Records of the Union and Confederate Armies Series I Volume XIX Part 1. Washington, DC: Government Printing Office. ISBN 978-0-918678-07-2. OCLC 427057.
- Scott, Robert Nicholson; Lazelle, H. M.; Davis, George B. (1891). The War of the Rebellion: A Compilation of the Official Records of the Union and Confederate Armies Series I Volume XXXVII Part 2. Washington, DC: Government Printing Office. ISBN 978-0-918678-07-2. OCLC 427057.
- Snell, Mark A. (2011). West Virginia and the Civil War : Mountaineers are Always Free. Charleston, SC: History Press. ISBN 978-1-61423-390-9. OCLC 829025932.
- Sutton, Joseph J. (2001) [1892]. History of the Second Regiment, West Virginia Cavalry Volunteers, During the War of the Rebellion. Huntington, WV: Blue Acorn Press. ISBN 978-0-9628866-5-2. OCLC 263148491.
- Thomason, John W.; Gallagher, Gary W. (1994). Jeb Stuart. Lincoln, NE: University of Nebraska Press. ISBN 978-0-8032-9424-0. OCLC 30110697.
- United States Adjutant-General's Office (1865–67). Official Army Register of the Volunteer Force of the United States Army for the Years 1861, '62, '63, '64, '65. Washington: United States. OCLC 686779.
- United States Congress (1891). "The Miscellaneous Documents of the House of Representatives for the First Session of the Fifty-First Congress 1889-'90". The War of the Rebellion: A Compilation of the Official Records of the Union and Confederate Armies Series I Volume XXVII Part II. U.S. Government Printing Office. OCLC 191710879. Retrieved 2016-02-23.
- Walker, Gary C. (1992). Civil War Tales. Roanoke, VA: A & W Enterprise. OCLC 27975601.
- Walker, Gary C. (1985). The War in Southwest Virginia, 1861–65. Roanoke, VA: Gurtner Graphics and Print. Co. OCLC 12703870.
- Whisonant, Robert C. (2015). Arming the Confederacy : How Virginia's Minerals Forged the Rebel War Machine. Cham, Switzerland: Springer International Publishing. ISBN 978-3-319-14508-2. OCLC 903929889.
- Units and formations of the Union Army from West Virginia
- 1861 establishments in Virginia
- Military units and formations established in 1861
- Military units and formations disestablished in 1865