Battle of Bunker Hill
| Battle of Bunker Hill | |||||||||
|---|---|---|---|---|---|---|---|---|---|
| Part of the American Revolutionary War | |||||||||
 Death of General Warren at the Battle of Bunker Hill by John Trumbull | |||||||||
| |||||||||
| Belligerents | |||||||||
|
| ||||||||
| Commanders and leaders | |||||||||
|
|
| ||||||||
| Strength | |||||||||
| ~2,400[1] | 3,000+[2] | ||||||||
| Casualties and losses | |||||||||
|
115 killed, 305 wounded, 30 captured (20 POWs died) Total: 450[3] |
19 officers killed 62 officers wounded 207 soldiers killed 766 soldiers wounded Total: 1,054[4] | ||||||||
 | |||||||||

The Battle of Bunker Hill was fought on Saturday, June 17, 1775, during the Siege of Boston in the first stage of the American Revolutionary War.[5] The battle is named after Bunker Hill in Charlestown, Massachusetts, which was peripherally involved in the battle. It was the original objective of both the colonial and British troops, though the majority of combat took place on the adjacent hill which later became known as Breed's Hill.[6][7]
On June 13, 1775, the leaders of the colonial forces besieging Boston learned that the British were planning to send troops out from the city to fortify the unoccupied hills surrounding the city, which would give them control of Boston Harbor. In response, 1,200 colonial troops under the command of William Prescott stealthily occupied Bunker Hill and Breed's Hill. During the night, the colonists constructed a strong redoubt on Breed's Hill, as well as smaller fortified lines across the Charlestown Peninsula.[8]
By daybreak of June 17, the British became aware of the presence of colonial forces on the Peninsula and mounted an attack against them that day. Two assaults on the colonial positions were repulsed with significant British casualties; the third and final attack carried the redoubt after the defenders ran out of ammunition. The colonists retreated over Bunker Hill, leaving the British [9] in control of the Peninsula.[10]
The battle was a tactical, though somewhat Pyrrhic, victory for the British,[11][12] as it proved to be a sobering experience for them; the British incurred many more casualties than the Americans had sustained, including many officers. The battle had demonstrated that inexperienced militia were able to stand up to regular army troops in battle. Subsequently, the battle discouraged the British from any further frontal attacks against well defended front lines. American casualties were comparatively much fewer, although their losses included General Joseph Warren and Major Andrew McClary, the final casualty of the battle.[13]
The battle led the British to adopt a more cautious planning and maneuver execution in future engagements, which was evident in the subsequent New York and New Jersey campaign, which arguably helped rather than hindered the American forces, as their new approach to battle was actually giving the Americans greater opportunity to retreat if defeat was imminent. The costly engagement also convinced the British of the need to hire substantial numbers of Hessian auxiliaries to bolster their strength in the face of the new and formidable Continental Army.
Geography

Boston, situated on a peninsula,[14] was largely protected from close approach by the expanses of water surrounding it, which were dominated by British warships. In the aftermath of the battles of Lexington and Concord on April 19, 1775, the colonial militia, a force of about 15,000 men,[15] had surrounded the town, and effectively besieged it. Under the command of Artemas Ward, they controlled the only land access to Boston itself (the Roxbury Neck), but, lacking a navy, were unable to even contest British domination of the waters of the harbor. The British troops, a force of about 6,000 under the command of General Thomas Gage, occupied the city, and were able to be resupplied and reinforced by sea.[16] In theory, they were thus able to remain in Boston indefinitely.
However, the land across the water from Boston contained a number of hills, which could be used to advantage.[17] If the militia could obtain enough artillery pieces, these could be placed on the hills and used to bombard the city until the occupying army evacuated it or surrendered. It was with this in mind that the Knox Expedition, led by Henry Knox, later transported cannon from Fort Ticonderoga to the Boston area.[18]
The Charlestown Peninsula, lying to the north of Boston, started from a short, narrow isthmus (known as the Charlestown Neck) at its northwest and extended about 1 mile (1.6 km) southeastward into Boston Harbor. Bunker Hill, with an elevation of 110 feet (34 m), lay at the northern end of the peninsula. Breed's Hill, at a height of 62 feet (19 m), was more southerly and nearer to Boston.[19] Although at an advantage due to the height of Breed's Hill and Bunker Hill, it also essentially trapped the American soldiers at the top.[20][21] The settled part of the town of Charlestown occupied flats at the southern end of the peninsula. At its closest approach, less than 1,000 feet (300 m) separated the Charlestown Peninsula from the Boston Peninsula, where Copp's Hill was at about the same height as Breed's Hill. While the British retreat from Concord had ended in Charlestown, General Gage, rather than immediately fortifying the hills on the peninsula, had withdrawn those troops to Boston the day after that battle, turning the entire Charlestown Peninsula into a no man's land.[22]

British planning
Throughout May, in response to orders from Gage requesting support, the British received reinforcements, until they reached a strength of about 6,000 men. On May 25, three generals arrived on HMS Cerberus: William Howe, John Burgoyne, and Henry Clinton. Gage began planning with them to break out of the city,[23] finalizing a plan on June 12.[24] This plan began with the taking of the Dorchester Neck, fortifying the Dorchester Heights, and then marching on the colonial forces stationed in Roxbury. Once the southern flank had been secured, the Charlestown heights would be taken, and the forces in Cambridge driven away. The attack was set for June 18.[25]
On June 13, the Massachusetts Provincial Congress was notified, by express messenger from the Committee of Safety in Exeter, New Hampshire, that a New Hampshire gentleman "of undoubted veracity" had, while visiting Boston, overheard the British commanders making plans to capture Dorchester and Charlestown.[26] On June 15, the Massachusetts Committee of Safety decided that additional defenses needed to be erected.[27] General Ward directed General Israel Putnam to set up defenses on the Charlestown Peninsula, specifically on Bunker Hill.[28][29]
Prelude to battle
Fortification of Breed's Hill

On the night of June 16, colonial Colonel William Prescott led about 1,200 men onto the peninsula in order to set up positions from which artillery fire could be directed into Boston.[30] This force was made up of men from the regiments of Prescott, Putnam (the unit was commanded by Thomas Knowlton), James Frye, and Ebenezer Bridge.[31] At first, Putnam, Prescott, and their engineer, Captain Richard Gridley, disagreed as to where they should locate their defense. Some work was performed on Bunker Hill, but Breed's Hill was closer to Boston and viewed as being more defensible. Arguably against orders, they decided to build their primary redoubt there.[32] Prescott and his men, using Gridley's outline, began digging a square fortification about 130 feet (40 m) on a side with ditches and earthen walls. The walls of the redoubt were about 6 feet (1.8 m) high, with a wooden platform inside on which men could stand and fire over the walls.[33][34]
The works on Breed's Hill did not go unnoticed by the British. General Clinton, out on reconnaissance that night, was aware of them, and tried to convince Gage and Howe that they needed to prepare to attack the position at daylight. British sentries were also aware of the activity, but most apparently did not think it cause for alarm.[35] Then, in the early predawn, around 4 a.m., a sentry on board HMS Lively spotted the new fortification, and notified her captain. Lively opened fire, temporarily halting the colonists' work. Aboard his flagship HMS Somerset, Admiral Samuel Graves awoke, irritated by the gunfire that he had not ordered.[36] He stopped it, only to have General Gage countermand his decision when he became fully aware of the situation in the morning. He ordered all 128 guns in the harbor, as well as batteries atop Copp's Hill in Boston, to fire on the colonial position.[37] The barrage had relatively little effect, as the hilltop fortifications were high enough to frustrate accurate aiming from the ships and far enough from Copp's Hill to render the batteries there ineffective. The shots that did manage to land, however, were able to kill one American soldier and damage the entire supply of water brought for the troops.[38]
The rising sun also alerted Prescott to a significant problem with the location of the redoubt – it could easily be flanked on either side.[35] He promptly ordered his men to begin constructing a breastwork running down the hill to the east, deciding he did not have the manpower to also build additional defenses to the west of the redoubt.[39]
British preparations
When the British generals met to discuss their options, General Clinton, who had urged an attack as early as possible, preferred an attack beginning from the Charlestown Neck that would cut off the colonists' retreat, reducing the process of capturing the new redoubt to one of starving out its occupants. However, he was outvoted by the other three generals, who were concerned that his plan violated the convention of the time to not allow one's army to become trapped between enemy forces.[40] Howe, who was the senior officer present and would lead the assault, was of the opinion that the hill was "open and easy of ascent and in short would be easily carried."[41] General Burgoyne concurred, arguing that the "untrained rabble" would be no match for their "trained troops".[42] Orders were then issued to prepare the expedition.[43]
When General Gage surveyed the works from Boston with his staff, Loyalist Abijah Willard recognized his brother-in-law Colonel Prescott. "Will he fight?" asked Gage. "[A]s to his men, I cannot answer for them;" replied Willard, "but Colonel Prescott will fight you to the gates of hell."[44] Prescott lived up to Willard's word, but his men were not so resolute. When the colonists suffered their first casualty, Asa Pollard of Billerica,[45] a young private killed by cannon fire, Prescott gave orders to bury the man quickly and quietly, but a large group of men gave him a solemn funeral instead, with several deserting shortly thereafter.[44]
It took six hours for the British to organize an infantry force and to gather up and inspect the men on parade. General Howe was to lead the major assault, drive around the colonial left flank, and take them from the rear. Brigadier General Robert Pigot on the British left flank would lead the direct assault on the redoubt, and Major John Pitcairn led the flank or reserve force. It took several trips in longboats to transport Howe's initial forces (consisting of about 1,500 men) to the eastern corner of the peninsula, known as Moulton's Point.[46][47] By 2 p.m., Howe's chosen force had landed.[46] However, while crossing the river, Howe noted the large number of colonial troops on top of Bunker Hill. Believing these to be reinforcements, he immediately sent a message to Gage, requesting additional troops. He then ordered some of the light infantry to take a forward position along the eastern side of the peninsula, alerting the colonists to his intended course of action. The troops then sat down to eat while they waited for the reinforcements.[47]

Colonists reinforce their positions
Prescott, seeing the British preparations, called for reinforcements. Among the reinforcements were Joseph Warren, the popular young leader of the Massachusetts Committee of Safety, and Seth Pomeroy, an aging Massachusetts militia leader. Both of these men held commissions of rank, but chose to serve as infantry.[46] Prescott ordered the Connecticut men under Captain Knowlton to defend the left flank, where they used a crude dirt wall as a breastwork, and topped it with fence rails and hay. They also constructed three small v-shaped trenches between this dirt wall and Prescott's breastwork. Troops that arrived to reinforce this flank position included about 200 men from the 1st and 3rd New Hampshire regiments, under Colonels John Stark and James Reed. Stark's men, who did not arrive until after Howe landed his forces (and thus filled a gap in the defense that Howe could have taken advantage of, had he pressed his attack sooner),[48] took positions along the breastwork on the northern end of the colonial position. When low tide opened a gap along the Mystic River to the north, they quickly extended the fence with a short stone wall to the water's edge.[48][49] Colonel Stark placed a stake about 100 feet (30 m) in front of the fence and ordered that no one fire until the regulars passed it.[50] Just prior to the action, further reinforcements arrived, including portions of Massachusetts regiments of Colonels Brewer, Nixon, Woodbridge, Little, and Major Moore, as well as Callender's company of artillery.[51]
Behind the colonial lines, confusion reigned. Many units sent toward the action stopped before crossing the Charlestown Neck from Cambridge, which was under constant fire from gun batteries to the south. Others reached Bunker Hill, but then, uncertain about where to go from there, milled around. One commentator wrote of the scene that "it appears to me there never was more confusion and less command."[52] While General Putnam was on the scene attempting to direct affairs, unit commanders often misunderstood or disobeyed orders.[52][53]
British assault

By 3 p.m., the British reinforcements, which included the 47th Regiment of Foot and the 1st Marines, had arrived, and the British were ready to march.[54] Brigadier General Pigot's force, gathering just south of Charlestown village, were taking casualties from sniper fire from the settlement, and Howe asked Admiral Graves for assistance in clearing out the snipers. Graves, who had planned for such a possibility, ordered a carcass fired into the village, and then sent a landing party to set fire to the town.[55][56] The smoke billowing from Charlestown lent an almost surreal backdrop to the fighting, as the winds were such that the smoke was kept from the field of battle.[57]
General Howe led the light infantry companies and grenadiers in the assault on the American left flank along the rail fence, expecting an easy effort against Stark's recently arrived troops.[58] His light infantry were set along the narrow beach, in column formation, in order to turn the far left flank of the colonial position.[59] The grenadiers were deployed in the centre, lining up four deep and several hundred across. Pigot, commanding the 5th, 38th, 43rd, 47th, and 52nd regiments, as well as Major Pitcairn's Marines, were to feint an assault on the redoubt. Just before the British advanced, the American position along the rail fence was reinforced by two pieces of artillery from Bunker Hill.[60]
Howe had intended the advance to be preceded by an artillery bombardment from the field pieces present, however, it was soon discovered that these cannon had been supplied with the wrong caliber of ammunition, delaying the assault. Attacking Breed's Hill presented an array of difficulties; the hay on the hillside had not been harvested, requiring that the regulars marched through waist-high grass which concealed the uneven terrain beneath; the pastureland of the hillside was covered with crisscrossing rail fences hampering the cohesion of marching formations; the regulars were loaded down with gear wholly unnecessary for the attack; and the heat of the afternoon sun, compounded by the nearby inferno from Charlestown, presented a environment not conducive for the troops in their wool uniforms to conduct an efficient attack.[61][62]
For their part, to offset their shortage of powder, the colonists withheld their fire until the regulars were within at least 50 paces of their position. As the regulars closed in range, they suffered heavy casualties from colonial fire. The colonists benefited from the rail fence to steady and aim their muskets, and enjoyed a modicum of cover from return fire. Under this withering fire, the light companies melted away and retreated, some as far as their boats. James Abercrombie, commanding the Grenadiers, was fatally wounded. Pigot's attacks on the redoubt and breastworks fared little better; by stopping and exchanging fire with the colonists, the regulars were fully exposed and suffered heavy losses. They continued to be harried by snipers in Charlestown, and, after seeing what happened to Howe's advance, Pigot ordered a retreat.[63][64][65]
The regulars reformed on the field and marched out again, this time navigating a field strewn with dead and wounded comrades. This time, Pigot was not to feint; he was to assault the redoubt directly, possibly without the assistance of Howe's force. Howe, instead of marching against Stark's position along the beach, advanced instead against Knowlton's position along the rail fence. The outcome of the second attack was very much the same as the first. One British observer wrote, "Most of our Grenadiers and Light-infantry, the moment of presenting themselves lost three-fourths, and many nine-tenths, of their men. Some had only eight or nine men a company left ..."[66] Pigot's attack did not enjoy any greater success than Howe; after almost thirty minutes of firing ineffective volleys at the colonial position,[67] Pigot ordered a retreat.[68] The second attack had failed.
Meanwhile, in the rear of the colonial forces, confusion continued to reign. General Putnam tried, with only limited success, to send additional troops from Bunker Hill to the forward positions on Breed's Hill to support the embattled regiments.[69][70] One colonial observer wrote to Samuel Adams afterwards, "it appears to me that there was never more confusion and less command". Some companies and leaderless groups of men moved toward the field; others retreated. They were running low on powder and ammunition, and the colonial regiments suffered from a hemorrhage of deserters; by the time the third attack came, there were only 700-800 men left on Breed's Hill, with only 150 in the redoubt.[71][72] John Chester, a Connecticut captain, seeing an entire company in retreat, ordered his company to aim muskets at that company to halt its retreat; they turned about and headed back to the battlefield.[73]
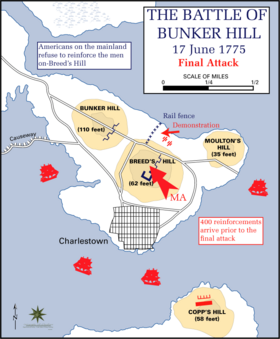
The British rear was also in disarray. Wounded soldiers that were mobile had made their way to the landing areas and were being ferried back to Boston, while the wounded lying on the field of battle were the source of moans and cries of pain.[74] Howe, committing to a third attack, sent word to Clinton in Boston for additional troops. Clinton, who had observed the first two attacks, sent around 400 men from the 2nd Marines and the 63rd Foot, and followed himself to help rally the troops. In addition to these reserves, he convinced around 200 walking wounded to form up for the third attack.[75]
The third assault was to concentrate squarely on the redoubt, with only a feint on the colonist's flank. Howe ordered his men to remove their heavy packs and leave all unnecessary equipment behind. Howe arrayed his forces in column formation rather than the extended order of the first two assaults, exposing fewer men along the front to colonial fire.[76] The third attack, this time made at the point of the bayonet, successfully carried the redoubt, however the final volleys of fire from the colonists cost the life of Major Pitcairn.[77] The defenders had run out of ammunition, reducing the battle to close combat. The advantage turned to the British, as their troops were equipped with bayonets on their muskets, while most of the colonists were not. Colonel Prescott, one of the last men to leave the redoubt, parried bayonet thrusts with his normally ceremonial sabre.[78] It is during the retreat from the redoubt that Joseph Warren was killed.[79]
The retreat of much of the colonial forces from the peninsula was made possible in part by the controlled withdrawal of the forces along the rail fence, led by John Stark and Thomas Knowlton, which prevented the encirclement of the hill. Their disciplined retreat, described by Burgoyne as "no flight; it was even covered with bravery and military skill", was so effective that most of the wounded were saved;[80] most of the prisoners taken by the British were mortally wounded.[80] General Putnam attempted to reform the troops on Bunker Hill; however the flight of the colonial forces was so rapid that artillery pieces and entrenching tools had to be abandoned. The colonists suffered most of their casualties during the retreat on Bunker Hill. By 5 p.m., the colonists had retreated over the Charlestown Neck to fortified positions in Cambridge, and the British were in control of the peninsula.[81]
Aftermath

The British had taken the ground but at a great loss; they had suffered 1,054 casualties (226 dead and 828 wounded), with a disproportionate number of these officers. The casualty count was the highest suffered by the British in any single encounter during the entire war.[82] General Clinton, echoing Pyrrhus of Epirus, remarked in his diary that "A few more such victories would have shortly put an end to British dominion in America."[11] British dead and wounded included 100 commissioned officers, a significant portion of the British officer corps in North America.[83] Much of General Howe's field staff was among the casualties.[84] General Gage, in his report after the battle, reported the following officer casualties (listing lieutenants and above by name):[85]
- 1 lieutenant colonel killed
- 2 majors killed, 3 wounded
- 7 captains killed, 27 wounded
- 9 lieutenants killed, 32 wounded
- 15 sergeants killed, 42 wounded
- 1 drummer killed, 12 wounded
The colonial losses were about 450, of whom 140 were killed. Most of the colonial losses came during the withdrawal. Major Andrew McClary was technically the highest ranking colonial officer to die in the battle; he was hit by cannon fire on Charlestown Neck, the last person to be killed in the battle. He was later commemorated by the dedication of Fort McClary in Kittery, Maine.[86] A serious loss to the Patriot cause, however, was the death of Dr. Joseph Warren. He was the President of Massachusetts' Provincial Congress, and he had been appointed a Major General on June 14. His commission had not yet taken effect when he served as a volunteer private three days later at Bunker Hill.[87] Only thirty men were captured by the British, most of them with grievous wounds; twenty died while held prisoner. The colonials also lost numerous shovels and other entrenching tools, as well as five out of the six cannon they had brought to the peninsula.[88][89]
Political consequences
When news of the battle spread through the colonies, it was reported as a colonial loss, as the ground had been taken by the enemy, and significant casualties were incurred. George Washington, who was on his way to Boston as the new commander of the Continental Army, received news of the battle while in New York City. The report, which included casualty figures that were somewhat inaccurate, gave Washington hope that his army might prevail in the conflict.[90]
We have ... learned one melancholy truth, which is, that the Americans, if they were equally well commanded, are full as good soldiers as ours.[91]
A British officer in Boston, after the battle
The Massachusetts Committee of Safety, seeking to repeat the sort of propaganda victory it won following the battles at Lexington and Concord, commissioned a report of the battle to send to England. Their report, however, did not reach England before Gage's official account arrived on July 20. His report unsurprisingly caused friction and argument between the Tories and the Whigs, but the casualty counts alarmed the military establishment, and forced many to rethink their views of colonial military capability.[92] King George's attitude toward the colonies hardened, and the news may have contributed to his rejection of the Continental Congress' Olive Branch Petition, the last substantive political attempt at reconciliation. Sir James Adolphus Oughton, part of the Tory majority, wrote to Lord Dartmouth of the colonies, "the sooner they are made to Taste Distress the sooner will [Crown control over them] be produced, and the Effusion of Blood be put a stop to."[93] About a month after receiving Gage's report the Proclamation of Rebellion would be issued in response; this hardening of the British position would also lead to a hardening of previously weak support for the rebellion, especially in the southern colonies, in favor of independence.[93]
Gage's report had a more direct effect on his own career. His dismissal from office was decided just three days after his report was received, although General Howe did not replace him until October 1775.[94] Gage wrote another report to the British Cabinet, in which he repeated earlier warnings that "a large army must at length be employed to reduce these people", that would require "the hiring of foreign troops".[95]
Analysis
Much has been written in the wake of this battle over how it was conducted. Both sides made strategic and tactical missteps which could have altered the outcome of the battle. While hindsight often gives a biased view, some things seem to be apparent after the battle that might reasonably have been within the reach of the command of the day.
Years after the battle, and after Israel Putnam was dead, General Dearborn published an account of the battle in Port Folio magazine, accusing General Putnam of inaction, cowardly leadership and failing to supply reinforcements during the battle, which subsequently sparked a long lasting and major controversy among veterans of the war, various friends, family members and historians.[96][a] People were shocked by the rancor of the attack, and this prompted a forceful response from defenders of Putnam, including such notables as John and Abigail Adams. It also prompted Putnam's son, Daniel Putnam, to defend his father using a letter of thanks written by George Washington, and statements from Colonel John Trumbull and Judge Thomas Grosvenor in Putnam's defense.[97] Historian Harold Murdock wrote that Dearborn's account "abounds in absurd misstatements and amazing flights of imagination." The Dearborn attack received considerable attention because at the time he was in the middle of considerable controversy himself. He had been relieved of one of the top commands in the War of 1812 due to his mistakes. He had also been nominated to serve as Secretary of War by President James Monroe, but was rejected by the United States Senate (which was the first time that the Senate had voted against confirming a presidential cabinet choice).[98][99][100][101] Several contradictory accounts of the event sparked discourse, but New Englanders attempted to resolve conflicts by suggesting to erect memorials dedicated to Bunker Hill rather than a specific person.[97]
Disposition of Colonial forces

The colonial regiments, while nominally under the overall command of General Ward, with General Putnam and Colonel Prescott leading in the field, often acted quite independently.[102] This was evident in the opening stages of the battle, when a tactical decision was made that had strategic implications: after deliberating with General Putnam and Colonel Gridley, Colonel Prescott and his staff, apparently in contravention of orders, decided to fortify Breed's Hill rather than Bunker Hill.[103] The fortification of Breed's Hill was more militarily provocative; it would have put offensive artillery closer to Boston, directly threatening the city.[104] It also exposed the forces there to the possibility of being trapped, as they probably could not properly defend against attempts by the British to land troops and take control of Charlestown Neck. If the British had taken that step, they might have had a victory with many fewer casualties.[105] The colonial fortifications were haphazardly arrayed; it was not until the morning that Prescott discovered the redoubt could be easily flanked,[35] compelling the hasty construction of a rail fence. Furthermore, the colonists did not have the manpower to defend to the west.[39]
Manpower was a further problem on Breed's Hill; toward the northern end of the colonial position the defenses were thin and could have been easily exploited by the British (as they had already landed), had reinforcements not arrived in time.[48] While the front lines of the colonial forces were generally well-managed, the scene behind them, especially once the fighting began, was significantly disorganized, due at least in part due to a poor chain of command and logistical organization. One commentator wrote: "it appears to me there never was more confusion and less command."[52] Only some of the militias operated directly under Ward's and Putnam's authority,[106] and some commanders directly disobeyed orders, remaining at Bunker Hill rather than committing to the defense of Breed's Hill once fighting began. Subsequent to the battle, several officers were subjected to court martial and cashiered.[107]
Once combat began, desertion was a chronic issue for the colonial troops. By the time of the third British assault, there were only 700-800 troops left, with only 150 in the redoubt.[71] Colonel Prescott was of the opinion that the third assault would have been repulsed, had his forces in the redoubt been reinforced with either more men, or if more supplies of ammunition and powder had been brought forward from Bunker Hill.[108] Despite these issues, the withdrawal of the colonial forces was generally well-managed, recovering most of their wounded in the process, and elicited praise from British generals such as Burgoyne.[80] However, the speed of the withdrawal precipitated leaving behind their artillery and entrenching tools.[81]
Disposition of British forces
The British leadership, for its part, acted slowly once the works on Breed's Hill were spotted. It was 2 p.m. when the troops were ready for the assault, roughly ten hours after the Lively first opened fire. This leisurely pace gave the colonial forces ample time to reinforce the flanking positions that would have otherwise been poorly defended and vulnerable.[109] Gage and Howe decided that a frontal assault on the works would be a simple matter, although an encircling move (i.e. gaining control of Charlestown Neck) would have given them a more rapid and resounding victory.[105] (This move would not have been without risks of its own, as the colonists could have made holding the Neck expensive with fire from the high ground in Cambridge.) However, the British leadership was excessively optimistic, believing that "two regiments were sufficient to beat the strength of the province".[110]

The British attack was further delayed when the inefficiencies engendered by peacetime bore fruit; the artillery bombardment that was to have preceded the assault did not transpire, as it was discovered the field guns had been supplied with the wrong caliber of ammunition.[61] Once in the field, Howe, rather than focusing on the redoubt, twice opted to dilute the force attacking the redoubt with flanking assaults against the colonial left. The formations the British used were not conducive to a successful assault; arrayed in long lines and weighed down by unnecessary heavy gear, many of the troops were immediately vulnerable to colonial fire, which resulted in heavy casualties in the initial attacks. The impetus of any British attack was further diluted when officers opted to concentrate on firing repeated volleys which were simply absorbed by the earthworks and rail fences. It was only with the third attack, when the forces were arrayed in deep columns; the troops were ordered to leave all unnecessary gear behind; the attacks were to be at the point of the bayonet;[76] and the flanking attack was merely a feint,[111] with the main force (now reinforced) squarely targeted the redoubt, that the effort succeeded.[112]
Following the taking of the peninsula, the British arguably had a tactical advantage that they could have used to press into Cambridge. General Clinton proposed this to Howe; having just led three assaults with grievous casualties (with most of his field staff among them), he declined the idea.[113] The colonial military leaders eventually recognized Howe as a tentative decision-maker, to his detriment; in the aftermath of the Battle of Long Island (1776), he again had tactical advantages that might have delivered Washington's army into his hands, but again refused to act.[114]
Historian John Ferling maintains that had General Gage used the Royal Navy to secure the narrow neck to the Charleston peninsula, cutting the Americans off from the mainland, he could have achieved a far less costly victory, but he was motivated by revenge over patriot resistance at the Battles of Lexington and Concord and relatively heavy British losses, and also felt that the colonial militia were completely untrained and could be overtaken with little effort, opting for a frontal assault.[115]
"The whites of their eyes"
The famous order "Don't fire until you see the whites of their eyes" was popularized in stories about the battle of Bunker Hill.[citation needed] It is uncertain as to who said it there, since various histories, including eyewitness accounts,[116] attribute it to Putnam, Stark, Prescott, or Gridley, and it may have been said first by one, and repeated by the others.[117] It was also not an original statement. The idea dates originally to the general-king Gustavus Adolphus (1594–1632) who gave standing orders to his musketeers: "never to give fire, till they could see their own image in the pupil of their enemy's eye".[118] Gustavus Adolphus's military teachings were widely admired and imitated and caused this saying to be often repeated. It was used by General James Wolfe on the Plains of Abraham, when his troops defeated Montcalm's army on September 13, 1759.[119] The earliest similar quote came from the Battle of Dettingen on June 27, 1743, where Lieutenant-Colonel Sir Andrew Agnew of Lochnaw warned his Regiment, the Royal Scots Fusiliers, not to fire until they could "see the white of their e'en."[120] The phrase was also used by Prince Charles of Prussia in 1745, and repeated in 1755 by Frederick the Great, and may have been mentioned in histories the colonial military leaders were familiar with.[121] Whether or not it was actually said in this battle, it was clear that the colonial military leadership were regularly reminding their troops to hold their fire until the moment when it would have the greatest effect, especially in situations where their ammunition would be limited.[122]
Notable participants


A significant number of notable American patriots fought in this battle. Henry Dearborn and William Eustis, for example, went on to distinguished military and political careers; both served in Congress, the Cabinet, and in diplomatic posts. Others, like John Brooks, Henry Burbeck, Christian Febiger, Thomas Knowlton, and John Stark, became well known for later actions in the war.[123][124] Stark became known as the "Hero of Bennington" for his role in the 1777 Battle of Bennington. Free African-Americans also fought in the battle; notable examples include Barzillai Lew, Salem Poor, and Peter Salem.[125][126] Another notable participant was Daniel Shays, who later became famous for his army of protest in Shays' Rebellion.[127] Israel Potter was immortalized in Israel Potter: His Fifty Years of Exile, a novel by Herman Melville.[128][129] Colonel John Paterson commanded the Massachusetts First Militia, served in Shays' Rebellion, and became a congressman from New York.[130] Lt. Col. Seth Read, who served under John Paterson at Bunker Hill, went on to settle Geneva, New York and Erie, Pennsylvania, and was said to have been instrumental in the phrase E pluribus unum being added to U.S. coins.[131][132][133][134] George Claghorn of the Massachusetts militia was shot in the knee at Bunker Hill and went on after the war to become the master builder of the USS Constitution, a.k.a. "Old Ironsides", which is the oldest naval vessel in the world that is still commissioned and afloat.[135][136]
Notable British participants in the battle were: Lt. Col. Samuel Birch, Major John Small, Lord Rawdon, General William Howe, Major John Pitcairn and General Henry Clinton.
Commemorations
John Trumbull's painting, The Death of General Warren at the Battle of Bunker Hill (displayed in lede), was created as an allegorical depiction of the battle and Warren's death, not as an actual pictorial recording of the event. The painting shows a number of participants in the battle including a British officer, John Small, among those who stormed the redoubt, yet came to be the one holding the mortally wounded Warren and preventing a fellow redcoat from bayoneting him. He was friends of Putnam and Trumbull. Other central figures include Andrew McClary who was the last man to fall in the battle.[137]
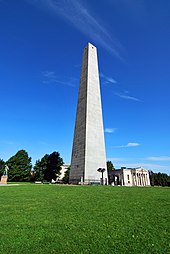
The Bunker Hill Monument is an obelisk that stands 221 feet (67 m) high on Breed's Hill. On June 17, 1825, the fiftieth anniversary of the battle, the cornerstone of the monument was laid by the Marquis de Lafayette and an address delivered by Daniel Webster.[138][139] The Leonard P. Zakim Bunker Hill Memorial Bridge was specifically designed to evoke this monument.[140] There is also a statue of William Prescott showing him calming his men down.

The National Park Service operates a museum dedicated to the battle near the monument, which is part of the Boston National Historical Park.[141] A cyclorama of the battle was added in 2007 when the museum was renovated.[142]
In nearby Cambridge, a small granite monument just north of Harvard Yard bears this inscription: "Here assembled on the night of June 16, 1775, 1200 Continental troops under command of Colonel Prescott. After prayer by President Langdon, they marched to Bunker Hill." See footnote for picture.[143] (Samuel Langdon, a Congregational minister, was Harvard's 11th president.)[144] Another small monument nearby marks the location of the Committee of Safety, which had become the Patriots' provisional government as Tories left Cambridge.[145] These monuments are on the lawn to the west of Harvard's Littaeur Center, which is itself the west of Harvard's huge Science Center. See footnote for map.[146]

Bunker Hill Day, observed every June 17, is a legal holiday in Suffolk County, Massachusetts (which includes the city of Boston), as well as Somerville in Middlesex County. Prospect Hill, site of colonial fortifications overlooking the Charlestown Neck, is now in Somerville, which was previously part of Charlestown.[147][148] State institutions in Massachusetts (such as public institutions of higher education) in Boston also celebrate the holiday.[149][150] However, the state's FY2011 budget requires that all state and municipal offices in Suffolk County be open on Bunker Hill Day and Evacuation Day.[151]
On June 16 and 17, 1875, the centennial of the battle was celebrated with a military parade and a reception featuring notable speakers, among them General William Tecumseh Sherman and Vice President Henry Wilson. It was attended by dignitaries from across the country.[152] Celebratory events also marked the sesquicentennial (150th anniversary) in 1925 and the bicentennial in 1975.[153][154]
Over the years the Battle of Bunker Hill has been commemorated on four U.S. Postage stamps.[155]

Left stamp depicts Battle of Bunker Hill battle flag and Monument
Left-center, depicts John Trumbull's painting of the battle
Right-center depicts detail of Trumbull's painting
Right depicts image of Bunker Hill battle flag
See also
- List of American Revolutionary War battles
- American Revolutionary War §Early Engagements. The Battle of Bunker Hill placed in sequence and strategic context.
- List of Continental Forces in the American Revolutionary War
- List of British Forces in the American Revolutionary War
- Dr. John Hart, Regimental Surgeon of Col Prescott's Regiment who treated the wounded at Bunker Hill
- Royal Welch Fusiliers
- USS Bunker Hill
Notes
- ^ In 1822 Dearborn wrote an anonymous plea in the Boston Patriot to urge the purchase the site of the Bunker Hill battlefield which was currently listed for sale.[96]
References
- ^ Chidsey p. 122 counts 1,400 in the night-time fortification work. Frothingham is unclear on the number of reinforcements arriving just before the battle breaks out. In a footnote on p. 136, as well as on p. 190, he elaborates the difficulty in getting an accurate count.
- ^ Chidsey p. 90 says the initial force requested was 1,550, but Howe requested and received reinforcements before the battle began. Frothingham p. 137 puts the total British contingent likely to be over 3,000. Furthermore, according to Frothingham p. 148, additional reinforcements arrived from Boston after the second attack was repulsed. Frothingham, p. 191 notes the difficulty in attaining an accurate count of British troops involved.
- ^ Chidsey, p. 104
- ^ Frothingham pp. 191, 194.
- ^ James L. Nelson, With Fire and Sword: The Battle of Bunker Hill and the Beginning of the American Revolution (2011)
- ^ Borneman, Walter R. American Spring: Lexington, Concord, and the Road to Revolution, p. 350, Little, Brown and Company, New York, Boston, London, 2014. ISBN 978-0-316-22102-3.
- ^ Hubbard, Robert Ernest. Major General Israel Putnam: Hero of the American Revolution, p. 85, McFarland & Company, Inc., Jefferson, North Carolina, 2017. ISBN 978-1-4766-6453-8.
- ^ Hubbard, Robert Ernest. Major General Israel Putnam: Hero of the American Revolution, pp. 85–87, McFarland & Company, Inc., Jefferson, North Carolina, 2017. ISBN 978-1-4766-6453-8.
- ^ Withington, Robert (June 1949). "A French Comment on the Battle of Bunker Hill". The New England Quarterly. 22 (2): 235–240. doi:10.2307/362033. ISSN 0028-4866. JSTOR 362033.
- ^ Hubbard, Robert Ernest. Major General Israel Putnam: Hero of the American Revolution, pp. 87–95, McFarland & Company, Inc., Jefferson, North Carolina, 2017. ISBN 978-1-4766-6453-8.
- ^ a b Clinton, p. 19. General Clinton's remark is an echoing of Pyrrhus of Epirus's original sentiment after the Battle of Heraclea, "one more such victory and the cause is lost".
- ^ "Battle of Bunker Hill". Encyclopædia Britannica. Encyclopædia Britannica, Inc. December 8, 2016. Retrieved January 25, 2016.
Although the British eventually won the battle, it was a Pyrrhic victory that lent considerable encouragement to the revolutionary cause.
- ^ Hubbard, Robert Ernest. Major General Israel Putnam: Hero of the American Revolution, pp. 94–95, McFarland & Company, Inc., Jefferson, North Carolina, 2017. ISBN 978-1-4766-6453-8.
- ^ 18th century Boston was a peninsula. Primarily in the 19th century, much land around the peninsula was filled, giving the modern city its present geography. See the history of Boston for details.
- ^ Chidsey, p. 72 New Hampshire 1,200, Rhode Island 1,000, Connecticut 2,300, Massachusetts 11,500
- ^ Alden, p. 178
- ^ Visitors to Boston, upon seeing the nearby hills, may conclude that they are too low. The hills were once higher, but were lowered by excavations to obtain landfill used to expand Boston in the 19th century.
- ^ Martin, James Kirby (1997). Benedict Arnold: Revolutionary Hero. New York: New York University Press. p. 73. ISBN 978-0-8147-5560-0. OCLC 36343341.
- ^ Chidsey p. 91 has an historic map showing elevations.
- ^ Withington, Robert (1949). "A French Comment on the Battle of Bunker Hill". The New England Quarterly. 2: 235–240 – via JSTOR.
- ^ Adams, Charles Francis (1896). "The Battle of Bunker Hill". The American Historical Review. 1: 401–413 – via JSTOR.
- ^ French, p. 220
- ^ French, p. 249
- ^ Brooks, p. 119
- ^ Ketchum, pp. 45–46
- ^ Ketchum, p. 47
- ^ Ketchum, pp. 74–75
- ^ French, p. 255
- ^ Hubbard, Robert Ernest. Major General Israel Putnam: Hero of the American Revolution, p. 84, McFarland & Company, Inc., Jefferson, North Carolina, 2017. ISBN 978-1-4766-6453-8.
- ^ Frothingham, pp. 122–123
- ^ Ketchum, pp. 102, 245
- ^ Frothingham, pp. 123–124
- ^ Frothingham, p. 135
- ^ Hubbard, Robert Ernest. Major General Israel Putnam: Hero of the American Revolution, pp. 87–88, McFarland & Company, Inc., Jefferson, North Carolina, 2017. ISBN 978-1-4766-6453-8.
- ^ a b c Ketchum, p. 115
- ^ Frothingham, p. 125
- ^ Brooks, p. 127
- ^ Middlekauff, Robert (2005). The Glorious Cause: The American Revolution, 1763-1789. New York, NY: Oxford University Press. p. 290. ISBN 0-19-516247-1. OCLC 55960833.
- ^ a b Ketchum, p. 117
- ^ Middlekauff, Robert (2005). The Glorious Cause: The American Revolution, 1763-1789. New York, NY: Oxford University Press. p. 293. ISBN 0-19-516247-1. OCLC 55960833.
- ^ Ketchum, pp. 120–121
- ^ Wood, p. 54
- ^ Ketchum, p. 122
- ^ a b Graydon, p. 424
- ^ Chidsey, p. 84
- ^ a b c Frothingham, p. 133
- ^ a b Ketchum, p. 139
- ^ a b c Ketchum, p 143
- ^ Chidsey p. 93
- ^ Chidsey p. 96
- ^ Frothingham, p. 136
- ^ a b c Ketchum, p. 147
- ^ Hubbard, Robert Ernest. Major General Israel Putnam: Hero of the American Revolution, pp. 92–93, McFarland & Company, Inc., Jefferson, North Carolina, 2017. ISBN 978-1-4766-6453-8.
- ^ Ketchum, pp. 152–153
- ^ Ketchum, pp. 151–152
- ^ Middlekauff, Robert (2005). The Glorious Cause: The American Revolution, 1763-1789. New York, NY: Oxford University Press. p. 296. ISBN 0-19-516247-1. OCLC 55960833.
- ^ Frothingham, pp. 144–145
- ^ Ketchum, p. 152
- ^ Fusillers, Mark Urban p38
- ^ Kurtz, Henry I. Men of War: Essays on American Wars and Warriors, p. 31, Xlibris Corporation, 2006.
- ^ a b Philbrick, Nathaniel. Bunker Hill: A City, A Siege, A Revolution, p. 219-220, New York: Viking Press, 2013.
- ^ Kurtz, p. 29
- ^ Ketchum, p. 160
- ^ Kurtz, p. 31-33
- ^ Frothingham, pp. 141–142
- ^ Ketchum, p. 161
- ^ Kurtz, p. 33
- ^ Ketchum, p. 162
- ^ Frothingham, p. 146
- ^ Hubbard, Robert Ernest. Major General Israel Putnam: Hero of the American Revolution, p. 92, McFarland & Company, Inc., Jefferson, North Carolina, 2017. ISBN 978-1-4766-6453-8.
- ^ a b Kurtz, p. 30-35
- ^ Hubbard, Robert Ernest. Major General Israel Putnam: Hero of the American Revolution, pp. 92–95, McFarland & Company, Inc., Jefferson, North Carolina, 2017. ISBN 978-1-4766-6453-8.
- ^ Ketchum, pp. 165–166
- ^ Ketchum, p. 163
- ^ Ketchum, p. 164
- ^ a b Kurtz p. 35
- ^ Chidsey p. 99
- ^ Frothingham, p. 150
- ^ Frothingham, p. 151
- ^ a b c Ketchum, p. 181
- ^ a b Frothingham, pp. 151–152
- ^ Brooks, p. 237
- ^ Brooks, pp. 183–184
- ^ Frothingham, pp. 145, 196
- ^ Frothingham, pp. 387–389 lists the officer casualties by name, as well as this summary
- ^ Bardwell, p. 76
- ^ Ketchum, p. 150
- ^ Ketchum, p. 255
- ^ Hubbard, Robert Ernest. Major General Israel Putnam: Hero of the American Revolution, pp. 94–96, McFarland & Company, Inc., Jefferson, North Carolina, 2017. ISBN 978-1-4766-6453-8.
- ^ Ketchum, pp. 207–208
- ^ Ketchum, p. 209
- ^ Ketchum, pp. 208–209
- ^ a b Ketchum, p. 211
- ^ Ketchum, p. 213
- ^ Scheer, p. 64
- ^ a b Cray, 2001
- ^ a b Cray, Robert E. (2001). "Bunker Hill Refought: Memory Wars and Partisan Conflicts, 1775-1825". Historical Journal of Massachusetts – via Proquest.
- ^ Purcell, 2010, pp.164-168
- ^ Ketchum, Richard M. The Battle for Bunker Hill, p. 178, The Cresset Press, London, England, 1963.
- ^ Murdock, Harold. Bunker Hill, Notes and Queries on a Famous Battle, Kessinger Publishing, LLC, 2010. ISBN 1163174912,
- ^ Hubbard, Robert Ernest. Major General Israel Putnam: Hero of the American Revolution, pp. 191–92, McFarland & Company, Inc., Jefferson, North Carolina, 2017 ISBN 978-1-4766-6453-8.
- ^ Frothingham, p. 131
- ^ Frothingham, p. 19
- ^ Hubbard, Robert Ernest. Major General Israel Putnam: Hero of the American Revolution, p. 87, McFarland & Company, Inc., Jefferson, North Carolina, 2017 ISBN 978-1-4766-6453-8.
- ^ a b Frothingham, p. 155
- ^ Frothingham, pp. 158–159
- ^ French, pp. 274–276
- ^ Frothingham, p. 153
- ^ French, pp. 263–265
- ^ Frothingham, p. 156
- ^ French, p. 277
- ^ Frothingham, p. 148
- ^ Frothingham pp. 152–153
- ^ Jackson, p. 20
- ^ Ferling, 2015, p. 127-129
- ^ Lewis, John E., ed. The Mammoth Book of How it Happened. London: Robinson, 1998. Print. P. 179
- ^ Hubbard, Robert Ernest. Major General Israel Putnam: Hero of the American Revolution, p. 97, McFarland & Company, Inc., Jefferson, North Carolina, 2017 ISBN 978-1-4766-6453-8.
- ^ Joannis Schefferi, "Memorabilium Sueticae Gentis Exemplorum Liber Singularis" (1671) p. 42
- ^ R. Reilly, The Rest to Fortune: The Life of Major-General James Wolfe (1960), p. 324
- ^ Anderson, p. 679
- ^ Winsor, p. 85
- ^ French, pp. 269–270
- ^ Abbatt, p. 252
- ^ Ketchum, pp. 132,165
- ^ Woodson, p. 204
- ^ Ketchum, p. 260
- ^ Richards, p. 95
- ^ Ketchum, p. 257
- ^ Melville
- ^ Biographical Directory of the United States
- ^ Buford, 1895, Preface
- ^ Marvin, p. 425, 436
- ^ "Massachusetts Coppers 1787–1788: Introduction". University of Notre Dame. Archived from the original on November 8, 2007. Retrieved October 9, 2007.
- ^ "e pluribus unum FAQ #7". www.treas.gov. Retrieved September 29, 2007.[permanent dead link]
- ^ Wheeler, O. Keith (January 30, 2002). "Individual Summary for COL. GEORGE CLAGHORN". Retrieved October 10, 2012.
- ^ HMS Victory is the oldest commissioned vessel by three decades; however, Victory has been in dry dock since 1922. "HMS Victory Service Life". HMS Victory website. Archived from the original on September 24, 2013. Retrieved October 14, 2012.
- ^ Bunce, p. 336
- ^ Hayward, p. 322
- ^ Clary
- ^ MTA Bridges
- ^ Bunker Hill Museum
- ^ McKenna
- ^ "Album Archive". Picasaweb.google.com. Retrieved November 19, 2017.
- ^ "Archived copy". Archived from the original on January 1, 2013. Retrieved 2013-12-31.CS1 maint: archived copy as title (link)
- ^ Committee of Safety (American Revolution)
- ^ "Harvard University Campus Map". Map.harvard.edu. Archived from the original on January 6, 2013. Retrieved November 19, 2017.
- ^ MA List of legal holidays
- ^ Somerville Environmental Services Guide
- ^ University of Massachusetts, Boston, observed holidays
- ^ Bunker Hill Day closings
- ^ "Commonwealth of Massachusetts FY2011 Budget, Outside Section 5". Mass.gov. July 14, 2010. Retrieved August 6, 2010.
- ^ See the Centennial Book for a complete description of the events.
- ^ Sesquicentennial celebration
- ^ New York Times, June 15, 1975
- ^ Scotts 2008 United States stamp catalogue
Bibliography
Major sources Most of the information about the battle itself in this article comes from the following sources.
- Brooks, Victor (1999). The Boston Campaign. Conshohocken, PA: Combined Publishing. ISBN 1-58097-007-9. OCLC 42581510.
- Chidsey, Donald Barr (1966). The Siege of Boston. Boston, MA: Crown. OCLC 890813.
- Frothingham, Jr, Richard (1851). History of the Siege of Boston and of the Battles of Lexington, Concord, and Bunker Hill, Second Edition. Boston, MA: Charles C. Little and James Brown. OCLC 2138693.
- French, Allen (1911). The Siege of Boston. New York: Macmillan. OCLC 3927532.
- Ketchum, Richard (1999). Decisive Day: The Battle of Bunker Hill. New York: Owl Books. ISBN 0-385-41897-3. OCLC 24147566. (Paperback: ISBN 0-8050-6099-5)
- Nelson , James L. With Fire and Sword: The Battle of Bunker Hill and the Beginning of the American Revolution (2011) excerpt
- Philbrick, Nathaniel. Bunker Hill: A City, a Siege, a Revolution (New York: Viking, 2013) excerpt
Minor sources Specific facts not necessarily covered by the major sources come from the following sources.
- Buford, Mary Hunter (1895). Seth Read, Lieut.-Col. Continental Army; Pioneer at Geneva, New York, 1787, and at Erie, Penn., June, 1795. His Ancestors and Descendants. Boston, Mass. pp. 167 Pages on CD in PDF Format.
- Bunce, Oliver Bell (1870). The romance of the revolution: being true stories of the adventures, romantic incidents, hairbreath escapes, and heroic exploits of the days of '76. Philadelphia: Porter & Coates. p. 337. OCLC 3714510.
- Abbatt, William (ed) (1883). The Magazine of American History with Notes and Queries, volume 8. A.S. Barnes. OCLC 1590082.CS1 maint: extra text: authors list (link)
- Alden, John R (1989). A History of the American Revolution. Da Capo. ISBN 0-306-80366-6.
- Anderson, William (1863). The Scottish Nation: Or, The Surnames, Families, Literature, Honours, and Biographical History of the People of Scotland, volume 2. Fullarton. OCLC 1290413.
- Bardwell, John D (2005). Old Kittery. Arcadia Publishing. ISBN 978-0-7385-2476-4.
- Clinton, Henry (1954). Willcox, William B. (ed.). The American Rebellion: Sir Henry Clinton's Narrative of His Campaigns, 1775–1782. Yale University Press. OCLC 1305132.
- Graydon, Alexander (1846). Littell, John Stockton (ed.). Memoirs of His Own Time: With Reminiscences of the Men and Events of the Revolution. Philadelphia: Lindsay & Blakiston. OCLC 1557096.
- Ferling, John (2015). Whirlwind, The American Revolution and the War That Won it. Bloomsbury Press, New York, London. ISBN 9781620401736.
- Hayward, John (1854). A Gazetteer of the United States of America. self published. OCLC 68756962.
- Jackson, Kenneth T; Dunbar, David S (2005). Empire City: New York Through the Centuries. Columbia University Press. ISBN 978-0-231-10909-3.
- Melville, Herman (1855). Israel Potter: his fifty years of exile. G. Routledge. OCLC 13065897.
- Richards, Leonard L (2003). Shays's Rebellion: The American Revolution's Final Battle. University of Pennsylvania Press. ISBN 978-0-8122-1870-1.
- Scheer, George F; Rankin, Hugh F (1987). Rebels and Redcoats: The American Revolution Through the Eyes of Those Who Fought and Lived It. Da Capo Press. ISBN 978-0-306-80307-9.
- Winsor, Justin; Jewett, Clarence F (1882). The Memorial History of Boston: Including Suffolk County, Massachusetts, 1630–1880, Volume 3. James R. Osgood. OCLC 4952179.
- Wood, Gordon S. (2002). The American Revolution: A History. Modern Library. ISBN 0-8129-7041-1.
- Woodson, Carter Godwin; Logan, Rayford Whittingham (1917). The Journal of Negro History, Volume 2. Association for the Study of Negro Life and History. OCLC 1782257.
- Cray, Robert E. (2001). Bunker Hill Refought: Memory Wars and Partisan Conflicts, 1775-1825 (PDF). Historical Journal of Massachusetts. Archived from the original (PDF) on May 5, 2016. Retrieved April 14, 2016.
- "Congressional bio of John Patterson". Biographical Directory of the United States.
Commemorations Various commemorations of the battle are described in the following sources.
- "Charles River Bridges". Massachusetts Turnpike Authority. Archived from the original on September 28, 2007. Retrieved November 26, 2008.
- "Massachusetts List of Legal Holidays". Massachusetts Secretary of State. Retrieved December 16, 2008.
- "Environmental Guide 2008" (PDF). City of Somerville, Massachusetts. Archived from the original (PDF) on March 4, 2009. Retrieved February 26, 2009.
- "UMass Boston Holidays observed". University of Massachusetts, Boston. Archived from the original on February 25, 2009. Retrieved March 16, 2009.
- "Bunker Hill Day Closings". Boston Globe. June 18, 2007. Retrieved March 16, 2009.
- Winsor, Justin (1875). Celebration of the centennial anniversary of the battle of Bunker Hill. Boston, MA: Boston City Council. OCLC 2776599.
- Celebration of the sesquicentennial anniversary of the Battle of Bunker Hill, June 17, 1925. Boston, MA: City of Boston. 1925. OCLC 235594934.
- "Bunker Hill Museum". National Park Service. Archived from the original on April 3, 2009. Retrieved March 17, 2009.
- Clary, David (2007). Adopted Son: Washington, Lafayette, and the Friendship that Saved the Revolution. New York City: Bantam Books. pp. 443–448. ISBN 978-0-553-80435-5. OCLC 70407848.
- Kifner, John (July 15, 1975). "Not Unusual Occurrence: British Take Bunker Hill". New York Times. Missing or empty
|url=(help) - McKenna, Kathleen (June 10, 2007). "On Bunker Hill, a boost in La Fayette profile". Boston Globe. Archived from the original on February 20, 2009. Retrieved March 17, 2009.
Further reading
- Axelrod, Alan (2007). The real History of the American Revolution. Sterling Publishing Company, New York. ISBN 9781402768163.
- Beck, Derek W. (2016). The War Before Independence: 1775-1776. Sourcebooks, Inc. ISBN 9781492633105., 480 pages
- Doyle, Peter (1998). Bunker Hill. Charlottesville, VA: Providence Foundation. ISBN 1-887456-08-2. OCLC 42421560.
- Drake, Samuel Adams (1875). Bunker Hill: the story told in letters from the battle field by British Officers Engaged. Boston: Nichols and Hall.
- Elting, John R. (1975). The Battle of Bunker's Hill. Monmouth Beach, NJ: Phillip Freneau Press. ISBN 0-912480-11-4. OCLC 2867199.
- Ferling, John (2007). Almost a Miracle. Oxford University Press. ISBN 9780199758470.
- Fast, Howard (2001). Bunker Hill. New York: ibooks inc. ISBN 0-7434-2384-4. OCLC 248511443.
- Lanning, Michael Lee (2008). The American Revolution 100. Source Books, Naperville, Illinois. ISBN 9781402252808.
- O'Brien, Michael J. (1968). The Irish at Bunker Hill: Evidence of Irish Participation in the Battle of 17 June 1775. Irish University Press. ISBN 9780716505020.
- Philbrick, Nathaniel (2013). Bunker Hill: A City, a Siege, a Revolution. Viking. ISBN 978-0670025442.
- Ristow, W. Walter (1979). Cartography of the Battle of Bunker Hill.
- Swett, S (1826). History of Bunker Hill Battle, With a Plan, Second Edition. Boston, MA: Munroe and Francis. OCLC 3554078. This book contains printings of both Gage's official account and that of the Massachusetts Congress.
- Commager, Henry Steele; Morris, Richard B. (1958). The Spirit of 76. Harper & Row Publishers, New York, London. ISBN 0306806207., eBook, Vol 2
External links
| Wikisource has the text of the 1911 Encyclopædia Britannica article "Bunker Hill". |
| Wikimedia Commons has media related to Battle of Bunker Hill. |
About the battle
- Library of Congress page about the battle
- Bunker Hill Web Exhibit of the Massachusetts Historical Society
- SAR Sons of Liberty Chapter list of colonial fallen at Bunker Hill
- SAR Sons of Liberty Chapter description of the battle
- The Battle of Bunker Hill: Now We Are at War, a National Park Service Teaching with Historic Places (TwHP) lesson plan
- TheAmericanRevolution.org description of the battle
- BritishBattles.com description of the battle
- Animated History of the Battle of Bunker Hill Archived October 8, 2012, at the Wayback Machine
- . The American Cyclopædia. 1879.
About people in the battle
| |||||||||||||||||||||||||||
| |||||||||||||||||||||||||||
| |||||||||||||||||||||||||||
| |||||||||||||||||||||||||||
| Authority control: National libraries |
|---|
- Battles of the American Revolutionary War in Massachusetts
- Battles involving Great Britain
- Battles involving the United States
- 18th century in Boston
- Charlestown, Boston
- 1775 in the Thirteen Colonies
- Conflicts in 1775
- 1775 in Massachusetts
- History of the Royal Marines
- Military history of New England
- Battles of the Boston campaign