Battle of the Duisburg Convoy
| Battle of the Duisburg Convoy | |||||||
|---|---|---|---|---|---|---|---|
| Part of the Battle of the Mediterranean of the Second World War | |||||||
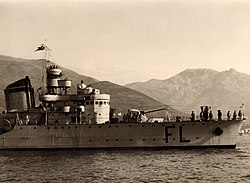 Fulmine, c. 1941 | |||||||
| |||||||
| Belligerents | |||||||
|
|
| ||||||
| Commanders and leaders | |||||||
|
|
| ||||||
| Strength | |||||||
|
2 light cruisers 2 destroyers |
2 heavy cruisers 10 destroyers 7 merchant ships | ||||||
| Casualties and losses | |||||||
| 1 destroyer damaged |
1 destroyer sunk 2 destroyers damaged 7 merchant ships sunk | ||||||

The Battle of the Duisburg Convoy, also known as the Battle of the BETA Convoy, was fought on the night of 8/9 November 1941 between an Italian convoy, its escorts and four British ships. The convoy was named "BETA" (Duisburg Convoy refers to the largest ship) by the Italian naval authorities and carried supplies for the Italian Army, civilian colonists and the Afrika Korps in Italian Libya.
Force K of the Royal Navy, based at Malta, annihilated the convoy, sinking all the merchant ships and the destroyer Fulmine with no loss and almost no damage. The Maestrale-class destroyer Libeccio was sunk next day by the British submarine HMS Upholder, while picking up survivors.
The Italians were severely criticised by the German naval attaché and pressured to accept liaison officers at Supermarina (headquarter of the Regia Marina) and on its ships. Italian attempts to reduce the risk of interception by British forces, by sending individual ships, pairs and smaller convoys from several ports at once was futile, because the British were reading Italian naval codes; the next convoy was forced to return to port.
Background[]
Italian belligerence[]
The declaration of war by Italy on 10 June 1940 placed the Italian Royal Air Force (Regia Aeronautica) astride the traditional British sea route to Indian Ocean ports through the Mediterranean and Suez Canal in Egypt. The Italian Royal Navy (Regia Marina) roughly trebled the numbers of battleships, cruisers and submarines available to the Axis against the Royal Navy. The British had held the eastern end of the Mediterranean and France the western end but on 25 June 1940 the fall of France ended the participation of the French Navy (Marine Nationale) in the Allied domination of the Mediterranean. The British based Force H at Gibraltar, the Mediterranean Fleet at Alexandria in Egypt and used the island of Malta in the central Mediterranean as base of operations. In September 1940, the Italian invasion of Egypt took place from Italian Libya (Africa Settentrionale Italiana, ASI) leading to the capture of Sidi Barrani. The Italian Army invaded Greece the following October.[1]
1940–1941[]
In early November 1940, the Italian offensive in Greece had been defeated and the Italian battleships Littorio, Conte di Cavour and Duilio had been damaged by Royal Navy torpedo bombers at the Battle of Taranto. The ship losses of the Italian Fleet had made it easier for the British to supply Malta and Greece.[2] The Axis forces involved the Western Desert Campaign were supplied across the Mediterranean by convoys from Italy to the ASI. Tripoli was the main entrepôt of the colony, which had lesser ports to the east, including Benghazi.[3] The normal wartime route for Italian supply deliveries to Libya went about 600 mi (966 km) westwards around Sicily and then hugged the coast from Tunisia eastwards to Tripoli, to evade British aircraft, ships and submarines from Malta. Once in Africa, Axis supplies had to be carried huge distances by road or in small consignments on coastal trading vessels, the distance from Tripoli to Benghazi being about 650 mi (1,050 km).[4]
Unternehmen Sonnenblume[]
In early 1941, after Operation Compass, the big British and Commonwealth victory in Egypt and Cyrenaica, the best-equipped units in the British XIII Corps were sent to Greece as part of Operation Lustre to assist the Greek Army against the Italian invaders and to be ready to meet an anticipated German invasion. Adolf Hitler responded to the Italian disaster in Egypt with Directive 22 (11 January 1941) ordering Unternehmen Sonnenblume (Operation Sunflower), the deployment of a new Deutsches Afrika Korps (DAK) to Libya, as a barrier detachment (Sperrverband). The DAK had fresh troops with better tanks, equipment and air support than the surviving Italian forces in the ASI.[5] The Axis force raided and quickly defeated the British at El Agheila on 24 March and at Mersa el Brega on 31 March, exploited the success and by 15 April, had pushed the British back to the Libyan–Egyptian border at Sollum and besieged the small Libyan port of Tobruk.[6] Several Axis attempts to seize Tobruk failed and the front line settled on the Egyptian border into November 1941.[7]
Malta[]
From 1 June to 31 October 1941, British forces based at Malta sank about 220,000 long tons (223,530 t) of Axis shipping on the African convoy routes, 94,000 long tons (95,508 t) by the navy and 115,000 long tons (116,845 t) by Royal Air Force (RAF) and Fleet Air Arm (FAA) aircraft from Malta and Egypt. Loaded Axis ships sailing to Africa accounted for 90 per cent of the losses and the Malta-based squadrons were responsible for about 75 per cent of ships sunk by aircraft.[8][9] In October 1941 the British re-established (Force K) a flotilla of surface ships at Malta for the first time since April, plus a detachment of Fairey Swordfish torpedo bombers. Italian air reconnaissance discovered the ships on 21 October and cancelled sailings for Tripoli, leaving only the inferior facilities at Benghazi.[10]
Prelude[]
Duisburg (BETA) Convoy operation[]
The convoy consisted two German vessels, SS Duisburg 7,889 gross register tonnage (GRT) and SS San Marco (3,113 GRT) and the Italian MV Maria (6,339 GRT), SS Sagitta (5,153 GRT) and MV Rina Corrado (5,180 GRT), carrying 389 vehicles, 34,473 long tons (35,026 t) of munitions, fuel in barrels and troops for the Italian and German forces in Libya. The tankers Conte di Misurata (7,599 GRT) and Minatitlan (5,014 GRT) carried 17,281 long tons (17,558 t) of fuel.[11] A powerful escort was to arranged for the convoy operation to counter Force K, the British flotilla recently based at Malta.[12]
Close Escort (Captain Ugo Bisciani) [Ship data from O'Hara (2009) unless indicated][13]
- Maestrale-class destroyers
- Folgore-class destroyer
- Fulmine (capitano di corvetta Mario Milano)
- Turbine-class destroyer
- Oriani-class destroyer
Distant Escort (Vice Admiral Bruno Brivonesi) [Ship data from O'Hara (2009) unless indicated][13]
- 3rd Cruiser Division: Trento-class cruisers Trieste and Trento
- 13th Destroyer Flotilla Soldati-class destroyers
The convoy was routed to the east of Malta, since the airfields in Libya were under Axis occupation, rather than the usual west and along the Tunisian coast. The convoy speed was 9 kn (17 km/h; 10 mph) and the distant escort had to sail a zig-zag course at 16 kn (30 km/h; 18 mph). Brivonesi and Supermarina were under the impression that the British ships would not be able to attack because they overlooked the fact that British ships were equipped with radar and prepared only for night attacks by aircraft.[12]
Force K[]
Force K (Captain William Agnew) consisted of two light cruisers with six 6-inch guns in twin turrets each and two treble 21-inch torpedo tubes. Two destroyers from Force H, with four twin 4-inch guns each and two quadruple 21-inch torpedo tubes, joined Force K at Malta. Intended to fight at night, all of the ships were equipped with radar and the cruisers had new searchlights with better performance.[15]
- Arethusa-class light cruisers [data from Greene and Massignani (2002) unless indicated][16]
- HMS Aurora (flagship)
- Penelope
- L-class destroyers
Battle[]
7 November[]

The Duisburg (BETA) Convoy, the 51st German–Italian sailing since 8 February departed from Naples on 7 November and Force K sailed the next day, forewarned by the British success in decyphering Italian signals concerning Axis shipping movements in the Mediterranean. A British reconnaissance aircraft was dispatched to "find" the convoy as camouflage.[10]
8/9 November[]
Force K made 28 kn (32 mph; 52 km/h) north-east of Malta, with Aurora leading the ships in line-ahead. The main convoy was found around midnight about 135 nmi (155 mi; 250 km) east of Syracuse.[12] There was slight moonlight to the east and the British ships took up position with the moon silhouetting the convoy. Agnew was under instructions to attack the nearest escorts first and then fire on the convoy, dealing with the other escorts as they appeared. The British ships slowed to 20 kn (23 mph; 37 km/h) and the gun crews were ordered to fire steadily, volume of fire being less important than accuracy. As the ships closed with the convoy, radar detected more ships, assumed to be destroyers and escorts but actually the distant escort (scorta a distanza). Force K sent an attack signal at 12:47 a.m. which was received by Trieste but jamming from Lively prevented a warning reaching the convoy; the only ships aware of the attack were 9.2 nmi (11 mi; 17 km) away.[17]
Aiming by radar, the British opened fire at about 12:58 a.m. from a range of 5,200 yd (2.6 nmi; 3.0 mi; 4.8 km) down to 3,000 yd (1.5 nmi; 1.7 mi; 2.7 km). Grecale was hit by the first three salvoes from Aurora; Lance and the 4-inch secondary armament of Aurora bombarded a merchant ship. Penelope engaged Maestrale, the leader of the close escort (scorta diretta) and was on target with the first salvoes and Lively began to shell the merchant ships three minutes afterwards. At first, the Italians thought that they were under air attack and the wireless mast of Maestrale was hit.[18] Fulmine attacked but was soon severely damaged by British gunfire, Milano losing an arm but remaining in command until the ship sank. Grecale was hit and came to a stop outside torpedo range and was later towed back to port by Oriani. Euro, undamaged, came within 2,200 yd (2,000 m) of the British ships but mistook them for Trieste and Trento, aided by the ships not firing on Euro. Maestrale had been signalling for Italian ships to rally on the port (far) side of the convoy, leading to Cigala countermanding an order to launch torpedoes. Moments later, British ships opened fire but Euro was no longer in a position to attack with torpedoes. Six British shells hit Euro but at such short range they passed through without exploding, killing about twenty members of the crew.[19]
The distant escort was on the right hand side of the convoy, steaming twice as fast, zig-zagging to keep station and also thought that the convoy was under air attack. At 1:13 a.m. Brivonesi signalled to Supermarina that torpedo bombers were attacking and then sailed for the point where the British ships had first been sighted, instead of their current position.[18] When watchmen on Trieste saw the arc of shells and ships beginning to burn, the distant escort was about 5,000 yd (2 nmi; 3 mi; 5 km) distant at the end of its zig-zag away from the convoy. As the escort closed on the convoy the British ships moved beyond the glare of the burning ships and became much harder to identify.[20] Trento fired star shells, then both Trieste and Trento opened fire at the British ships at 8,700 yd (4 nmi; 5 mi; 8 km). From 1:10 to 1:25 a.m. the British engaged the Axis merchant ships with shell and torpedo, the ships taking little evasive action. The close escort on the east side of the convoy moved off with Maestrale and Euro to rally and then attacked again, the Italian salvoes having no effect and the ships then being driven off. The distant escort sighted the British again and fired 207 8 in (200 mm) rounds, managing to straddle some of the British ships. The fires and explosions on the merchant ships obscured the British ships and Brivonesi ordered the distant escort to turn north at 24 kn (28 mph; 44 km/h) to intercept them but made no further contact. Some shells had landed close to British ships as they finished off the convoy but caused only splinter damage to Lively's funnel; by 1:40 a.m. firing has ceased.[18]
9 November[]
All of the Axis merchant ships had sunk or were on fire and sinking.[21] At 2:05 a.m. the British headed at high speed towards Malta, ineffectively chased by the covering force, not noticing Italian salvoes at 2:07 a.m. Force K reached harbour at Malta by 1:00 p.m. that afternoon, having sunk about 39,800 long tons (40,439 t) of Axis shipping.[11] The destroyer Libeccio was torpedoed by the submarine HMS Upholder while rescuing some of the 704 survivors of the BETA Convoy. Libeccio was taken in tow by Euro but sank after an internal structural collapse. The Italian cruisers were also looking for survivors and managed to evade torpedoes.[22]
Aftermath[]
Analysis[]
In 1948, Marcantonio Bragadin wrote that the battle was a serious Italian defeat, in which individuals had shown exemplary bravery but the escorts had lacked coordination and made mistakes because of the confusion caused by the surprise and speed of the British attack and through mistaken identity. The Italians had no answer to the superior British night-fighting equipment and tactics which had revolutionised maritime night fighting. Technical obsolescence made an Italian attempt to counter the British at night a useless sacrifice of crews and ships.[23] Writing in 1957, the British official historian of the Royal Navy, Stephen Roskill, wrote that morale in the Regia Marina suffered greatly after such a formidable escort had failed to prevent the disaster. Next day, Rommel signalled to Berlin that convoys to the ASI has been suspended and that of 60,000 troops due in Benghazi, only 8,093 had arrived.[24] In 1960, Ian Playfair, in volume III of "History of the Second World War, The Mediterranean and Middle East, the official British campaign history, wrote that the destruction of the Duisburg (BETA) Convoy was a severe blow to the Axis forces in Cyrenaica. Some supplies arrived in ships sailing alone or in pairs, more journeys were undertaken by submarine and fuel was carried by warships. Fewer convoys with more escorts and air cover were planned and four convoys sailed on 20 November.[25]
In 2002, Jack Greene and Alessandro Massignani wrote that the German naval attaché, Admiral , criticised Italian night fighting training, noting that of his 150 training sessions on the cruiser Leipzig, 130 had been at night. Italian ships had no night fighting equipment like low-light-level rangefinders; torpedo boats (escort destroyers in British parlance) could not engage targets further out than 10,000 yd (6 mi; 9 km). In a report to Berlin, Weichold blamed a lack of training and accused Brivonesi of incompetence. In retrospect the Italians had erred in assuming that a night attack by ships was unlikely; merchant ships should have been instructed to scatter or sail away from an attack. The destroyers on the port side should not have withdrawn but attacked at once without regard for the risk of friendly fire and the distant escort should have estimated the position of Force K instead of heading towards the sighting, attacking the British as they sailed for Malta. Brivonesi was court-martialled and sacked for not attacking (and reinstated on 5 June 1942).[26]
In 2009, Vincent O'Hara wrote that the destruction of the Duisburg (BETA) Convoy was "one of the most brilliant British naval surface victories of the war" in which the British demonstrated better tactical ability, equipment and leadership, combined with luck, surprise and Italian incompetence. The Germans were outraged and wanted to foist German naval officers onto Supermarina and even Italian ships. Grand Admiral Erich Raeder told Hitler that
Today the enemy has complete naval and air supremacy in the area of the German transport routes....[T]he Italians are not able to bring any major improvements in the situation, due to the oil situation and due to their own operational and tactical impotence.
Supermarina tried smaller, dispersed convoys and sailing convoys at the same time to mislead the British but the British code breakers exposed the ruses. When four ships sailed from Naples on 20 November with an escort of heavy and light cruisers, British submarines from Malta torpedoed two cruisers, forcing the convoy to turn back.[27]
Footnotes[]
- ^ Roskill 1957, pp. 293–320.
- ^ Greene & Massignani 2002, pp. 56–114.
- ^ Stegemann 2015, pp. 717–718.
- ^ Cooper 1978, pp. 361–362.
- ^ Stegemann 2015, pp. 654–656.
- ^ Stegemann 2015, pp. 673–684.
- ^ Playfair 2004, pp. 153–159.
- ^ Richards & Saunders 1975, pp. 169–170.
- ^ Playfair 2004, pp. 324–325.
- ^ Jump up to: a b Stegemann 2015, p. 718.
- ^ Jump up to: a b O'Hara 2009, p. 171.
- ^ Jump up to: a b c Greene & Massignani 2002, p. 194.
- ^ Jump up to: a b O'Hara 2009, p. 172.
- ^ Bragadin 1957, p. 133.
- ^ Greene & Massignani 2002, p. 193; Roskill 1957, p. 532.
- ^ Greene & Massignani 2002, p. 193.
- ^ Greene & Massignani 2002, pp. 194–195.
- ^ Jump up to: a b c Greene & Massignani 2002, p. 195.
- ^ Bragadin 1957, pp. 133–134.
- ^ Bragadin 1957, p. 134.
- ^ O'Hara 2009, pp. 148–149.
- ^ Greene & Massignani 2002, p. 195; Bragadin 1957, p. 134.
- ^ Bragadin 1957, pp. 134–135.
- ^ Roskill 1957, pp. 532–533.
- ^ Playfair 2004, p. 105.
- ^ Greene & Massignani 2002, pp. 195–196.
- ^ O'Hara 2009, pp. 175–176.
References[]
- Bragadin, M. (1957) [1948]. Fioravanzo, G. (ed.). The Italian Navy in World War II. Translated by Hoffman, G. (Eng. trans. ed.). Annapolis, Maryland: United States Naval Institute. OCLC 602717421.
- Cooper, Matthew (1978). The German Army 1933–1945: Its Political and Military Failure. Briarcliff Manor, NY: Stein and Day. ISBN 978-0-8128-2468-1.
- Greene, Jack; Massignani, Alessandro (2002) [1998]. The Naval War in the Mediterranean, 1940–1943. Rochester: Chatham. ISBN 978-1-86176-057-9.
- O'Hara, Vincent (2009). Struggle for the Middle Sea: The Great Navies at War in the Mediterranean Theater, 1940–1945. Annapolis, Maryland: Naval Institute Press. ISBN 978-1-61251-408-6.
- Playfair, I. S. O.; et al. (2004) [1st. pub. HMSO:1960]. Butler, Sir James (ed.). The Mediterranean and Middle East: British Fortunes Reach Their Lowest Ebb (September 1941 to September 1942). History of the Second World War, United Kingdom Military Series. III. Uckfield, UK: Naval & Military Press. ISBN 978-1-84574-067-2.
- Richards, D.; Saunders, H. St G. (1975) [1954]. Royal Air Force 1939–45: The Fight Avails. II (repr. ed.). London: HMSO. ISBN 978-0-11-771593-6. Retrieved 19 July 2019.
- Roskill, S. W. (1957) [1954]. Butler, J. R. M. (ed.). The Defensive. History of the Second World War United Kingdom Military Series: The War at Sea 1939–1945. I (4th impr. ed.). London: HMSO. OCLC 881709135. Retrieved 21 December 2015.
- Stegemann, B.; Schreiber, G.; Vogel, D. (2015) [1995]. Falla, P. S. (ed.). The Mediterranean, South-East Europe and North Africa, 1939–1941: From Italy's Declaration of non-Belligerence to the Entry of the United States into the War. Germany and the Second World War. III. Translated by McMurry, D. S.; Osers, E.; Willmot, L. (2nd pbk. trans. Oxford University Press, Oxford ed.). Freiburg im Breisgau: Militärgeschichtliches Forschungsamt. ISBN 978-0-19-873832-9.
- Stegemann, B. "Part V, Chapter 5: The Italo-German Conduct of the War in the Mediterranean and North Africa". In Stegemann, Schreiber & Vogel (2015).
Further reading[]
- Baroni, Piero (2007). La guerra dei radar: il suicidio dell'Italia: 1935/1943 [The Radar War: The Suicide of Italy: 1935/1943] (in Italian). Milano: Greco & Greco. p. 277. ISBN 978-88-7980-431-8.
- Cocchia, A. (1962). La Difesa del Traffico con L'Africa Settentrionale dal 1 ottobre 1941 al 30 settembre 1942 [The Defence of Traffic with North Africa from 1 October 1941 to 30 June 1942]. Marina italiana nella seconda guerra mondiale. VII. Roma: Ufficio storico della Marina militare. OCLC 221140047.
- Shores, C. F.; Cull, B.; Malizia, N. (1987). Malta: The Hurricane Years: 1940–41. London: Grub Street. ISBN 0-948817-06-2.
External links[]
- 1941 in Italy
- Allied naval victories in the battle of the Mediterranean
- Naval battles of World War II involving Italy
- Naval battles of World War II involving the United Kingdom
- November 1941 events