4th Division (Australia)
| 4th Division | |
|---|---|
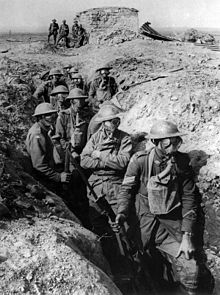
 4th Division troops at Le Verguier, France, September 1918 | |
| Active | 1916–1919 1921–1944 |
| Country | Australia |
| Branch | Australian Army |
| Type | Division |
| Part of | II ANZAC Corps (1916) I ANZAC Corps (1916–1917) Australian Corps (1917–1919) 3rd Military District (Inter-war years) III Corps (World War II) |
| Engagements | World War I
World War II
|
| Commanders | |
| Notable commanders | Herbert Cox William Holmes Ewen Sinclair-Maclagan |
| Insignia | |
| Unit colour patch |  |
The Australian 4th Division was formed in the First World War during the expansion of the Australian Imperial Force (AIF) infantry brigades in February 1916. In addition to the experienced 4th Brigade (previously in the original New Zealand and Australian Division) were added the new 12th and 13th Brigades (spawned from the battalions of the 4th and 3rd Brigades respectively). From Egypt the division was sent to France, where it took part in the fighting on the Western Front during 1916–1918. After the war ended, the AIF was demobilised and the division was dissolved.
In 1921, the 4th Division was reactivated as a Citizen Military Forces (militia/reserve) formation. The division performed home defence duties for most of World War II. The division's composition during World War II changed frequently, as brigades were rotated between different divisions and moved to different locations as the need arose. The division spent the majority of the war in Western Australia, before moving to Queensland prior to its deactivation in late 1944.
World War I[]
Formation in Egypt, 1916[]
In January 1916, in the aftermath of the Gallipoli Campaign, the Australian government decided to expand the Australian Imperial Force, then based in Egypt, prior to the force's deployment to the Western Front. At the time, two divisions already existed in Egypt: the 1st and 2nd. The 3rd Division was also being raised in Australia. The 2nd Division had only been partially raised by the time it was sent to Gallipoli late in the campaign, so it was left to complete its formation, while the 1st Division, and the spare 4th Brigade (which had formed part of the composite New Zealand and Australian Division and had served at Gallipoli) were used to provide an experienced cadre to form the 4th and 5th Divisions. The 4th Division subsequently gained the experienced 4th Brigade, and two newly raised brigades – the 12th and 13th – which were formed from cadres from the 4th and 3rd Brigades respectively.[2][3]

Under the command of Major General Vaughan Cox, a British Indian Army officer,[4] the 4th Division began forming at Tel el Kebir, in Egypt in February 1916. In addition to three infantry brigades, the new division included various support troops, including the 4th Field Company, 4th Field Ambulance and 7th Army Service Corps Company, which had previously served at Gallipoli.[1] Together with the 5th Division, the 4th Division formed II ANZAC Corps under Lieutenant General Alexander Godley.[4]
There were delays in assembling the divisional artillery as I ANZAC Corps, which was to proceed to France first, received priority for personnel and artillery pieces.[5] Consequently, the division could not depart for France before June 1916. In the meantime, the 4th Division undertook defensive duties along the Suez Canal, around Serapeum, to defend against a possible Ottoman attack. As it was necessary for elements of the division to take over as soon as possible, the 16th Battalion was sent ahead by train, while the rest of the division completed the move on foot, marching through the desert from Tel el Kebir to take up their positions, arriving in late March. At Serapeum, the division absorbed a batch of reinforcements that had been left behind by the departed 1st and 2nd Divisions, consisting of men with poor conduct records, who were deemed to need further training prior to employment in combat.[6]
Somme, 1916[]
Personnel deficiencies amongst the division's artillery units were hastily rectified by bolstering numbers from the division's infantry units, as well as light horse reinforcements. Throughout May, these units received rudimentary training and by the end of the month, the 4th Division received its orders to deploy to the Western Front.[7] The following month, the division moved to France, taking over part of the "nursery" sector near Armentières, where they could be introduced to trench warfare in a relatively quite area. The 4th Brigade was first into the line, taking over a sector from the 2nd Division on 15 June.[8]
The division was transferred to I ANZAC Corps around this time, swapping with the New Zealand Division.[9] The division's stay at Armentières was brief and it soon accompanied the 1st and 2nd Divisions to the Somme sector where the British had launched an offensive in July. In August 1916, it relieved the 2nd Division on the Pozières heights,[10] arriving in time to fight off a determined German counterattack.[11] The attack fell largely on a small number of battalions, with the South Australian 48th Battalion losing nearly 600 men killed or wounded; the New South Welshman of the 45th Battalion were called upon to help a neighbouring British unit capture a position dubbed "Munster Alley", during which they lost 345 men. Meanwhile, an attack on the 14th Battalion was repulsed after an individual effort by Lieutenant Albert Jacka, who had previously received the Victoria Cross for actions at Gallipoli.[12]
Following this, the division was brought back up to two thirds strength, and after relieving the 2nd Division, launched an attack to the north of Mouquet Farm. After a rest, the division returned to Mouquet Farm in late August and early September; the division's losses during these two periods amounted to over 7,000 killed or wounded.[13] After a rest around Ypres, the division undertook a third tour of the front at Flers in the final months of 1916.[14] In December 1916, Major General William Holmes assumed command of the division,[1] arriving in January 1917.[15]
Hindenburg Line, 1917[]

The 4th Division remained on the Somme during the winter of 1916–1917, enduring extreme cold and damp conditions.[16] In the early part of 1917, after winter had passed, the division took part in operations on the Ancre,[17] before the Germans sought to reduce the length of their line, withdrawing to prepared positions along the Hindenburg Line. In response, the Allied units began a brief pursuit,[18] the Australian contribution to which involved columns from the 2nd and 5th Divisions being sent forward in pursuit. A period of rapid movement followed until the outposts were reached, and resistance grew. In April, the Fifth Army, to which the 4th Division was assigned, was ordered to attack the Hindenburg Line south of Arras. As part of this, on 11 April, two of the division's brigades – the 4th and 12th – assaulted the new line in the First Battle of Bullecourt, supported by British tanks for the first time. Due to break downs and other mishaps, the tanks were largely ineffective; nevertheless, the initial assault proved successful in capturing the first trench line, and also partially capturing the second. Lacking artillery support, which had been held back due to incorrect reports about the location of Allied troops, and enfiladed from the flanks,[19] the Australians became cut off and came under heavy counter-attack from the 27th Division. Ultimately the battle was a disaster for the 4th Division, with 3,200 casualties, and 1,170 captured.[20][21]
Following the failed attack around Bullecourt, the division was withdrawn from the line for rest and reinforcement.[22] The next major attack it took part in came in June, when it participated in the Battle of Messines, in Flanders, Belgium. Fought as part of efforts to secure the Wytschaete – Messines Ridge, which existed south of a salient in the line around Ypres, providing the Germans with observation of the Allied positions, the battle saw the 4th Division brought in to reinforce the British 25th Division, the Australian 3rd and the New Zealand Division. Although slated to be the corps reserve,[23] during the attack, launched on 7 June, the division was called upon to secure a large gap that developed in the line after the neighbouring British corps was held up.[24] In this effort, the division was tasked with attacking the Oosttaverne Line late in the day. Enduring shelling by their own guns, and coming up against German pillboxes for the first time, the division took heavy casualties, but managed to secure all but a small part of the line where the Australian sector joined the neighbouring British sector.[25]
Following the Battle of Messines, the division remained in the line around the town. On 2 July, the divisional commander, Holmes, was fatally wounded by a stray shell while escorting the New South Wales premier, William Holman, around the battlefield at Messines.[15] Holmes was replaced temporarily by Brigadier General Charles Rosenthal until a new permanent commander could arrive, in the form of Major General Ewen Sinclair-Maclagan, who took over the division on 16 July 1917.[1]
In September, the Australians took part in the Third Battle of Ypres. Within this wider battle, the Australian divisions took part in several subsidiary actions. The 1st and 2nd Divisions undertook the first attack around the Menin Road, which was followed up by the 4th and 5th Divisions around Polygon Wood on 26 September. Attacking in the centre of the Allied line, the two divisions were flanked by the British V Corps to the north, and X Corps to the south. The 4th Division was the more northern of the two Australian divisions for the assault, and tasked with capturing the northern part of Polygon Wood, and the high ground beyond it, and tying-in with the British around the edge of Zonnebeke while the 5th Division captured the remainder of the wood. Supported by a well co-ordinated artillery barrage,[26] which rolled ahead of the assault, and then broke up the subsequent German counter-attack, the attack proved successful, albeit costly.[27] The 4th Division's attack was carried by the 4th and 13th Brigades, with the 12th in reserve, and resulted in 1,700 casualties amongst the division.[28][29]
On 12 October, the 12th Brigade was assigned to protect the 3rd Division's flank during the First Battle of Passchendaele, and took part in an effort to capture the Keiberg ridge. Although, elements of the 3rd were able to enter Passchendaele, and the 12th gained their objective, both groups were eventually forced back. The unsuccessful effort cost the 12th Brigade around 1,000 casualties. The Canadians then took over responsibility for the sector, and were eventually able to secure the village in November, while the Australians were withdrawn to Messines for a rest.[30][31] In the wake of considerable losses, which could not be made up from voluntary recruitment, Australian authorities considered breaking up the 4th Division to provide reinforcements, although this did not eventuate.[32] In November 1917, the division became part of the Australian Corps, initially under Lieutenant General William Birdwood and then later under Lieutenant General John Monash.[33]
German Spring Offensive, 1918[]
Throughout the winter of 1917–1918, the Australians rotated between the front and rest areas around Flanders and northern France, during which time it was largely quiet, apart from occasional shelling and aerial attacks. In early 1917, the Australians moved back to the front around Messines, after a rest in the rear areas.[34] The 4th Division spent a short period in the line around Hollebeke in the northern part of the Australian sector during this time.[35] In late March, the division was rushed to the Somme region to stem the German spring offensive, which had been launched on 21 March and was threatening Amiens. The Australian 3rd and 4th Divisions had been ordered to proceed to Amiens to strengthen the retreating British 5th Army. There it repulsed the advancing Germans in several hard-fought battles at Hebuterne and Dernancourt.[36]

The 4th Brigade was detached from the division during this time, and fought a sharp action alongside the New Zealanders at Hebuterne, holding off several German attacks in late March and early April.[37] Meanwhile, the 12th and 13th Brigades established themselves south of Albert, around the railway embankment and cuttings of the Albert–Amiens railway at Dernancourt, where they joined troops of the British VII Corps.[38] The 12th Brigade was positioned forward, taking over from the British 9th (Scottish) Division, while the 13th held a support position around Bresle and Ribemont-sur-Ancre.[39] On 28 March, during the First Battle of Dernancourt, the 12th brigade helped fight off an attack by the 50th Reserve Division, with 137 Australian casualties.[37] A week later, on 5 April, the Second Battle of Dernancourt was fought. In the lead up, the 13th Brigade moved forward beside the 12th, taking over from the 35th Division. Together, the two brigades faced an attack by two and a half German divisions in what was described by historian Chris Coulthard-Clark as "the strongest attack mounted against the Australians in the war".[40] The Australian 48th Battalion soon found itself outflanked by Germans to its rear. The 48th was ordered to hold at all costs but by midday was facing annihilation and the senior officer ordered a withdrawal, which was completed in good order. The two brigades then committed their reserves, which restored the situation for the Allies. In the action, the division lost 1,230 casualties, and afterwards it was relieved by the 2nd Division.[40]
In April, the 13th Brigade was involved in the counterattack at Villers-Bretonneux. On 21 April, in the lead up to the battle, the German fighter pilot, Manfred von Richthofen (the "Red Baron") was shot down over Australian lines, north of Villers-Bretonneux at Corbie. There are many theories as to who shot him down, one of which is that an Australian Vickers machine gunner, Sergeant Cedric Popkin of the 24th Machine-Gun Company, 4th Division, fired the actual bullet that killed von Richthofen.[41][42] At dawn on 24 April, the Germans launched their attack, supported by armoured vehicles and a heavy artillery bombardment, that included mustard gas. With the situation urgent, the British III Corps ordered a counter-attack from the Australian 13th and 15th Brigades to retake the town. The attack was launched around 10 pm that night, with the two brigades isolated the town, enveloping it from the north and south, before entering it on Anzac Day to begin mopping up operations, with the Australians penetrating from the east, while British troops came from the opposite direction. The 14th Brigade, from the 5th Division, also filled a supporting role,[43] securing flanking positions to the north of the town.[44] In early May, the 12th Brigade carried out a follow up attack around Monument Wood, to the east of Villers-Bretonneux, which made little headway against the defending Jager troops; nevertheless, the recapture of Villers-Bretonneux had restored the Allied line in the sector.[43]
Hundred Days offensive, 1918[]

Following the defeat of the German Spring Offensive, a brief lull followed while the Allies prepared to launch their own offensive, which ultimately would bring an end to the war. During this time, the division went on to fight in the Battle of Hamel in July. The 4th Division was responsible for planning and commanding the attack, but the decision was made the only one of its brigades would take part with the 4th Brigade being reinforced by brigades from both the 3rd and 5th Divisions, as well as four companies from the US 33rd Infantry Division for the attack. A combined arms assault, including armour and air support, the attack proved successful in capturing the town, in just over 90 minutes, for around 1,400 casualties.[45]
After the Allies launched their Hundred Days Offensive in August 1918, the division took part in the Battle of Amiens, the Battle of Albert,[17] the Battle of Épehy and the battles against the Hindenburg Line outposts, finally reaching the town of Bellenglise.[1] Withdrawn in late September, the division was replaced by the 3rd and 5th Divisions for the Battle of St Quentin Canal, and then the 2nd Division for the assault on the Beaureviour Line.[46] For these final battles, the 4th Division provided 200 advisers to assist the inexperienced US troops that were assigned to Monash's corps.[47] In early October, the remainder of the Australian Corps was withdrawn from the line for rest at the insistence of Prime Minister Billy Hughes.[48]
After the armistice in November 1918, the division was not selected to advance into Germany. Demobilisation commenced in late 1918,[17] and in March 1919 the division merged with 1st Australian Division, under the designation A Divisional Group, as personnel were repatriated back to Australia and individual units were demobilised.[49] During the war, the division suffered 41,048 casualties, including 8,360 killed in action. Another 2,613 men died of wounds, and 872 died from other causes. A total of 2,076 men were captured, and 27,127 were wounded.[1]
Inter-war years and World War II[]
In 1921, following the demobilisation of the AIF, Australia's part-time military forces were reorganised to replicate the numerical designations of the AIF.[51] At this time, the 4th Division name was revived and was assigned to a Citizen Military Forces (reserve) formation headquartered in Melbourne, and assigned to the 3rd Military District. This formation consisted of three brigades spread across two states: the 2nd and 6th were based in Victoria, while the 3rd was based in South Australia.[52] The division's commander upon re-establishment was Major General William Glasgow.[53]

After the outbreak of war with Japan, the division was mobilised for war service and undertook defensive duties in southern Victoria, as part of Southern Command. In April 1942, the division became part of III Corps, which was responsible for the defence of Western Australia. The division occupied positions around Guildford, Geraldton, Moora and Perth. Following the arrival of the 2nd Division in July 1942, the division handed over the Perth region to them, although several rotations occurred over the next six months.[54] In October 1942, the division took part in a large-scale anti-invasion exercise around Geraldton, which involved over 20,000 troops. Headquartered around Moora, the 2nd Brigade was positioned outside Geraldton, while the 6th held Irwin and Mingenew, and the 13th Brigade was around Dandaragan and Jurien Bay. Responding to a landing at Dongara, by a simulated Japanese division (played by the 8th Brigade) the exercise lasted four days and was the largest anti-invasion exercise undertaken by the Australian Army during the war.[55]
In January 1943, the division was slowly broken up with the 6th Brigade being sent to Queensland and the 13th deploying to the Northern Territory. In April and May 1943, the division's headquarters was transferred to north Queensland, establishing itself around Townsville, absorbing personnel from the disbanded Yorkforce headquarters. At this time, the division assumed control of a broad area, with many dispersed brigades: the 6th at Kuranda, the 11th at Cairns, the 12th at Smyth's Siding, and the 14th at Cluden.[54]
Over time all of these brigades were transferred elsewhere (Milne Bay, Darwin, and Merauke), meanwhile the division gained the 3rd Brigade. As the war advanced north, the need for strong garrison forces on the mainland of Australia diminished. As more garrison troops were moved to the Torres Strait, the 4th Division's headquarters was moved to Thursday Island in October 1943, and then to Cape York. At this time, the division assumed control of Torres Strait Force and Merauke Force, although both forces were reduced or redesignated shortly after, with Merauke Force being redesignated as the 11th Brigade and later being withdrawn back to Brisbane, and Torres Strait Force being reduced to an area command.[56] By February 1944, the division reported directly to the First Army.[57] As further Allied advances in New Guinea reduced the threat posed to the area the 4th Division became redundant and its headquarters elements were withdrawn to Atherton and disbanded in October 1944.[56]
Commanders[]
The following officers commanded the division during World War I:[1]
- Major General Herbert Cox (1916)
- Major General William Holmes (1916–1917)
- Major General Ewen Sinclair-Maclagan (1917–1919)
The following officers commanded the division during World War II:[58]
- Major General Francis Derham (1940–1942)
- Major General Jack Stevens (1942)
- Major General John Murray (1942–1944)
See also[]
References[]
Citations[]
- ^ a b c d e f g Mallett, Ross. "First AIF Order of Battle 1914–1918: Fourth Division". University of New South Wales (Australian Defence Force Academy). Archived from the original on 28 February 2015. Retrieved 1 October 2018.
- ^ Grey 2008, pp. 99–100.
- ^ Bean 1941a, pp. 36–42.
- ^ a b Grey 2008, p. 100.
- ^ Bean 1941a, pp. 63–64.
- ^ Bean 1941a, pp. 288–292.
- ^ Bean 1941a, p. 297.
- ^ Bean 1941a, p. 299.
- ^ Carlyon 2006, p. 52.
- ^ Coulthard-Clark 1998, p. 118.
- ^ Carlyon 2006, pp. 201–206.
- ^ Carlyon 2006, p. 206.
- ^ Coulthard-Clark 1998, pp. 117–120.
- ^ Bean 1941a, p. 940.
- ^ a b Travers 1983.
- ^ Carlyon 2006, p. 284.
- ^ a b c Baker, Chris. "4th Australian Division". The Long, Long Trail: The British Army in the Great War of 1914–1918. Retrieved 15 October 2018.
- ^ Carlyon 2006, pp. 307–310.
- ^ Grey 2008, p. 104.
- ^ Coulthard-Clark 1998, pp. 125–126.
- ^ Carlyon 2006, p. 349.
- ^ Carlyon 2006, pp. 349 & 407.
- ^ Carlyon 2006, p. 407.
- ^ Coulthard-Clark 1998, pp. 129–130.
- ^ Carlyon 2006, pp. 412–413.
- ^ Carlyon 2006, pp. 466–467.
- ^ Coulthard-Clark 1998, pp. 130–131.
- ^ Carlyon 2006, p. 474.
- ^ Bean 1941b, pp. 828–831.
- ^ Coulthard-Clark 1998, p. 134.
- ^ Bean 1941b, pp. 909 & 928.
- ^ Carlyon 2006, p. 531.
- ^ Grey 2008, p. 107.
- ^ Carlyon 2006, pp. 540 & 548.
- ^ Bean 1941c, p. 34.
- ^ Coulthard-Clark 1998, pp. 137–138.
- ^ a b Coulthard-Clark 1998, p. 138.
- ^ Bean 1941c, p. 153.
- ^ Bean 1941c, pp. 158–169.
- ^ a b Coulthard-Clark 1998, p. 141.
- ^ Carlyon 2006, pp. 605–606.
- ^ Australian Associated Press staff (20 April 2018). "Who shot down the notorious Red Baron?". Murray Valley Standard. Retrieved 30 September 2018.
- ^ a b Coulthard-Clark 1998, p. 145.
- ^ Bean 1941c, p. 578.
- ^ Coulthard-Clark 1998, pp. 148–149.
- ^ Carlyon 2006, pp. 696–698, 708 & 719.
- ^ Coulthard-Clark 1998, p. 163.
- ^ Grey 2008, p. 109.
- ^ Ellis 1920, p. 399.
- ^ "4th Division: Subordinates". Orders of Battle. Retrieved 27 October 2018.
- ^ Grey 2008, p. 125.
- ^ Palazzo 2001, p. 91.
- ^ Harry, Ralph (1983). "Glasgow, Sir Thomas William (1876–1955)". Australian Dictionary of Biography. Melbourne University Press. ISSN 1833-7538. Retrieved 9 December 2007 – via National Centre of Biography, Australian National University.
- ^ a b McKenzie-Smith 2018a, pp. 2034–2035.
- ^ McKenzie-Smith 2018b, pp. 61–63.
- ^ a b McKenzie-Smith 2018a, p. 2035.
- ^ Palazzo 2001, p. 180.
- ^ "4th Division: Appointments". Orders of Battle. Retrieved 10 October 2018.
Bibliography[]
- Bean, Charles (1941a). The Australian Imperial Force in France, 1916. Official History of Australia in the War of 1914–1918, Volume III (12th ed.). Sydney, New South Wales: Angus and Robertson. OCLC 220623454.
- Bean, Charles (1941b). The Australian Imperial Force in France, 1917. Official History of Australia in the War of 1914–1918, Volume III (11th ed.). Sydney, New South Wales: Angus and Robertson. OCLC 271462395.
- Bean, Charles (1941c). The Australian Imperial Force in France during the Main German Offensive, 1918. Official History of Australia in the War of 1914–1918, Volume V (8th ed.). Sydney, New South Wales: Angus and Robertson. OCLC 271462406.
- Carlyon, Les (2006). The Great War. Sydney, New South Wales: Picador. ISBN 978-1-4050-3799-0.
- Coulthard-Clark, Chris (1998). The Encyclopaedia of Australia's Battles (1st ed.). Sydney, New South Wales: Allen & Unwin. ISBN 1-86448-611-2.
- Ellis, A. D. (1920). The Story of the Fifth Australian Division, Being an Authoritative Account of the Division's Doings in Egypt, France and Belgium. London: Hodder and Stoughton. OCLC 464115474.
- Grey, Jeffrey (2008). A Military History of Australia (3rd ed.). Melbourne, Victoria: Cambridge University Press. ISBN 978-0-521-69791-0.
- McKenzie-Smith, Graham (2018a). The Unit Guide: The Australian Army 1939–1945, Volume 2. Warriewood, New South Wales: Big Sky Publishing. ISBN 978-1-925675-146.
- McKenzie-Smith, Graham (2018b). "The Japanese Landing at Dongara – 24–28 October 1942". Sabretache. LIX (3 (September)): 61–63. ISSN 0048-8933.
- Palazzo, Albert (2001). The Australian Army: A History of its Organisation 1901–2001. Melbourne, Victoria: Oxford University Press. ISBN 0195515072.
- Travers, B.H. (1983). "Holmes, William (1862–1917)". Australian Dictionary of Biography. Melbourne University Press. Retrieved 29 September 2018.
Further reading[]
- Franki, George; Slayter, Clyde (2003). Mad Harry, Australia's Most Decorated Soldier. East Roseville, New South Wales: Kangaroo Press. ISBN 978-0-73181-188-5.
- Hatwell, Jeff (2021) Brave Days: The Fourth Australian Division in the Great War. Melbourne, Victoria: Echo Books. ISBN 978-0-6485540-8-0.
- Hatwell, Jeff (2005). No Ordinary Determination: Percy Black and Harry Murray of the First AIF. Fremantle, Western Australia: Fremantle Arts Centre Press. ISBN 978-1-92073-141-0.
- Lynch, Edward (2006). Davies, Will (ed.). Somme Mud: The War Experiences of an Australian Infantryman in France 1916–1919. Milsons Point, New South Wales: Random House. ISBN 1-74166-547-7.
- Walker, Jonathan (2000). The Blood Tub: General Gough and the Battle of Bullecourt 1917. Staplehurst, United Kingdom: Spellmount. ISBN 978-1-86227-022-0.
External links[]
- Battles involving the 4th Division, Digger History
- 4th Division Memorial, Department of Veterans Affairs
- Australian 4th Division Vehicle Marking
| Expeditionary Forces |
| ||||
|---|---|---|---|---|---|
| Corps | |||||
| Divisions |
| ||||
| Brigades |
| ||||
| |||||
- Divisions of Australia in World War I
- Australian World War II divisions
- Infantry divisions of Australia
- Military units and formations established in 1916
- Military units and formations disestablished in 1919
- 1916 establishments in Australia
- Military units and formations of the British Empire in World War II
- Military units and formations established in 1921
- Military units and formations disestablished in 1944